Python爬虫入门到入职05:抓包与请求分析

大型项目中需要面对各式复杂的网络请求,所以抓包与请求分析是爬虫工程师的必备技能,需要熟练掌握。
本章知识点:
- 认识反爬虫
- 使用chrome开发者工具抓包
- 请求分析
- 正则表达式
认识反爬虫
本章以 虎嗅网作为项目,根据之前的学习写出首页抓取代码:
import requests
from pymongo import MongoClient


class HuXiuSpider:
    def __init__(self):
        client = MongoClient(host='127.0.0.1', port=27017)
        self.coll = client.get_database('spider').get_collection('huxiu')

    def start(self):
        self.crawl_index(1)

    def crawl_index(self, page):
        url = 'https://www.huxiu.com/'
        rsp = requests.get(url)
        print(rsp.text)

    def crawl_detail(self, url):
        pass


if __name__ == '__main__':
    HuXiuSpider().start()
运行爬虫,获得html源码:
<html>
<head><title>500 Internal Server Error</title></head>
<body bgcolor="white">
<center><h1>500 Internal Server Error</h1></center>
<hr><center>nginx/1.12.2</center>
</body>
</html>
很明显这个源码有问题,在chrome上按Ctrl+u,真正的源码长这样:


仔细查看错误源码,发现500 Internal Server Error字样。
查询 百度百科-HTTP状态码,500状态码表示:服务器遇到了一个未曾预料的状况,导致了它无法完成对请求的处理。
但是在chrome上刷新网页又能正常访问,那只能是程序发出的请求有问题,我们来做个验证:
- 在chrome上访问 httpbin 测试请求信息:
{
  "args": {},
  "headers": {
    "Accept": "text/html,application/xhtml+xml,application/xml;q=0.9,image/webp,image/apng,*/*;q=0.8",
    "Accept-Encoding": "gzip, deflate, br",
    "Accept-Language": "zh-CN,zh;q=0.9,en;q=0.8",
    "Host": "httpbin.org",
    "Referer": "https://www.jianshu.com/writer",
    "Upgrade-Insecure-Requests": "1",
    "User-Agent": "Mozilla/5.0 (Windows NT 10.0; Win64; x64) AppleWebKit/537.36 (KHTML, like Gecko) Chrome/72.0.3626.119 Safari/537.36"
  },
  "origin": "125.70.79.155, 125.70.79.155",
  "url": "https://httpbin.org/get"
}- 使用requests发送请求:
{
  "args": {},
  "headers": {
    "Accept": "*/*",
    "Accept-Encoding": "gzip, deflate",
    "Host": "httpbin.org",
    "User-Agent": "python-requests/2.21.0"
  },
  "origin": "125.70.79.155, 125.70.79.155",
  "url": "https://httpbin.org/get"
}
对比结果,发现少了很多参数,而且“User-Agent”参数标识出我们是用python的requests库发送请求。
虎嗅网接收到请求,发现这人不是通过正常的浏览器进行访问,心想:他肯定是个爬虫,又来抓取我们网站的数据,返回一个错误页面给他得了。
这种通过请求头信息(如:headers中的User-Agent参数)屏蔽爬虫请求的方法,是网站最常用、最基础的反爬虫策略。
应对这种情况需要伪造请求,把所有参数设置得跟浏览器一样,我们来抓包查看chrome中的请求参数:
使用chrome开发者工具抓包
按下F12进入开发者工具页面,点击Network标签,刷新页面获得请求,如图:


点击首页链接对应的请求,显示出该请求的详细参数:
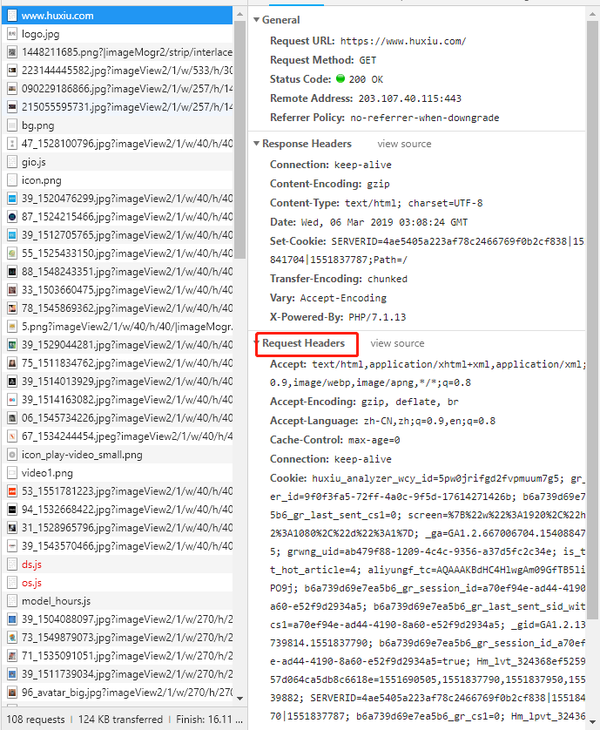
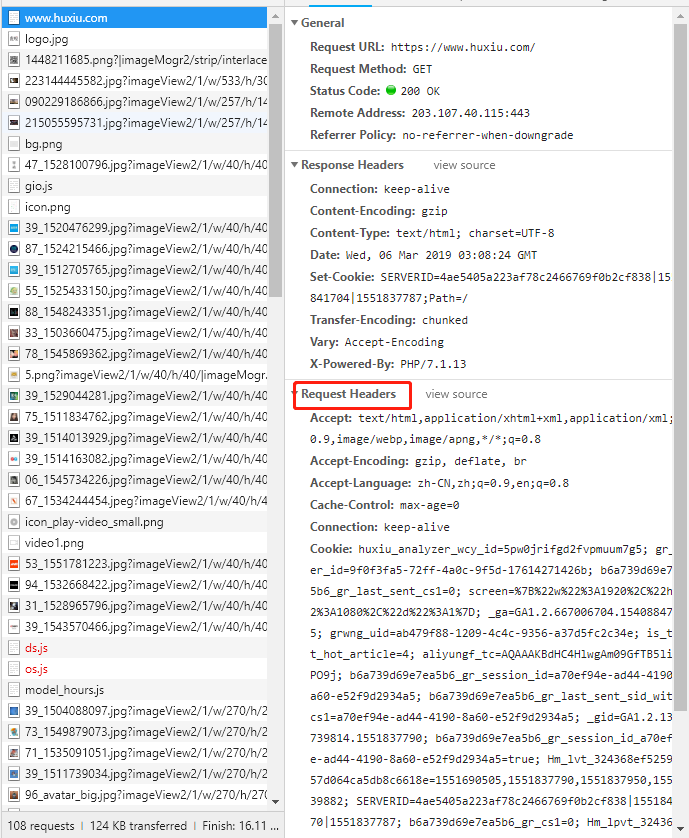
Request Headers部分就是请求头信息,按照chrome的抓包结果来伪造我们自己的请求:
def crawl_index(self, page):
    url = 'https://www.huxiu.com/'
    headers = {
        'Accept': 'text/html,application/xhtml+xml,application/xml;q=0.9,image/webp,image/apng,*/*;q=0.8',
        'Accept-Encoding': 'gzip, deflate',
        'Accept-Language': 'zh-CN,zh;q=0.9,en;q=0.8',
        'Cache-Control': 'max-age=0',
        'Connection': 'keep-alive',
        'Cookie': 'huxiu_analyzer_wcy_id=5pw0jrifgd2fvpmuum7g5; gr_user_id=9f0f3fa5-72ff-4a0c-9f5d-17614271426b; b6a739d69e7ea5b6_gr_last_sent_cs1=0; screen=%7B%22w%22%3A1920%2C%22h%22%3A1080%2C%22d%22%3A1%7D; _ga=GA1.2.667006704.1540884785; grwng_uid=ab479f88-1209-4c4c-9356-a37d5fc2c34e; is_test_hot_article=4; aliyungf_tc=AQAAAKBdHC4HlwgAm09GfTB5li6QPO9j; b6a739d69e7ea5b6_gr_session_id=a70ef94e-ad44-4190-8a60-e52f9d2934a5; b6a739d69e7ea5b6_gr_last_sent_sid_with_cs1=a70ef94e-ad44-4190-8a60-e52f9d2934a5; _gid=GA1.2.1388739814.1551837790; b6a739d69e7ea5b6_gr_session_id_a70ef94e-ad44-4190-8a60-e52f9d2934a5=true; Hm_lvt_324368ef52596457d064ca5db8c6618e=1551690505,1551837790,1551837950,1551839882; SERVERID=4ae5405a223af78c2466769f0b2cf838|1551841570|1551837787; b6a739d69e7ea5b6_gr_cs1=0; Hm_lpvt_324368ef52596457d064ca5db8c6618e=1551841573',
        'Host': 'www.huxiu.com',
        'Upgrade-Insecure-Requests': '1',
        'User-Agent': 'Mozilla/5.0 (Windows NT 10.0; Win64; x64) AppleWebKit/537.36 (KHTML, like Gecko) Chrome/72.0.3626.119 Safari/537.36',
    }
    rsp = requests.get(url, headers=headers)
    print(rsp.text)
成功获得正确的html源码,这里有两点需要注意:
- requests库不支持br格式数据解码,在Accept-Encoding参数需要去除。
- 许多网站只判断User-Agent字段,编写代码时可以先尝试设置User-Agent,失败后再添加其他字段。
继续修改代码,抓取第一页新闻:
class HuXiuSpider:
    def __init__(self):
        client = MongoClient(host='127.0.0.1', port=27017)
        self.coll = client.get_database('spider').get_collection('huxiu')

        self.headers = {
            'User-Agent': 'Mozilla/5.0 (Windows NT 10.0; Win64; x64) AppleWebKit/537.36 (KHTML, like Gecko) Chrome/72.0.3626.119 Safari/537.36'}

    def start(self):
        self.crawl_index(1)

    def crawl_index(self, page):
        url = 'https://www.huxiu.com/'
        rsp = requests.get(url, headers=self.headers)
        soup = BeautifulSoup(rsp.text, 'lxml')
        for h2_node in soup.find('div', class_='mod-info-flow').find_all('h2'):
            href = h2_node.find('a')['href']
            url_news = urljoin(rsp.url, href)
            self.crawl_detail(url_news)

    def crawl_detail(self, url):
        rsp = requests.get(url, headers=self.headers)
        soup = BeautifulSoup(rsp.text, 'lxml')
        title = soup.find('div', class_='article-wrap').find('h1', class_='t-h1').text.strip()
        author = soup.find('span', class_='author-name').text.strip()
        try:
            publish_time = soup.find('span', class_='article-time pull-left').text.strip()
            collect = soup.find('span', class_='article-share pull-left').text.strip()
            comment = soup.find('span', class_='article-pl pull-left').text.strip()
            category = soup.find('a', class_='column-link').text.strip()
        except AttributeError:
            # 解析不同页面结构
            publish_time = soup.find('span', class_='article-time').text.strip()
            collect = soup.find('span', class_='article-share').text.strip()
            comment = soup.find('span', class_='article-pl').text.strip()
            category = ''
        article = soup.find('div', class_='article-content-wrap').text.strip()
        images = []
        images.append(soup.find('div', class_='article-img-box').find('img')['src'])  # 文章头图
        for img_node in soup.find('div', class_='article-content-wrap').find_all('img'):
            images.append(img_node['src'])

        data = {
            'title': title,
            'author': author,
            'publish_time': publish_time,
            'collect': collect,
            'comment': comment,
            'category': category,
            'article': article,
            'images': images,
            'url': url
        }
        print(data)
成功抓取网页源码。
请求分析
我们来进行翻页操作,虎嗅网的翻页有点另类:

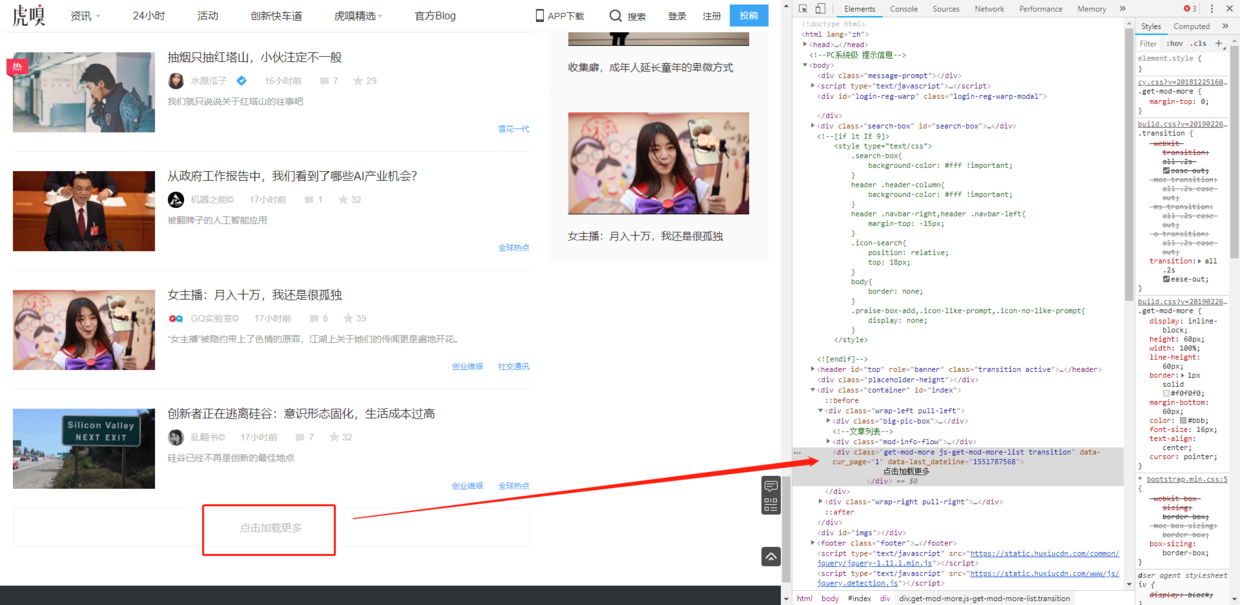
网站使用ajax异步加载下一页数据,需要抓包获取请求详情:进入Network标签,清空之前的请求,点击“加载更多”按钮,查看请求参数:
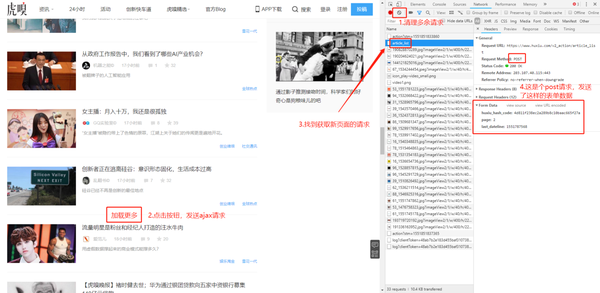
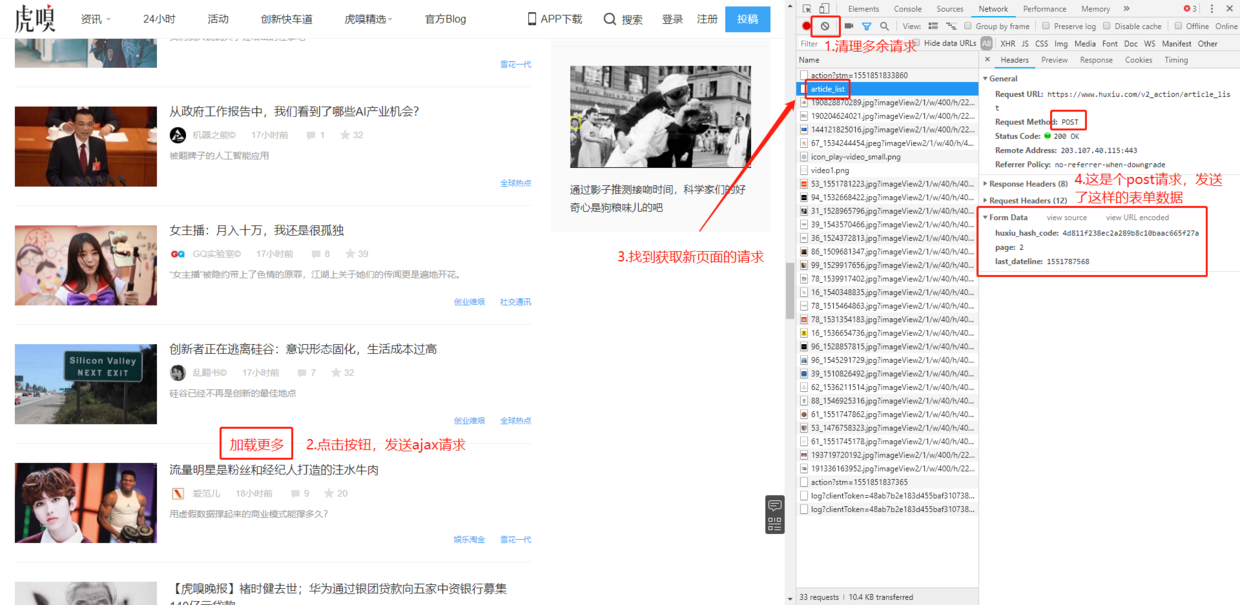
分析请求:
- ajax请求是POST类型,不熟悉的读者可以查看: HTTP协议的8种请求类型介绍
- 发送请求时需要带上form data表单数据,其中包含了页码信息
- 在html源码中搜索huxiu_hash_code,发现包含在js标签中,需要用正则表达式提取
- 发送回来的是json格式的数据,需要转成字典后再把html源码提取出来进行解析
根据抓包分析的结果改写代码:
import requests
from pymongo import MongoClient
from bs4 import BeautifulSoup
from urllib.parse import urljoin
import re
import time


class HuXiuSpider:
    def __init__(self):
        client = MongoClient(host='127.0.0.1', port=27017)
        self.coll = client.get_database('spider').get_collection('huxiu')
        self.headers = {
            'User-Agent': 'Mozilla/5.0 (Windows NT 10.0; Win64; x64) AppleWebKit/537.36 (KHTML, like Gecko) Chrome/72.0.3626.119 Safari/537.36'}

    def start(self):
        try:
            url = 'https://www.huxiu.com/'
            rsp = requests.get(url, headers=self.headers)
            soup = BeautifulSoup(rsp.text, 'lxml')
            for h2_node in soup.find('div', class_='mod-info-flow').find_all('h2'):
                href = h2_node.find('a')['href']
                url_news = urljoin(rsp.url, href)
                self.crawl_detail(url_news)

            # 使用正则表达式匹配字符串,(.*?)就是想要匹配的部分,带上问号表示只匹配一次
            regex_res = re.findall(r'huxiu_hash_code=\'(.*?)\'', rsp.text)
            if regex_res is not None:
                self.hash_code = regex_res[0]
                self.crawl_index_ajax(2)
        except:
            pass

    def crawl_index_ajax(self, page):
        try:
            req_data = {
                'huxiu_hash_code': self.hash_code,
                'page': page,
                'last_dateline': int(time.time()),  # 10位时间戳。以后看到15开头、10位或13位整数,就要注意这是不是时间戳
            }
            url = 'https://www.huxiu.com/v2_action/article_list'
            rsp = requests.post(url=url, data=req_data, headers=self.headers)  # 发送post请求,带上表单数据
            html = rsp.json()['data']  # requsts返回的对象内置了json()函数,可以方便的转成字典
            soup = BeautifulSoup(html, 'lxml')
            for h2_node in soup.find_all('h2'):
                href = h2_node.find('a')['href']
                url_news = urljoin(rsp.url, href)
                self.crawl_detail(url_news)

            if page == 2:
                # 这里可以拿到total_page进行分页
                max_page = int(rsp.json()['total_page'])
                for new_page in range(3, max_page + 1):
                    self.crawl_index_ajax(new_page)
        except:
            pass

    def crawl_detail(self, url):
        try:
            rsp = requests.get(url, headers=self.headers)
            soup = BeautifulSoup(rsp.text, 'lxml')
            title = soup.find('div', class_='article-wrap').find('h1', class_='t-h1').text.strip()
            author = soup.find('span', class_='author-name').text.strip()
            try:
                publish_time = soup.find('span', class_='article-time pull-left').text.strip()
                collect = soup.find('span', class_='article-share pull-left').text.strip()
                comment = soup.find('span', class_='article-pl pull-left').text.strip()
                category = soup.find('a', class_='column-link').text.strip()
            except AttributeError:
                # 解析不同页面结构
                publish_time = soup.find('span', class_='article-time').text.strip()
                collect = soup.find('span', class_='article-share').text.strip()
                comment = soup.find('span', class_='article-pl').text.strip()
                category = ''
            article = soup.find('div', class_='article-content-wrap').text.strip()
            images = []
            images.append(soup.find('div', class_='article-img-box').find('img')['src'])  # 文章头图
            for img_node in soup.find('div', class_='article-content-wrap').find_all('img'):
                images.append(img_node['src'])

            data = {
                'title': title,
                'author': author,
                'publish_time': publish_time,
                'collect': collect,
                'comment': comment,
                'category': category,
                'article': article,
                'images': images,
                'url': url
            }

            self.coll.insert_one(data)
            print(data)
        except:
            pass


if __name__ == '__main__':
    HuXiuSpider().start()
正则表达式
正则表达式是用于处理字符串的强大工具,本教程不单独讲解。
推荐教程: Python正则表达式指南
语法不用死记硬背,写写demo做到基本了解,遇到相关问题再来查询即可。
课外练习:
- 小饭桌:全量采集,写入mongodb
练习答案:
Github地址
下一章 >> Python爬虫入门到入职06:爬虫快跑!(努力写作中。。。)
文章被以下专栏收录