Java架构之路-纯手写spring boot框架
文章内容输出来源:拉勾教育Java高薪训练
前言
没有什么天赋异禀,背后都是不断刻意练习。
框架源码-设计模式专栏:
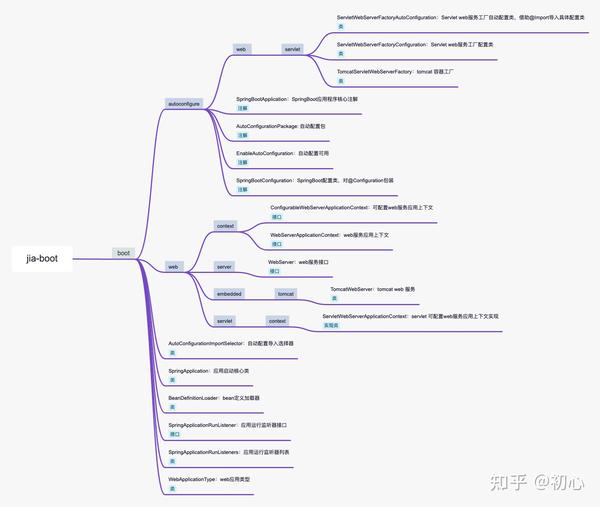
纯手写SpringBoot框架-自定义jia-boot框架
1、SpringBoot主要特性
- SpringBoot Starter:他将常用的依赖分组进行了整合,将其合并到一个依赖中,这样就可以一次性添加到项目的Maven或Gradle构建中;
- 使编码变得简单,SpringBoot采用 JavaConfig的方式对Spring进行配置,并且提供了大量的注解,极大的提高了工作效率;
- 自动配置:SpringBoot的自动配置特性利用了Spring对条件化配置的支持,合理地推测应用所需的bean并自动化配置他们;
- 使部署变得简单,SpringBoot内置了三种Servlet容器,Tomcat,Jetty,undertow.我们只需要一个Java的运行环境就可以跑SpringBoot的项目了,SpringBoot的项目可以打成一个jar包。
2、梳理springboot两大核心原理:
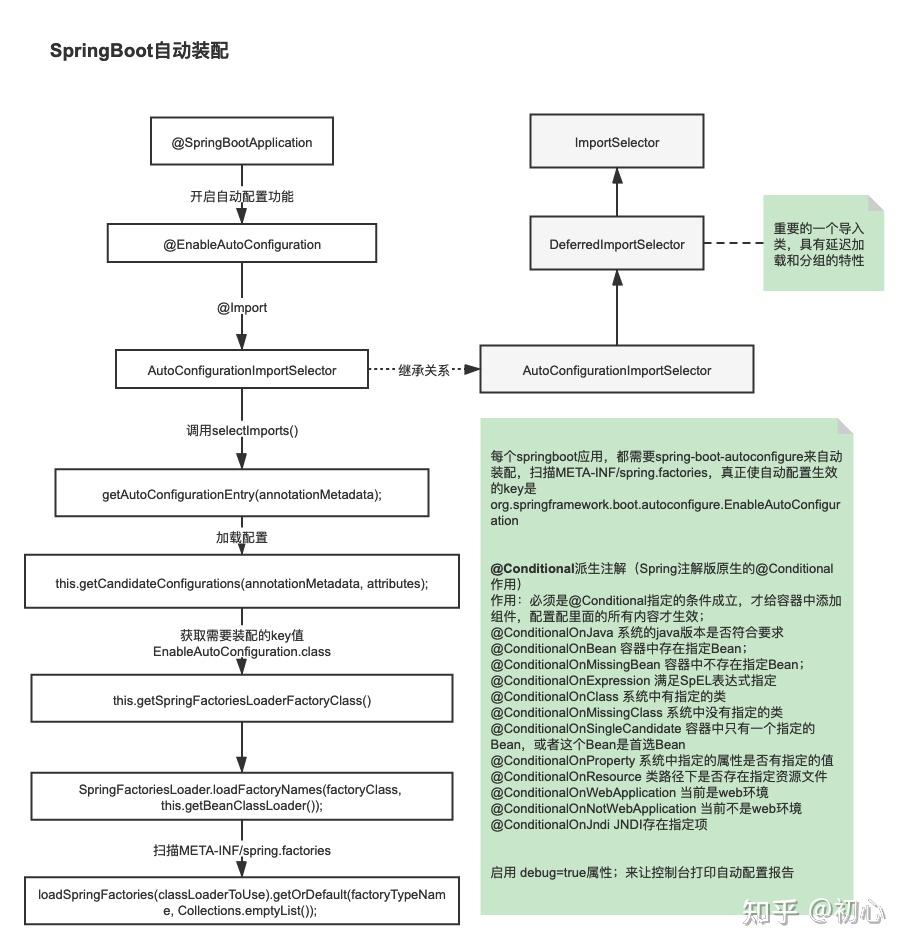
SpringBoot-自动装配原理:

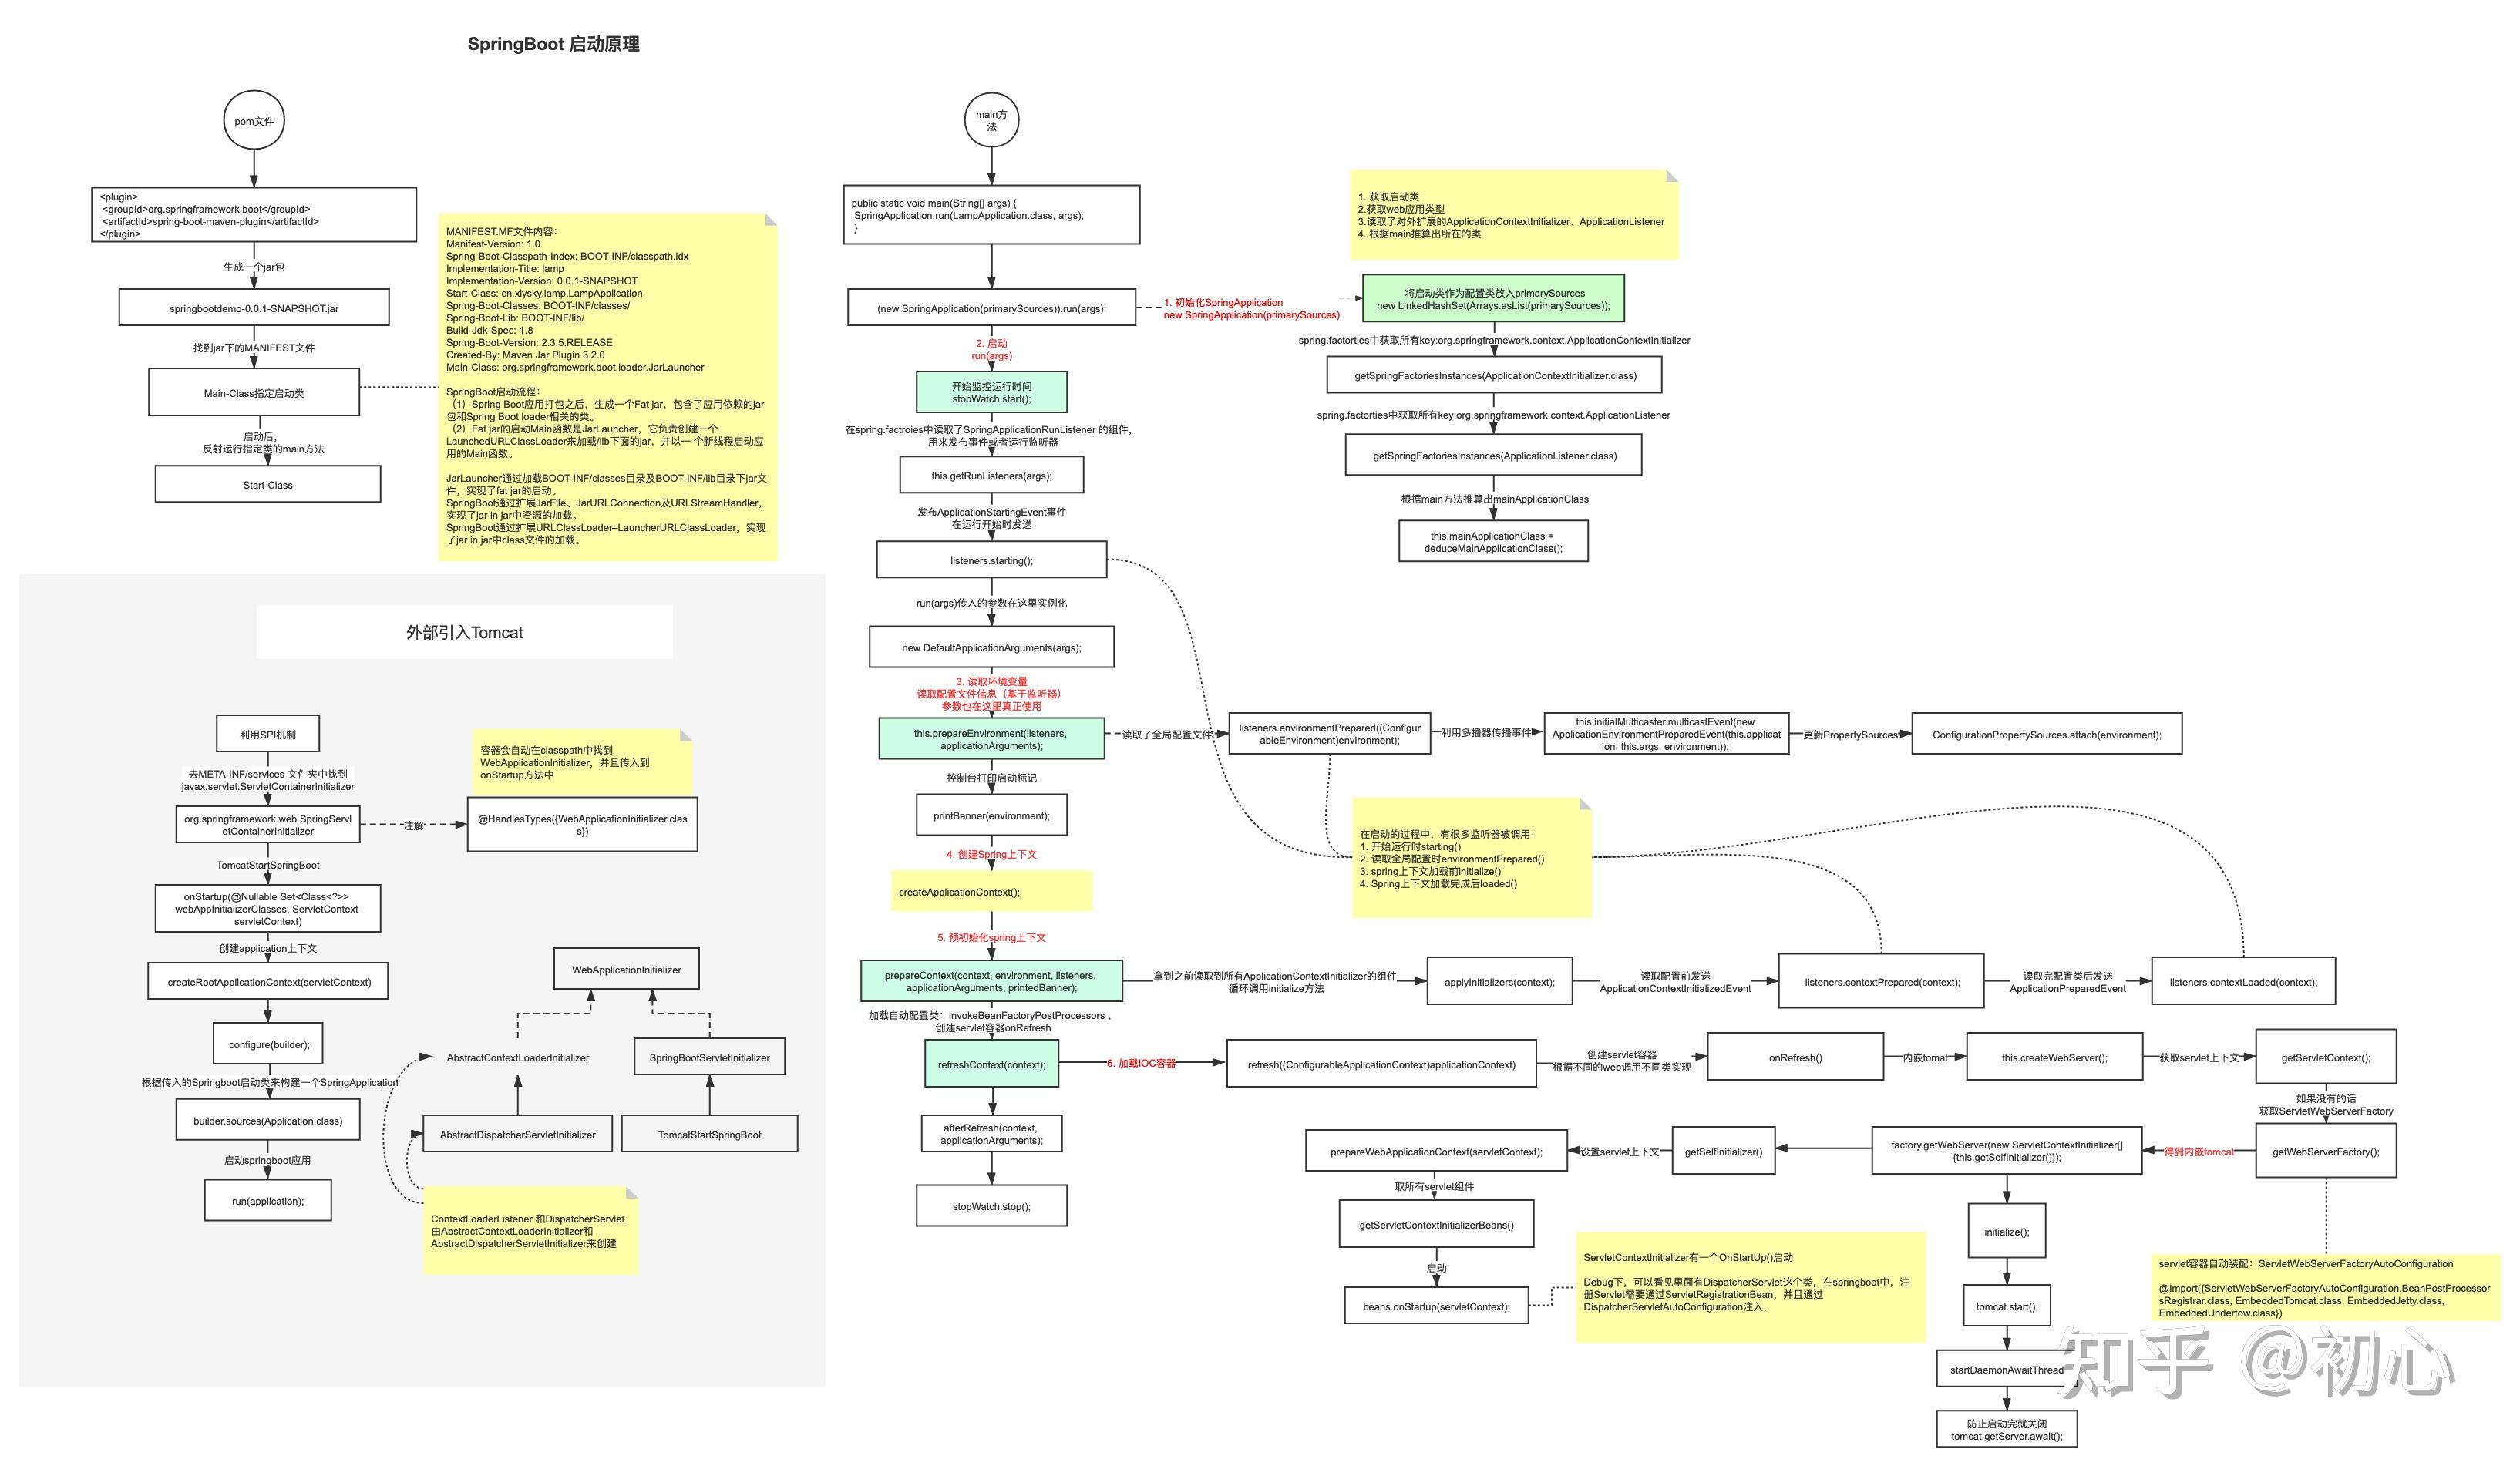
SpringBoot-启动原理:

3、自定义JIA-MVC框架功能设计
实现SpringBoot MVC及内嵌Tomcat启动、DispatcherServlet注册和组件扫描功能。
- 支持自动配置类、初始化器、监听器等扫描加载;
- 程序通过main方法启动,可以自动启动tomcat服务器;
- 可以自动创建和加载DispatcherServlet组件到ServletContext中。
详细设计如下:

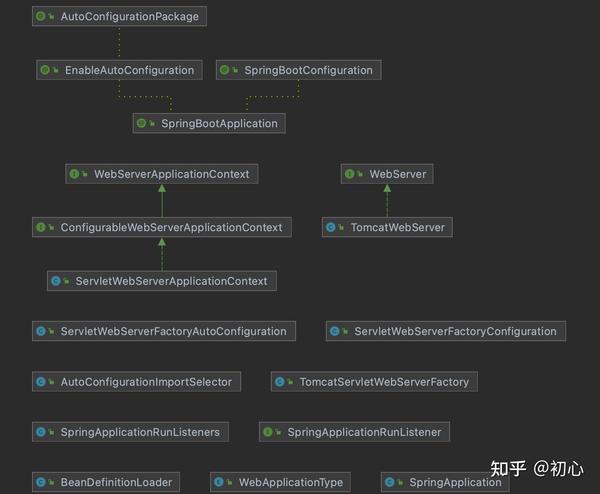
实现类图:

4、实现jia-boot框架
码云仓库地址:
核心实现代码分析:
引入依赖包:
<?xml version="1.0" encoding="UTF-8"?>
<project xmlns="http://maven.apache.org/POM/4.0.0"
         xmlns:xsi="http://www.w3.org/2001/XMLSchema-instance"
         xsi:schemaLocation="http://maven.apache.org/POM/4.0.0 http://maven.apache.org/xsd/maven-4.0.0.xsd">
    <modelVersion>4.0.0</modelVersion>

    <groupId>com.jinit</groupId>
    <artifactId>jia-boot</artifactId>
    <version>1.0.0-SNAPSHOT</version>

    <properties>
        <project.build.sourceEncoding>UTF-8</project.build.sourceEncoding>
        <maven.compiler.encoding>UTF-8</maven.compiler.encoding>
        <java.version>1.8</java.version>
        <maven.compiler.source>1.8</maven.compiler.source>
        <maven.compiler.target>1.8</maven.compiler.target>
    </properties>


    <dependencies>
        <!-- log4j 日志组件 -->
        <dependency>
            <groupId>org.slf4j</groupId>
            <artifactId>slf4j-api</artifactId>
            <version>1.7.21</version>
        </dependency>
        <dependency>
            <groupId>org.slf4j</groupId>
            <artifactId>slf4j-log4j12</artifactId>
            <version>1.7.21</version>
        </dependency>
        <!-- 内嵌tomcat 核心依赖包 -->
        <dependency>
            <groupId>org.apache.tomcat.embed</groupId>
            <artifactId>tomcat-embed-core</artifactId>
            <version>8.5.32</version>
        </dependency>
        <dependency>
            <groupId>org.apache.tomcat.embed</groupId>
            <artifactId>tomcat-embed-jasper</artifactId>
            <version>8.5.32</version>
        </dependency>
        <!-- spring-context 依赖包 -->
        <dependency>
            <groupId>org.springframework</groupId>
            <artifactId>spring-context</artifactId>
            <version>5.2.8.RELEASE</version>
        </dependency>
        <!-- spring-core 依赖包 -->
        <dependency>
            <groupId>org.springframework</groupId>
            <artifactId>spring-core</artifactId>
            <version>5.2.8.RELEASE</version>
        </dependency>
        <!-- spring-web 依赖包 -->
        <dependency>
            <groupId>org.springframework</groupId>
            <artifactId>spring-web</artifactId>
            <version>5.2.8.RELEASE</version>
        </dependency>
        <!-- spring-webmvc 依赖包 -->
        <dependency>
            <groupId>org.springframework</groupId>
            <artifactId>spring-webmvc</artifactId>
            <version>5.2.8.RELEASE</version>
        </dependency>

    </dependencies>

    <build>
        <plugins>
            <plugin>
                <groupId>org.springframework.boot</groupId>
                <artifactId>spring-boot-maven-plugin</artifactId>
            </plugin>
        </plugins>
    </build>

</project>
@EnableAutoConfiguration注解利用@Import导入AutoConfigurationImportSelector自动配置导入选择器。
package com.jinit.jia.boot.autoconfigure;

import com.jinit.jia.boot.AutoConfigurationImportSelector;
import org.springframework.context.annotation.Import;

import java.lang.annotation.*;

/**
 * EnableAutoConfiguration
 *
 * @author JInit
 * @date 2021-08-04
 */
@Target(ElementType.TYPE)
@Retention(RetentionPolicy.RUNTIME)
@Documented
@Inherited

@AutoConfigurationPackage
@Import(AutoConfigurationImportSelector.class)
public @interface EnableAutoConfiguration {


    /**
     * 排除特定的自动配置类
     * @return
     */
    Class<?>[] exclude() default {};

    /**
     * 排除特定的自动配置类名称
     * @return
     */
    String[] excludeName() default {};
}
SpringApplication实例化具体完成一下主要6个步骤流程。
/**
     * 构造方法
     * @param resourceLoader 资源加载器
     * @param primarySources 主bean资源
     */
    public SpringApplication(ResourceLoader resourceLoader, Class<?>... primarySources) {
        // 设置资源加载器
        this.resourceLoader = resourceLoader;
        // 断言主bean资源不能为null
        Assert.notNull(primarySources, "PrimarySources不能为空");
        // 将primarySources数组转换为List,最后放到LinkedHashSet集合中
        this.primarySources = new LinkedHashSet<>(Arrays.asList(primarySources));

        // 1、推断应用类型,后面会根据类型初始化对应的环境
        this.webApplicationType = WebApplicationType.deduceFromClasspath();
        // 2、初始化classpath下 META-INF/spring.factories中已配置的ApplicationContextInitializer
        setInitializers((Collection) getSpringFactoriesInstances(ApplicationContextInitializer.class));
        // 3、初始化classpath下所有已配置的应用监听器
        setListeners((Collection) getSpringFactoriesInstances(ApplicationListener.class));
        // 4、根据调用栈,推断出 main 方法的类名
        this.mainApplicationClass = deduceMainApplicationClass();
    }
其中SpringApplication实例化步骤2中通过通过指定的classLoader从 META-INF/spring.factories 的资源文件中读取 key为type.getName()的value。
/**
     * 获取spring工厂实例
     * @param type class 类型
     * @param parameterTypes 参数类型数组
     * @param args 可变参数
     * @param <T>
     * @return
     */
    private <T> Collection<T> getSpringFactoriesInstances(Class<T> type, Class<?>[] parameterTypes, Object... args) {
        ClassLoader classLoader = getClassLoader();
        // 通过指定的classLoader从 META-INF/spring.factories 的资源文件中
        // 读取 key为type.getName()的value
        Set<String> names = new LinkedHashSet<>(SpringFactoriesLoader.loadFactoryNames(type, classLoader));
        // 创建工厂实例
        List<T> instances = createSpringFactoriesInstances(type, parameterTypes, classLoader, args, names);
        // 对Spring工厂实例排序(org.springframework.core.annotation.Order注解指定的顺序)
        AnnotationAwareOrderComparator.sort(instances);
        return instances;
    }
SpringApplication run方法,关注springboot源码设计中关键6步:
第一步:获取并启动监听器;
第二步:构造应用上下文环境;
第三步:初始化应用上下文;
第四步:刷新应用上下文前的准备阶段;
第五步:刷新应用上下文;
第六步:刷新应用上下文后的扩展接口;
自定义jia-boot实现如下:(核心在于剖析源码设计思路)
/**
     * SpringApplication 运行入口
     * @param args 应用参数(通常从java main方法传递)
     * @return
     */
    public ConfigurableApplicationContext run(String... args) {
        // 记录程序运行时间
        StopWatch stopWatch = new StopWatch();
        stopWatch.start();
        // ConfigurableApplicationContext Spring 的上下文
        ConfigurableApplicationContext context = null;
        // Collection<SpringBootExceptionReporter> exceptionReporters = new ArrayList<>();
        // 设置该应用程序,即使没有检测到显示器,也允许其启动.
        // configureHeadlessProperty();
        //1、获取并启动监听器
        SpringApplicationRunListeners listeners = getRunListeners(args);
        listeners.starting();
        try {
            //ApplicationArguments applicationArguments = new DefaultApplicationArguments(args);
            // 2、构造应用上下文环境
            //ConfigurableEnvironment environment = prepareEnvironment(listeners, applicationArguments);
            // 处理需要忽略的Bean
            //configureIgnoreBeanInfo(environment);
            // 打印banner
            //Banner printedBanner = printBanner(environment);
            // 3、初始化应用上下文
            context = createApplicationContext();
            // 实例化SpringBootExceptionReporter.class,用来支持报告关于启动的错误
//            exceptionReporters = getSpringFactoriesInstances(SpringBootExceptionReporter.class,
//                    new Class[] { ConfigurableApplicationContext.class }, context);
            // 4、刷新应用上下文前的准备阶段
            prepareContext(context, listeners);
            // 5、刷新应用上下文
            refreshContext(context);

            // 6、刷新应用上下文后的扩展接口
            //afterRefresh(context, applicationArguments);
            // 时间记录停止
            stopWatch.stop();
            logger.info("启动耗时:" + stopWatch.getTotalTimeMillis() + "ms");
            // 发布容器启动完成事件
            listeners.started(context);
            // callRunners(context, applicationArguments);
        }
        catch (Throwable ex) {
            // handleRunFailure(context, ex, exceptionReporters, listeners);
            throw new IllegalStateException(ex);
        }

        try {
            listeners.running(context);
        }
        catch (Throwable ex) {
            // handleRunFailure(context, ex, exceptionReporters, null);
            throw new IllegalStateException(ex);
        }
        return context;
    }
ServletWebServerApplicationContext继承GenericWebApplicationContext,实现ConfigurableWebServerApplicationContext,核心监听应用上下文刷新时,执行onRefresh()中createWebServer()来创建web服务,默认仅实现tomcat容器服务。
 @Override
    protected void onRefresh() {
        super.onRefresh();
        try {
            // 获取嵌入式的Servlet容器工厂,并通过工厂来获取Servlet容器
            // 简化:仅实现tomcat容器工厂
            createWebServer();
        }
        catch (Throwable ex) {
            throw new ApplicationContextException("Unable to start web server", ex);
        }
    }

    /**
     * 创建web 服务
     */
    private void createWebServer() {
        WebServer webServer = this.webServer;
        ServletContext servletContext = getServletContext();
        if (webServer == null && servletContext == null) {
            // 先获取嵌入式Servlet容器工厂
            TomcatServletWebServerFactory factory = new TomcatServletWebServerFactory();
            this.webServer = factory.getWebServer();
        }
        else if (servletContext != null) {
            Enumeration<String> attributeNames = servletContext.getAttributeNames();
            // TODO: webServer不为空,待实现初始化器的onStartUp

        }
        initPropertySources();
    }
jia-boot测试框架
码云仓库地址:
引入jia-boot框架:
<?xml version="1.0" encoding="UTF-8"?>

<project xmlns="http://maven.apache.org/POM/4.0.0" xmlns:xsi="http://www.w3.org/2001/XMLSchema-instance"
  xsi:schemaLocation="http://maven.apache.org/POM/4.0.0 http://maven.apache.org/xsd/maven-4.0.0.xsd">
  <modelVersion>4.0.0</modelVersion>

  <groupId>com.jinit</groupId>
  <artifactId>jia-boot-test</artifactId>
  <version>1.0.0-SNAPSHOT</version>
  <packaging>war</packaging>

  <name>mvc Maven Webapp</name>
  <!-- FIXME change it to the project's website -->
  <url>http://www.example.com</url>

  <properties>
    <project.build.sourceEncoding>UTF-8</project.build.sourceEncoding>
    <maven.compiler.source>11</maven.compiler.source>
    <maven.compiler.target>11</maven.compiler.target>
  </properties>

  <dependencies>
    <!-- junit单元测试 -->
    <dependency>
      <groupId>junit</groupId>
      <artifactId>junit</artifactId>
      <version>4.12</version>
      <scope>test</scope>
    </dependency>
    <!-- 自定义springBoot框架 jia-boot 依赖包 -->
    <dependency>
      <groupId>com.jinit</groupId>
      <artifactId>jia-boot</artifactId>
      <version>1.0.0-SNAPSHOT</version>
    </dependency>
  </dependencies>

  <build>
    <plugins>
      <plugin>
        <groupId>org.apache.maven.plugins</groupId>
        <artifactId>maven-compiler-plugin</artifactId>
      </plugin>
    </plugins>
  </build>
</project>
api测试接口:
package com.jinit.jia.boot.test.controller;
import org.springframework.web.bind.annotation.RequestMapping;
import org.springframework.web.bind.annotation.RestController;
import javax.xml.crypto.Data;
import java.time.LocalDateTime;
import java.time.format.DateTimeFormatter;
/**
* TestController
*
* @author JInit
* @date 2021-08-06
*/
@RestController
public class TestController {
/**
* 测试api接口
* @return
*/
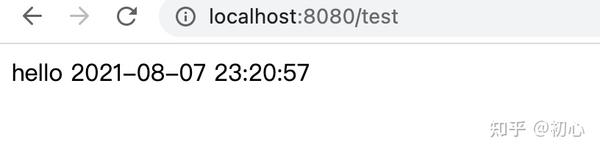
@RequestMapping("/test")
public String test(){
LocalDateTime nowDateTime = LocalDateTime.now();
DateTimeFormatter dateTimeFormatter = DateTimeFormatter.ofPattern("yyyy-MM-dd HH:mm:ss");
return "hello " + dateTimeFormatter.format(nowDateTime);
}
}
启动类TestSpringApplication:
package com.jinit.jia.boot.test;

import com.jinit.jia.boot.SpringApplication;
import com.jinit.jia.boot.autoconfigure.SpringBootApplication;

/**
 * TestSpringApplication
 *
 * @author JInit
 * @date 2021-08-05
 */
@SpringBootApplication
public class TestSpringApplication {

    public static void main(String[] args) {
        SpringApplication.run(TestSpringApplication.class,args);
    }
}
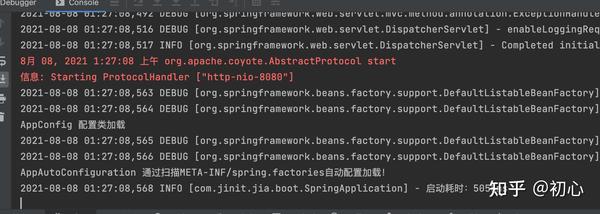
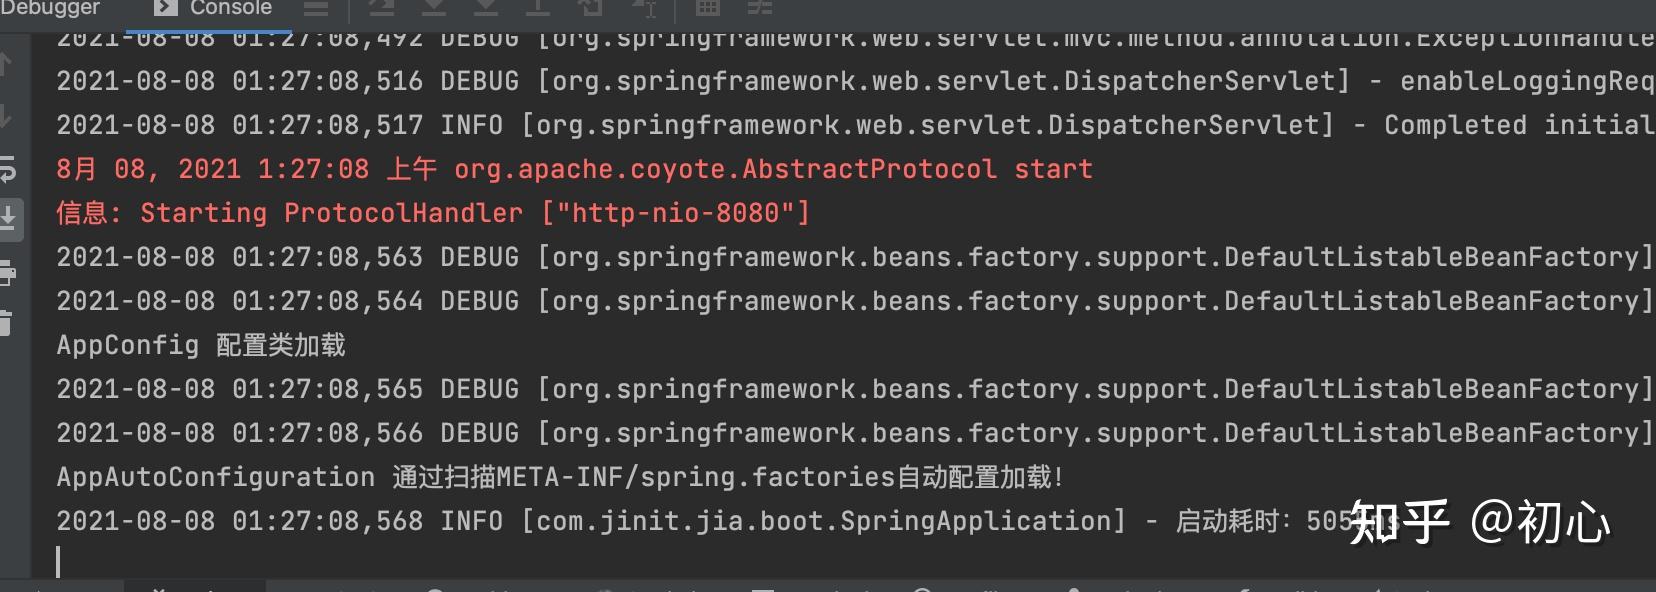
测试效果: