分布式开发-Maven多模块聚合项目

作者:知了堂-刘阳


在分布式开发项目中,聚合项目搭建非常重要。后面的zookeeper + dobbo,我们采用聚合项目来完成。
内容:
搭建聚合项目
再次将前面的zookeepr + dubbo入门demo变为聚合项目的工程结构
最后,测试在聚合项目中是否能够运行zookeeper + dubbo的程序
搭建聚合项目
第一步:创建parent项目,我们把项目名称取名为dubbo,注意这里不勾选模板


第二步:输入坐标和模块的名称


第三步:设置工程的路径


第四步:把刚创建好的dubbo工程里面的src目录去掉。因为此工程主要用来管理第三方依赖


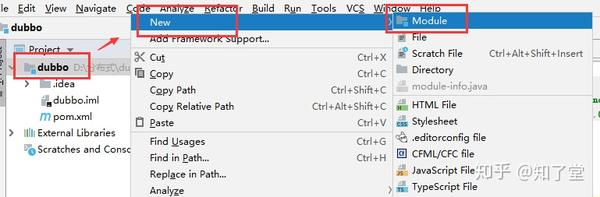
第五步:创建子模块
选中dubbo项目,然后鼠标右键new->Module

还是选择Maven的项目,继续不选择模板,直接下一步


输入子模块的名称


创建好的子模块的工程结构如下

注意查看父模块(dubbo)和子模块(dubbo-provider)的pom.xml文件之间的关系


按照上面的子模块创建方式,我们在创建dubbo-customer子模块


第六步:将创建好的子模块设置为maven-webapp的项目
选中子模块dubbo-provider,然后找到open module settings的选项


在打开的页面中,先选择dubbo-provider,然后点击左上角的+号,选择web


下面是设置web相关的属性选项,请大家按照如下截图进行操作


OK ,至此,我们就将dubbo-provider成功的改造成了一个web项目,此时我们的项目结构如下

最后,我们再将dubbo-customer也改造为web模块
上面的聚合环境初步搭建,我们开始搭建dubbo的环境。再后面的编写后过程中,我们还会对pom.xml文件进行修改
我们先搭建dubbo的服务提供者,dubbo-provider
第一步:配置dubbo所需要的pom.xml文件
<?xml version="1.0" encoding="UTF-8"?>
<project xmlns="http://maven.apache.org/POM/4.0.0"
         xmlns:xsi="http://www.w3.org/2001/XMLSchema-instance"
         xsi:schemaLocation="http://maven.apache.org/POM/4.0.0 http://maven.apache.org/xsd/maven-4.0.0.xsd">
    <parent>
        <artifactId>dubbo</artifactId>
        <groupId>com.zlt</groupId>
        <version>1.0-SNAPSHOT</version>
    </parent>
    <modelVersion>4.0.0</modelVersion>

    <packaging>war</packaging>
    <artifactId>dubbo-provider</artifactId>

    <dependencies>
        <dependency>
            <groupId>junit</groupId>
            <artifactId>junit</artifactId>
            <version>4.11</version>
            <scope>test</scope>
        </dependency>

        <dependency>
            <groupId>org.springframework</groupId>
            <artifactId>spring-webmvc</artifactId>
            <version>4.0.3.RELEASE</version>
        </dependency>

        <dependency>
            <groupId>com.alibaba</groupId>
            <artifactId>dubbo</artifactId>
            <version>2.5.3</version>
            <exclusions>
                <exclusion>
                    <groupId>org.springframework</groupId>
                    <artifactId>spring</artifactId>
                </exclusion>
            </exclusions>
        </dependency>

        <dependency>
            <groupId>org.apache.zookeeper</groupId>
            <artifactId>zookeeper</artifactId>
            <version>3.4.6</version>
            <type>pom</type>
        </dependency>

        <!-- https://mvnrepository.com/artifact/com.github.sgroschupf/zkclient -->
        <dependency>
            <groupId>com.github.sgroschupf</groupId>
            <artifactId>zkclient</artifactId>
            <version>0.1</version>
        </dependency>

        <dependency>
            <groupId>log4j</groupId>
            <artifactId>log4j</artifactId>
            <version>1.2.16</version>
        </dependency>

    </dependencies>

    <build>
        <pluginManagement>
            <plugins>
                <plugin>
                    <groupId>org.apache.tomcat.maven</groupId>
                    <artifactId>tomcat7-maven-plugin</artifactId>
                    <version>2.2</version>
                    <configuration>
                        <port>8081</port>
                        <path>/</path>
                        <uriEncoding>UTF-8</uriEncoding>
                        <server>tomcat7</server>
                    </configuration>
                </plugin>
            </plugins>
        </pluginManagement>
    </build>
</project>
第二步:加入log4j.properties日志文件
log4j.rootLogger=INFO,Console
log4j.appender.Console=org.apache.log4j.ConsoleAppender
log4j.appender.Console.Target=System.out
log4j.appender.Console.layout = org.apache.log4j.PatternLayout
log4j.appender.Console.layout.ConversionPattern=[%c] - %m%n
第三步:编写spring.xml文件,里面加入dubbo的相关配置信息
<?xml version="1.0" encoding="UTF-8"?>
<beans xmlns="http://www.springframework.org/schema/beans"
       xmlns:xsi="http://www.w3.org/2001/XMLSchema-instance"
       xmlns:dubbo="http://code.alibabatech.com/schema/dubbo"
       xsi:schemaLocation="http://www.springframework.org/schema/beans http://www.springframework.org/schema/beans/spring-beans.xsd
            http://code.alibabatech.com/schema/dubbo http://code.alibabatech.com/schema/dubbo/dubbo.xsd">

    <dubbo:application name="dubboprovider"></dubbo:application>
    <dubbo:registry address="zookeeper://192.168.27.128:2181"></dubbo:registry>
    <dubbo:annotation package="com.zlt.service"></dubbo:annotation>

</beans>
第四步:修改web.xml文件,加入Listener监听,并加载spring配置文件
<?xml version="1.0" encoding="UTF-8"?>
<web-app xmlns="http://xmlns.jcp.org/xml/ns/javaee"
         xmlns:xsi="http://www.w3.org/2001/XMLSchema-instance"
         xsi:schemaLocation="http://xmlns.jcp.org/xml/ns/javaee http://xmlns.jcp.org/xml/ns/javaee/web-app_4_0.xsd"
         version="4.0">
    <context-param>
        <param-name>contextConfigLocation</param-name>
        <param-value>classpath:spring/spring.xml</param-value>
    </context-param>

    <listener>
        <listener-class>org.springframework.web.context.ContextLoaderListener</listener-class>
    </listener>
</web-app>
第五步:添加业务层接口
package com.zlt.service;

public interface UserService {
    public String getName();
}
第六步:编写实现业务层的类
package com.zlt.service.impl;

import com.alibaba.dubbo.config.annotation.Service;
import com.zlt.service.UserService;

@Service
public class UserServiceImpl implements UserService {
    public String getName() {
        return "zhiliaotang...";
    }
}
搭建dubbo的消费者,dubbo-customer
第一步:所需maven环境和dubbo-provider一样,这里参考上面的代码
第二步:加入log4j.properties文件,这里参考上面的代码
第三步:加入spring-mvc.xml文件,并添加dubbo的配置信息
<?xml version="1.0" encoding="UTF-8"?>
<beans xmlns="http://www.springframework.org/schema/beans"
       xmlns:xsi="http://www.w3.org/2001/XMLSchema-instance"
       xmlns:mvc="http://www.springframework.org/schema/mvc"
       xmlns:dubbo="http://code.alibabatech.com/schema/dubbo"
       xsi:schemaLocation="http://www.springframework.org/schema/beans http://www.springframework.org/schema/beans/spring-beans.xsd
            http://www.springframework.org/schema/mvc http://www.springframework.org/schema/mvc/spring-mvc.xsd
            http://code.alibabatech.com/schema/dubbo http://code.alibabatech.com/schema/dubbo/dubbo.xsd">

    <mvc:annotation-driven></mvc:annotation-driven>

    <dubbo:application name="dubbocustomer"></dubbo:application>
    <dubbo:registry address="zookeeper://192.168.27.128:2181"></dubbo:registry>
    <dubbo:annotation package="com.zlt.controller"></dubbo:annotation>

</beans>
第四步:配置springmvc的DispatcherServlet
<?xml version="1.0" encoding="UTF-8"?>
<web-app xmlns="http://xmlns.jcp.org/xml/ns/javaee"
         xmlns:xsi="http://www.w3.org/2001/XMLSchema-instance"
         xsi:schemaLocation="http://xmlns.jcp.org/xml/ns/javaee http://xmlns.jcp.org/xml/ns/javaee/web-app_4_0.xsd"
         version="4.0">
    <filter>
        <filter-name>characterEncodingFilter</filter-name>
        <filter-class>org.springframework.web.filter.CharacterEncodingFilter</filter-class>
        <init-param>
            <param-name>encoding</param-name>
            <param-value>utf-8</param-value>
        </init-param>
        <init-param>
            <param-name>forceEncoding</param-name>
            <param-value>true</param-value>
        </init-param>
    </filter>

    <filter-mapping>
        <filter-name>characterEncodingFilter</filter-name>
        <url-pattern>/*</url-pattern>
    </filter-mapping>

    <servlet>
        <servlet-name>springmvc</servlet-name>
        <servlet-class>org.springframework.web.servlet.DispatcherServlet</servlet-class>
        <init-param>
            <param-name>contextConfigLocation</param-name>
            <param-value>classpath:spring/spring-mvc.xml</param-value>
        </init-param>
    </servlet>
    <servlet-mapping>
        <servlet-name>springmvc</servlet-name>
        <url-pattern>/</url-pattern>
    </servlet-mapping>
</web-app>
第五步:编写接口代码,在接口代码里面依赖注入UserService
备注:@Reference 这个注解类似@Autowired,但是这里必须使用dubbo的依赖注入
package com.zlt.controller;

import com.alibaba.dubbo.config.annotation.Reference;
import com.zlt.service.UserService;
import org.springframework.stereotype.Controller;
import org.springframework.web.bind.annotation.RequestMapping;
import org.springframework.web.bind.annotation.ResponseBody;

@Controller
public class IndexController {

    @Reference
    private UserService userService;

    @RequestMapping("/index")
    @ResponseBody
    public String index() {
        return userService.getName();
    }
}
第六步:通过调用IndexController接口的方法,测试是否能够通过dubbo+zookeeper找到一个801服务提供的UserService接口提供的功能。
好了,今天的内容就分享到这里了噢!下次给大家分享《分布式开发-dubbo管理中心的部署》,请持续关注哦!


文章被以下专栏收录