Spring--AOP详细介绍--和详细代码演示证明理解
目录
Spring--AOP详细介绍
基本介绍
代码演示—入门
需求说明
定义一个接口类Vehicle
定义一个实现接口类的Car类
定义一个实现接口类的Ship类
创建测试类Test.java
来思考一下,
解决方案-动态代理方式-2
修改 Car类
修改 Ship类
创建VehicleProxyProvider类
解释说明
创建InvocationHandler 对象
解释public Object invoke(Object o, Method method, Object[] args)
解释ClassLoader loader,Class[] interfaces,InvocationHandler h
创建Test.java 类
解释
动态代理的 动态怎么体现
代码演示--动态代理深入
需求说明
输出结果
创建接口 SmartAnimalable.java
实现类SmartDog
创建MyProxyProvider类
执行思路
创建MyProxyProvider
创建测试类
● 问题提出
使用土方法解决前面的问题
创建MyProxyProvider
对土方法解耦-开发简易的 AOP 类
创建WyxAOP.java
修改MyProxyProvider
完成测试
再次分析-提出 Spring AOP
AOP 的基本介绍
● 什么是 AOP
● 示意图说明 AOP 的相关概念
一张详细图说明 AOP
● AOP 实现方式
AOP 编程快速入门
● 说明
快速入门实例
● 需求说明
创建 SmartAnimalable接口
创建SmartDog
创建 SmartAnimalAspect类
解读
@Before
@AfterReturning
@AfterThrowing
@After
创建 src\beans6.xml 并配置
测试
细节说明
AOP-切入表达式
具体使用
注意事项和细节
AOP-JoinPoint
应用实例
其它常用方法一
AOP-环绕通知
应用实例
修改 SmartAnimalAspect.java
xml配置
测试
AOP-切面优先级问题
执行顺序
AOP-基于 XML 配置 AOP
代码示例
创建SmartAnimalAspect类注意没有注解
创建SmartDog注意没有注解
xml配置
测试
综合代码-示例
基于注解
创建Cal.java接口
创建MyCal.java
创建MyCalAOP类
xml配置
创建测试类
基于xml配置
创建Cal.java接口
创建MyCal.java
创建MyCalAOP类
xml配置
创建测试类
Spring--AOP详细介绍
基本介绍
AOP 讲解: spring-framework-5.3.8/docs/reference/html/core.html#aop
AOP APIs : spring-framework-5.3.8/docs/reference/html/core.html#aop-api
代码演示—入门
需求说明
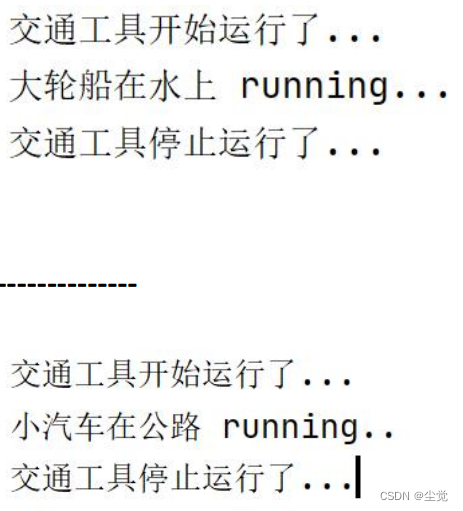
1. 有 Vehicle(交通工具接口, 有一个 run 方法), 下面有两个实现类 Car 和 Ship
2. 当运行 Car 对象 的 run 方法和 Ship 对象的 run 方法时,输入如下内容, 注意观察前后有统一的输出.
定义一个接口类Vehicle
里面有一个方法run
public interface Vehicle {
public void run();
}
定义一个实现接口类的Car类
public class Car implements Vehicle {@Overridepublic void run() {System.out.println("交通工具开始运行了...");System.out.println("小汽车在公路 running..");System.out.println("交通工具停止运行了...");}
}
定义一个实现接口类的Ship类
public class Ship implements Vehicle {@Overridepublic void run() {System.out.println("交通工具开始运行了...");System.out.println("大轮船在水上 running..");System.out.println("交通工具停止运行了...");}
}
创建测试类Test.java
Vehicle vehicle = new Car(); //可以切换成 new Ship() vehicle.run();
来思考一下,
解决方案好吗? ===> 代码冗余, 其实就是单个对象的调用,并没有很好的解决
解决方案-动态代理方式-2
动态代理解决思路,在调用方法时,使用反射机制,根据方法去决定调用哪个对象方法
修改 Car类
public class Car implements Vehicle {@Overridepublic void run() {System.out.println("小汽车在公路 running..");}
}
修改 Ship类
public class Ship implements Vehicle {@Overridepublic void run() {System.out.println("大轮船在水上 running..");}
}
创建VehicleProxyProvider类
1.执行思路
2.定义一个属性
3.构造器
4.编写一个方法,可以返回一个代理对象, 该代理对象可以通过反射机制调用到被代理对象的方法
4.1 得到类加载器
4.2 得到要代理的对象/被执行对象 的接口信息,底层是通过接口来完成调用
4.3 创建InvocationHandler 对象
import java.lang.reflect.InvocationHandler;
import java.lang.reflect.Method;
import java.lang.reflect.Proxy;/*** VehicleProxyProvider 该类可以返回一个代理对象.*/
public class VehicleProxyProvider {//定义一个属性//target_vehicle 表示真正要执行的对象//该对象实现了Vehicle接口private Vehicle target_vehicle;//构造器public VehicleProxyProvider(Vehicle target_vehicle) {this.target_vehicle = target_vehicle;}//编写一个方法,可以返回一个代理对象, 该代理对象可以通过反射机制调用到被代理对象的方法//1. 这个方法非常重要, 理解有一定难度public Vehicle getProxy() {//得到类加载器ClassLoader classLoader =target_vehicle.getClass().getClassLoader();//得到要代理的对象/被执行对象 的接口信息,底层是通过接口来完成调用Class<?>[] interfaces = target_vehicle.getClass().getInterfaces();//创建InvocationHandler 对象//因为 InvocationHandler 是接口,所以我们可以通过匿名对象的方式来创建该对象/**** public interface InvocationHandler {*  public Object invoke(Object proxy, Method method, Object[] args)*         throws Throwable;* }* invoke 方法是将来执行我们的target_vehicle的方法时,会调用到**/InvocationHandler invocationHandler = new InvocationHandler() {/*** invoke 方法是将来执行我们的target_vehicle的方法时,会调用到* @param o 表示代理对象* @param method 就是通过代理对象调用方法时,的哪个方法 代理对象.run()* @param args : 表示调用 代理对象.run(xx) 传入的参数* @return 表示 代理对象.run(xx) 执行后的结果.* @throws Throwable*/@Overridepublic Object invoke(Object o, Method method, Object[] args)throws Throwable {System.out.println("交通工具开始运行了....");//这里是我们的反射基础 => OOP//method 是?: public abstract void com.hspedu.spring.proxy2.Vehicle.run()//target_vehicle 是? Ship对象//args 是null//这里通过反射+动态绑定机制,就会执行到被代理对象的方法//执行完毕就返回Object result = method.invoke(target_vehicle, args);System.out.println("交通工具停止运行了....");return result;}};/*public static Object newProxyInstance(ClassLoader loader,Class<?>[] interfaces,InvocationHandler h)1. Proxy.newProxyInstance() 可以返回一个代理对象2. ClassLoader loader: 类的加载器.3. Class<?>[] interfaces 就是将来要代理的对象的接口信息4. InvocationHandler h 调用处理器/对象 有一个非常重要的方法invoke*/Vehicle proxy =(Vehicle)Proxy.newProxyInstance(classLoader, interfaces, invocationHandler);return proxy;}
}
解释说明
创建InvocationHandler 对象
//因为 InvocationHandler 是接口,所以我们可以通过匿名对象的方式来创建该对象
/**
*
* public interface InvocationHandler {
* public Object invoke(Object proxy, Method method, Object[] args)
* throws Throwable;
* }
* invoke 方法是将来执行我们的target_vehicle的方法时,会调用到
*
*/
解释public Object invoke(Object o, Method method, Object[] args)
* invoke 方法是将来执行我们的target_vehicle的方法时,会调用到
* @param o 表示代理对象
* @param method 就是通过代理对象调用方法时,的哪个方法 代理对象.run()
* @param args : 表示调用 代理对象.run(xx) 传入的参数
* @return 表示 代理对象.run(xx) 执行后的结果.
* @throws Throwable
解释ClassLoader loader,Class<?>[] interfaces,InvocationHandler h
public static Object newProxyInstance(ClassLoader loader,
Class<?>[] interfaces,
InvocationHandler h)1. Proxy.newProxyInstance() 可以返回一个代理对象
2. ClassLoader loader: 类的加载器.
3. Class<?>[] interfaces 就是将来要代理的对象的接口信息
4. InvocationHandler h 调用处理器/对象 有一个非常重要的方法invoke
创建Test.java 类
public class Test {public static void main(String[] args) {//这里可以切换 Vehicle 的 实现类(对象)Vehicle vehicle = new Car();VehicleProxyProvider vehicleProxyProvider =new VehicleProxyProvider(vehicle);//看一下 proxy 的结构. Vehicle proxy = vehicleProxyProvider.getProxy();System.out.println("proxy 编译类型是 Vehicle");System.out.println("proxy 运行类型" + proxy.getClass());}
}
解释
动态代理的 动态怎么体现
1. proxy 运行类型是 com.sun.proxy.$Proxy0 该类型被转型成 Vehicle
因此可以调用 Vehicle 的接口方法
2. 当执行 run() 的时候会调用, 根据 Java 的动态绑定机制, 这时直接调用 Car的 run(),而是 proxy 对象的 invocationHandler 的 invoke 方法(!!!!!!)
3. invoke 方法使用反射机制来调用 run()方法注意这个 run 方法也可以是Vehicle 的其它方法)
这时就可以在调用 run()方法前,进行前置处理和后置处理
4. 也就是说 proxy 的 target_vehicle 运行类型只要是实现了 Vehicle 接口
,就可以去调用不同的方法, 是动态的,变化的,底层就是 使用反射完成的. proxy.run();
代码演示--动态代理深入
需求说明
1. 有一个 SmartAnimal 接口,可以完成简单的加减法, 要求在执行 getSum()和 getSub() 时,输出执行前,执行过程,执行后的日志输出
输出结果
日志-方法名-getSum-参数 10.0 2.0
方法内部打印 result = 12.0
日志-方法名-getSum-结果 result= 12.0
==========================
日志-方法名-getSub-参数 10.0 2.0
方法内部打印 result = 8.0
日志-方法名-getSub-结果 result= 8
创建接口 SmartAnimalable.java
public interface SmartAnimalable {//求和float getSum(float i, float j);//求差float getSub(float i, float j);
}
实现类SmartDog
public class SmartDog implements SmartAnimalable {@Overridepublic float getSum(float i, float j) {//System.out.println("日志-方法名-getSum-参数 " + i + " " + j);float result = i + j;System.out.println("方法内部打印result = " + result);//System.out.println("日志-方法名-getSum-结果result= " + result);return result;}@Overridepublic float getSub(float i, float j) {//System.out.println("日志-方法名-getSub-参数 " + i + " " + j);float result = i - j;System.out.println("方法内部打印result = " + result);//System.out.println("日志-方法名-getSub-结果result= " + result);return result;}
}
创建MyProxyProvider类
注意这里就没有使用上面直接new一个对象来调用了而是直接使用反射
这里也考虑了出现异常的问题
执行思路
定义我们要执行的目标对象, 该对象需要实现SmartAnimalable
构造器
方法, 可以返回代理对象,该代理对象可以执行目标对象
1. 先到的类加载器/对象
2. 得到要执行的目标对象的接口信息
3. 创建InvocationHandler
最后 创建代理对象并返回
创建MyProxyProvider
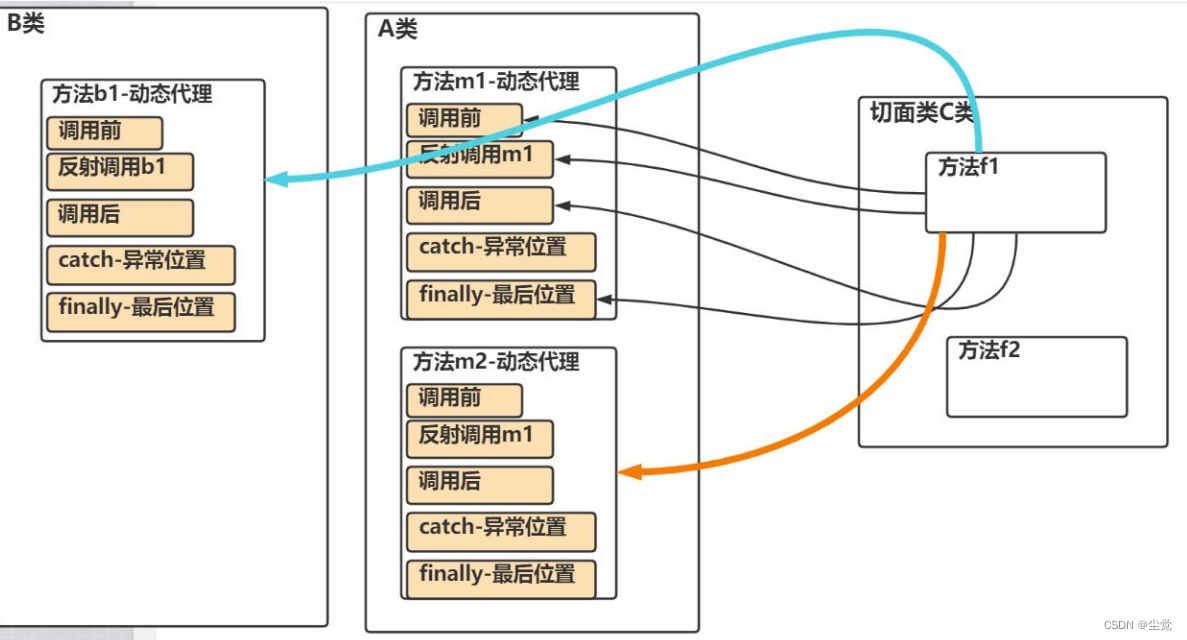
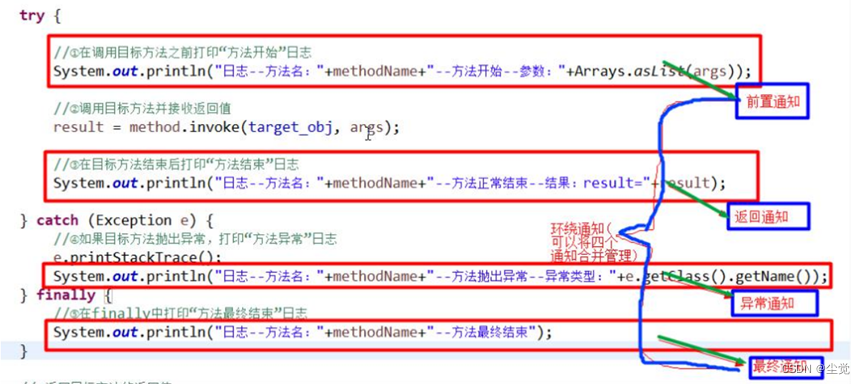
public class MyProxyProvider {//定义我们要执行的目标对象, 该对象需要实现SmartAnimalableprivate SmartAnimalable target_obj;//构造器public MyProxyProvider(SmartAnimalable target_obj) {this.target_obj = target_obj;}//方法, 可以返回代理对象,该代理对象可以执行目标对象public SmartAnimalable getProxy() {//1. 先到的类加载器/对象ClassLoader classLoader = target_obj.getClass().getClassLoader();//2. 得到要执行的目标对象的接口信息Class<?>[] interfaces = target_obj.getClass().getInterfaces();//3. 创建InvocationHandlerInvocationHandler invocationHandler = new InvocationHandler() {@Overridepublic Object invoke(Object proxy, Method method, Object[] args) throws Throwable {Object result = null;try {System.out.println("方法执行前-日志-方法名-" + method.getName() + "-参数 "+ Arrays.asList(args)); //这里从AOP看,就是一个横切关注点-前置通知//使用反射调用方法result = method.invoke(target_obj, args);System.out.println("方法执行正常结束-日志-方法名-" + method.getName() + "-结果result= "+ result);//从AOP看, 也是一个横切关注点-返回通知} catch (Exception e) {e.printStackTrace();//如果反射执行方法时,出现异常,就会进入到catch{}System.out.println("方法执行异常-日志-方法名-" + method.getName()+ "-异常类型=" + e.getClass().getName());//从AOP看, 也是一个横切关注点-异常通知} finally {//不管你是否出现异常,最终都会执行到finally{}//从AOP的角度看, 也是一个横切关注点-最终通知System.out.println("方法最终结束-日志-方法名-" + method.getName());}return result;}};//创建代理对象SmartAnimalable proxy =(SmartAnimalable)Proxy.newProxyInstance(classLoader, interfaces, invocationHandler);return proxy;}
}
创建测试类
@Testpublic void smartDogTestByProxy() {SmartAnimalable smartAnimalable = new SmartDog();MyProxyProvider myProxyProvider =new MyProxyProvider(smartAnimalable);//我们返回了代理对象SmartAnimalable proxy =myProxyProvider.getProxy();proxy.getSum(10, 2);System.out.println("====================");proxy.getSub(10, 2);}● 问题提出
1. 在 MyProxyProvider.java 中, 我们的输出语句功能比较弱,在实际开发中,我们希望是 以一个方法的形式,嵌入到真正执行的目标方法前
使用土方法解决前面的问题
把输出语句抽出来在上面形成一个方法
创建MyProxyProvider
//我们一个方法,在目标对象执行前执行public void before(Object proxy, Method method, Object[] args) {System.out.println("before-方法执行前-日志-方法名-" + method.getName() + "-参数 "+ Arrays.asList(args)); //这里从AOP看,就是一个横切关注点-前置通知}//我们一个方法,在目标对象执行后执行public void after(Method method, Object result) {System.out.println("after-方法执行正常结束-日志-方法名-" + method.getName() + "-结果result= "+ result);//从AOP看, 也是一个横切关注点-返回通知}
public SmartAnimalable getProxy() {//1. 先到的类加载器/对象ClassLoader classLoader = target_obj.getClass().getClassLoader();//2. 得到要执行的目标对象的接口信息Class<?>[] interfaces = target_obj.getClass().getInterfaces();//3. 创建InvocationHandlerInvocationHandler invocationHandler = new InvocationHandler() {@Overridepublic Object invoke(Object proxy, Method method, Object[] args) throws Throwable {Object result = null;try {before(proxy, method, args);//使用反射调用方法result = method.invoke(target_obj, args);after(method, result);} catch (Exception e) {e.printStackTrace();//如果反射执行方法时,出现异常,就会进入到catch{}System.out.println("方法执行异常-日志-方法名-" + method.getName()+ "-异常类型=" + e.getClass().getName());//从AOP看, 也是一个横切关注点-异常通知} finally {//不管你是否出现异常,最终都会执行到finally{}//从AOP的角度看, 也是一个横切关注点-最终通知System.out.println("方法最终结束-日志-方法名-" + method.getName());}return result;}};//创建代理对象SmartAnimalable proxy =(SmartAnimalable) Proxy.newProxyInstance(classLoader, interfaces, invocationHandler);return proxy;}
}
该方法问题分析:耦合度高
对土方法解耦-开发简易的 AOP 类
创建WyxAOP.java
/*** 自己编写一个一个极简的AOP类*/
public class WyxAOP {//我们一个方法,在目标对象执行前执行public static void before(Object proxy, Method method, Object[] args) {System.out.println("WyxAOP-方法执行前-日志-方法名-" + method.getName() + "-参数 "+ Arrays.asList(args)); //这里从AOP看,就是一个横切关注点-前置通知}//我们一个方法,在目标对象执行后执行public static void after(Method method, Object result) {System.out.println("WyxAOP-方法执行正常结束-日志-方法名-" + method.getName() + "-结果result= "+ result);//从AOP看, 也是一个横切关注点-返回通知}
}
修改MyProxyProvider
 public SmartAnimalable getProxy() {//1. 先到的类加载器/对象ClassLoader classLoader = target_obj.getClass().getClassLoader();//2. 得到要执行的目标对象的接口信息Class<?>[] interfaces = target_obj.getClass().getInterfaces();//3. 创建InvocationHandlerInvocationHandler invocationHandler = new InvocationHandler() {@Overridepublic Object invoke(Object proxy, Method method, Object[] args) throws Throwable {Object result = null;try {WyxAOP.before(proxy, method, args);//使用反射调用方法result = method.invoke(target_obj, args);WyxAOP.after(method, result);} catch (Exception e) {e.printStackTrace();//如果反射执行方法时,出现异常,就会进入到catch{}System.out.println("方法执行异常-日志-方法名-" + method.getName()+ "-异常类型=" + e.getClass().getName());//从AOP看, 也是一个横切关注点-异常通知} finally {//不管你是否出现异常,最终都会执行到finally{}//从AOP的角度看, 也是一个横切关注点-最终通知System.out.println("方法最终结束-日志-方法名-" + method.getName());}return result;}};//创建代理对象SmartAnimalable proxy =(SmartAnimalable) Proxy.newProxyInstance(classLoader, interfaces, invocationHandler);return proxy;}
}
完成测试
@Testpublic void smartDogTestByProxy() {SmartAnimalable smartAnimalable = new SmartDog();MyProxyProvider myProxyProvider =new MyProxyProvider(smartAnimalable);//我们返回了代理对象SmartAnimalable proxy =myProxyProvider.getProxy();proxy.getSum(10, 2);System.out.println("====================");proxy.getSub(10, 2);}再次分析-提出 Spring AOP
- 土方法 不够灵活
- 土方法 复用性差
- 土方法 还是一种硬编码(因为没有注解和反射支撑)
- Spring AOP 闪亮登场-底层是 ASPECTJ
- 有了前面的技术引导,理解 Spring AOP 就水到渠成
AOP 的基本介绍
● 什么是 AOP
AOP 的全称(aspect oriented programming) ,面向切面编程
● 示意图说明 AOP 的相关概念
一张详细图说明 AOP
● AOP 实现方式
1. 基于动态代理的方式[内置 aop 实现]
2. 使用框架 aspectj 来实现
AOP 编程快速入门
● 说明
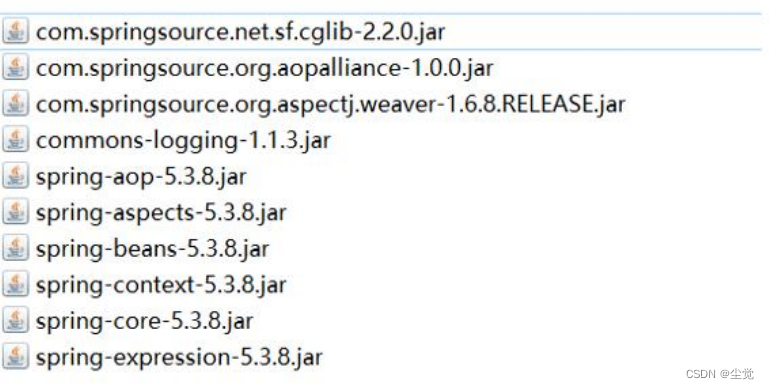
1. 需要引入核心的 aspect 包
2. 在切面类中声明通知方法
1) 前置通知:@Before
2) 返回通知:@AfterReturning
3) 异常通知:@AfterThrowing
4) 后置通知:@After
5) 环绕通知:@Around
 五种通知和前面写的动态代理类方法的对应关系
快速入门实例
● 需求说明
我们使用 aop 编程的方式,来实现手写的动态代理案例效果,就以上一个案例为例来讲解
● 代码实现步骤
导入 AOP 编程需要的jar
创建 SmartAnimalable接口
public interface SmartAnimalable {//求和float getSum(float i, float j);//求差float getSub(float i, float j);
}
创建SmartDog
注意加入注解@Component
@Component //使用@Component 当spring容器启动时,将 SmartDog注入到容器
public class SmartDog implements SmartAnimalable {@Overridepublic float getSum(float i, float j) {float result = i + j;//result = 1 / 0; //模拟一个算术异常System.out.println("方法内部打印result = " + result);return result;}@Overridepublic float getSub(float i, float j) {float result = i - j;System.out.println("方法内部打印result = " + result);return result;}
}
创建 SmartAnimalAspect类
SmartAnimalAspect 作用就是接管切面编程 , 此时原来的 MyProxyProvider 类就可以拿掉了
@Aspect //表示是一个切面类[底层切面编程的支撑(动态代理+反射+动态绑定...)]
@Component //会注入SmartAnimalAspect到容器
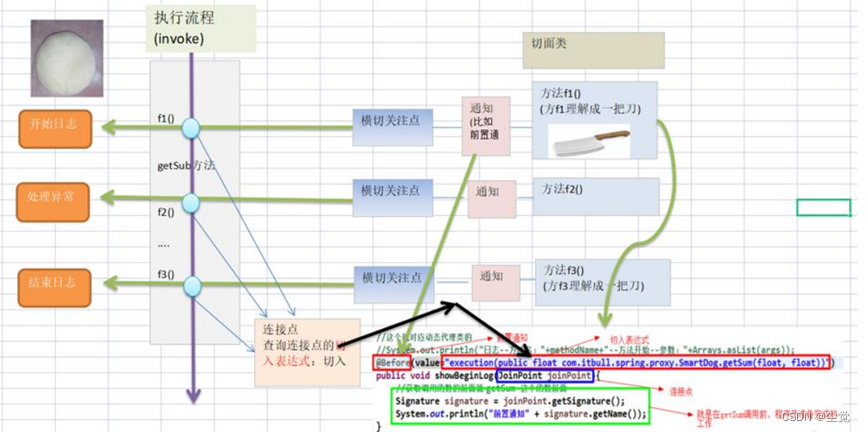
public class SmartAnimalAspect {/*** * 1. @Before 表示前置通知:即在我们的目标对象执行方法前执行* 2. value = "execution(public float com.spring.aop.aspectj.SmartDog.getSum(float, float)* 指定切入到哪个类的哪个方法 形式是: 访问修饰符 返回类型 全类名.方法名(形参列表)* 3. showBeginLog方法可以理解成就是一个切入方法, 这个方法名是可以程序员指定 比如:showBeginLog* 4. JoinPoint joinPoint 在底层执行时,由AspectJ切面框架, 会给该切入方法传入 joinPoint对象* , 通过该方法,程序员可以获取到 相关信息** @param joinPoint*/@Before(value = "execution(public float com.spring.aop.aspectj.SmartDog.getSum(float, float))")public void showBeginLog(JoinPoint joinPoint) {//通过连接点对象joinPoint 可以获取方法签名Signature signature = joinPoint.getSignature();System.out.println("SmartAnimalAspect-切面类showBeginLog()[使用的myPointCut()]-方法执行前-日志-方法名-" + signature.getName() + "-参数 "+ Arrays.asList(joinPoint.getArgs()));}// 返回通知:即把showSuccessEndLog方法切入到目标对象方法正常执行完毕后的地方// 1. 如果我们希望把目标方法执行的结果,返回给切入方法// 2. 可以再 @AfterReturning 增加属性 , 比如 returning = "res"// 3. 同时在切入方法增加 Object res// 4. 注意: returning = "res" 和 Object res 的 res名字一致// @AfterReturning(value = "execution(public float com.spring.aop.aspectj.SmartDog.getSum(float, float))", returning = "res")// 使用切入点@AfterReturning(value = "execution(public float com.hspedu.spring.aop.aspectj.SmartDog.getSum(float, float))", returning = "res")public void showSuccessEndLog(JoinPoint joinPoint, Object res) {Signature signature = joinPoint.getSignature();System.out.println("SmartAnimalAspect-切面类showSuccessEndLog()-方法执行正常结束-日志-方法名-" + signature.getName() + " 返回的结果是=" + res);}//异常通知:即把showExceptionLog方法切入到目标对象方法执行发生异常的的catch{}@AfterThrowing(value = "execution(public float com.spring.aop.aspectj.SmartDog.getSum(float, float))", throwing = "throwable")public void showExceptionLog(JoinPoint joinPoint, Throwable throwable) {Signature signature = joinPoint.getSignature();System.out.println("SmartAnimalAspect-切面类showExceptionLog()-方法执行异常-日志-方法名-" + signature.getName() + " 异常信息=" + throwable);}//最终通知:即把showFinallyEndLog方法切入到目标方法执行后(不管是否发生异常,都要执行 finally{})@After(value = "execution(public float com.spring.aop.aspectj.SmartDog.getSum(float, float))")public void showFinallyEndLog(JoinPoint joinPoint) {Signature signature = joinPoint.getSignature();System.out.println("SmartAnimalAspect-切面类showFinallyEndLog()-方法最终执行完毕-日志-方法名-" + signature.getName());}
}解读
@Before
1. @Before 表示前置通知:即在我们的目标对象执行方法前执行
2. value = "execution(public float com.spring.aop.aspectj.SmartDog.getSum(float, float)指定切入到哪个类的哪个方法 形式是: 访问修饰符 返回类型 全类名.方法名(形参列表)
3. showBeginLog方法可以理解成就是一个切入方法, 这个方法名是可以程序员指定 比如:showBeginLog
4. JoinPoint joinPoint 在底层执行时,由AspectJ切面框架, 会给该切入方法传入 joinPoint对象, 通过该方法,程序员可以获取到 相关信息
@AfterReturning
返回通知:即把showSuccessEndLog方法切入到目标对象方法正常执行完毕后的地方
1. 如果我们希望把目标方法执行的结果,返回给切入方法
2. 可以再 @AfterReturning 增加属性 , 比如 returning = "res"
3. 同时在切入方法增加 Object res
4. 注意: returning = "res" 和 Object res 的 res名字一致
@AfterReturning(value = "execution(public float com.spring.aop.aspectj.SmartDog.getSum(float, float))", returning = "res")
使用切入点
@AfterThrowing
异常返回:在异常通知方法中获取异常信息 可以增加属性如 throwing = "throwable"
即public void showExceptionLog(JoinPoint joinPoint, Throwable throwable
注意:throwing = "throwable" 和 showExceptionLog 的 Throwable throwable名字一致
异常通知:即把showExceptionLog方法切入到目标对象方法执行发生异常的的catch{}
@After
最终通知:即把showFinallyEndLog方法切入到目标方法执行后(不管是否发生异常,都要执行 finally{})
创建 src\beans6.xml 并配置
<?xml version="1.0" encoding="UTF-8"?>
<beans xmlns="http://www.springframework.org/schema/beans"xmlns:xsi="http://www.w3.org/2001/XMLSchema-instance"xmlns:context="http://www.springframework.org/schema/context"xmlns:aop="http://www.springframework.org/schema/aop"xsi:schemaLocation="http://www.springframework.org/schema/beans http://www.springframework.org/schema/beans/spring-beans.xsd http://www.springframework.org/schema/context https://www.springframework.org/schema/context/spring-context.xsd http://www.springframework.org/schema/aop https://www.springframework.org/schema/aop/spring-aop.xsd"><context:component-scanbase-package="com.spring.aop.aspectj"/><!-- 开启基于注解的AOP功能 --><aop:aspectj-autoproxy/>
</beans>
测试
@Testpublic void testDoAround() {//得到spring容器ApplicationContext ioc =new ClassPathXmlApplicationContext("beans08.xml");SmartAnimalable smartAnimalable =ioc.getBean(SmartAnimalable.class);smartAnimalable.getSum(10, 2);}细节说明
1. 关于切面类方法命名可以自己规范一下,
比如 showBeginLog() . showSuccessEndLog() showExceptionLog(), showFinallyEndLog()
2. 切入表达式的更多配置,比如使用模糊配置
@Before(value="execution(* com.hspedu.aop.proxy.SmartDog.*(..))")
3. 表示所有访问权限,
所有包的下所有有类的所方法,都会被执行该前置通知方法
@Before(value="execution(* *.*(..))")
4. 当 spring 容器开启了 <!-- 开启基于注解的 AOP 功能 --> <aop:aspectj-autoproxy/> ,
我们获取注入的对象, 需要以接口的类型来获取, 因为你注入的对象.getClass() 已经是代理类型了!
5. 当 spring 容器开启了 <!-- 开启基于注解的 AOP 功能 --> <aop:aspectj-autoproxy/> ,
我们获取注入的对象, 也可以通过 id 来获取, 但是也要转成接口类型
7.如果每回使用注解来配置的时候都要写类的全路径麻烦可以考虑
//定义一个切入点, 在后面使用时可以直接引用, 提高了复用性
@Pointcut(value = "execution(public float com.spring.aop.aspectj.SmartDog.getSum(float, float)))")
public void myPointCut() {}
使用如前面的
前面的@Before(value = "execution(public float com.hspedu.spring.aop.aspectj.SmartDog.getSum(float, float))")
//这里我们使用定义好的切入点
可以写成@Before(value = "myPointCut()")@AfterReturning(value = "myPointCut()", returning = "res")
其他的类似使用
8. 如果有多个切面类需要定义顺序可以使用
@Order(value = 2)//表示该切面类执行的顺序, value的值越小, 优先级越v
AOP-切入表达式
具体使用
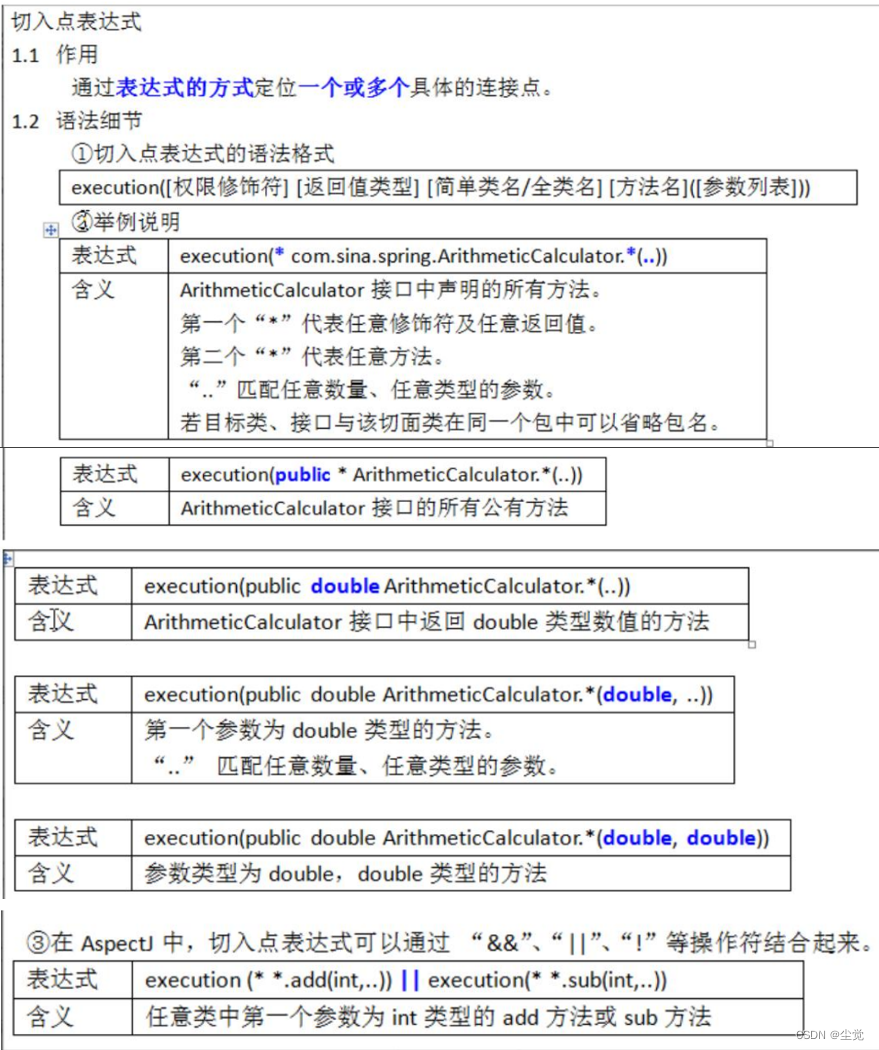
注意事项和细节
1. 切入表达式也可以指向类的方法, 这时切入表达式会对该类/对象生效
2. 切入表达式也可以指向接口的方法, 这时切入表达式会对实现了接口的类/对象生效
3. 切入表达式也可以对没有实现接口的类,进行切入
补充: 动态代理 jdk 的 Proxy 与 Spring 的 CGlib
https://www.cnblogs.com/threeAgePie/p/15832586.html
AOP-JoinPoint
应用实例
● 通过 JoinPoint 可以获取到调用方法的签名
● 应用实例需求
说明: 在调用前置通知获取到调用方法的签名, 和其它相关信息
● 应用实例-代码实现
前面我们已经举例说明过了
其它常用方法一
Signature signature = joinPoint.getSignature();System.out.println("切面类的ok4()-执行的目标方法-" + signature.getName());//演示一下JoinPoint常用的方法.joinPoint.getSignature().getName(); // 获取目标方法名joinPoint.getSignature().getDeclaringType().getSimpleName(); // 获取目标方法所属类的简单类名joinPoint.getSignature().getDeclaringTypeName(); // 获取目标方法所属类的类名joinPoint.getSignature().getModifiers(); // 获取目标方法声明类型(public、private、protected)Object[] args = joinPoint.getArgs(); // 获取传入目标方法的参数,返回一个数组joinPoint.getTarget(); // 获取被代理的对象joinPoint.getThis(); // 获取代理对象自己AOP-环绕通知
应用实例
● 环绕通知可以完成其它四个通知要做的事情
看一个需求: 如何使用环绕通知完成其它四个通知的功能。
修改 SmartAnimalAspect.java
1. @Around:
表示这是一个环绕通知[完成其它四个通知的功能]
2. value = "execution(public float com.hspedu.spring.aop.aspectj.SmartDog.getSum(float, float))切入点表达式
3. doAround 表示要切入的方法 - 调用结构 try-catch-finally
@Aspect //表示是一个切面类[底层切面编程的支撑(动态代理+反射+动态绑定...)]
@Component //会注入SmartAnimalAspect2到容器
public class SmartAnimalAspect2 {//演示环绕通知的使用-了解//解读//1. @Around: 表示这是一个环绕通知[完成其它四个通知的功能]//2. value = "execution(public float com.spring.aop.aspectj.SmartDog.getSum(float, float)) 切入点表达式//3. doAround 表示要切入的方法 - 调用结构 try-catch-finally@Around(value = "execution(public float com.spring.aop.aspectj.SmartDog.getSum(float, float))")public Object doAround(ProceedingJoinPoint joinPoint) {Object result = null;String methodName = joinPoint.getSignature().getName();try {//1.相当于前置通知完成的事情Object[] args = joinPoint.getArgs();List<Object> argList = Arrays.asList(args);//转换成list集合方便输出System.out.println("AOP环绕通知[-前置通知]" + methodName + "方法开始了--参数有:" + argList);//在环绕通知中一定要调用joinPoint.proceed()来执行目标方法result = joinPoint.proceed();//2.相当于返回通知完成的事情System.out.println("AOP环绕通知[-返回通知]" + methodName + "方法结束了--结果是:" + result);} catch (Throwable throwable) {//3.相当于异常通知完成的事情System.out.println("AOP环绕通知[-异常通知]" + methodName + "方法抛异常了--异常对象:" + throwable);} finally {//4.相当于最终通知完成的事情System.out.println("AOP环绕通知[-后置通知]" + methodName + "方法最终结束了...");}return result;}
}
xml配置
<?xml version="1.0" encoding="UTF-8"?>
<beans xmlns="http://www.springframework.org/schema/beans"xmlns:xsi="http://www.w3.org/2001/XMLSchema-instance"xmlns:context="http://www.springframework.org/schema/context"xmlns:aop="http://www.springframework.org/schema/aop"xsi:schemaLocation="http://www.springframework.org/schema/beans http://www.springframework.org/schema/beans/spring-beans.xsd http://www.springframework.org/schema/context https://www.springframework.org/schema/context/spring-context.xsd http://www.springframework.org/schema/aop https://www.springframework.org/schema/aop/spring-aop.xsd"><context:component-scanbase-package="com.spring.aop.aspectj"/><!-- 开启基于注解的AOP功能 --><aop:aspectj-autoproxy/>
</beans>
测试
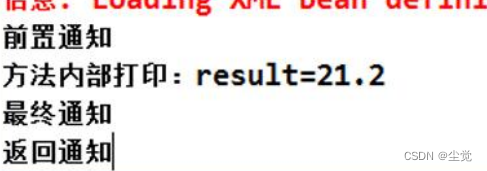
@Testpublic void smartDogTestByProxy() {//得到spring容器ApplicationContext ioc =new ClassPathXmlApplicationContext("beans08.xml");//这里我们需要通过接口类型来获取到注入的SmartDog对象-就是代理对象SmartAnimalable smartAnimalable =ioc.getBean(SmartAnimalable.class);//SmartAnimalable smartAnimalable =// (SmartAnimalable)ioc.getBean("smartDog");smartAnimalable.getSum(10, 2);//System.out.println("smartAnimalable运行类型="// + smartAnimalable.getClass());System.out.println("=============================");//smartAnimalable.getSub(100, 20);}AOP-切面优先级问题
● 切面优先级问题:
如果同一个方法,有多个切面在同一个切入点切入,那么执行的优先级如何控制.
● 基本语法:
@order(value=n) 来控制 n值越小,优先级越高
这个前面已经讲了这里只说细节
执行顺序
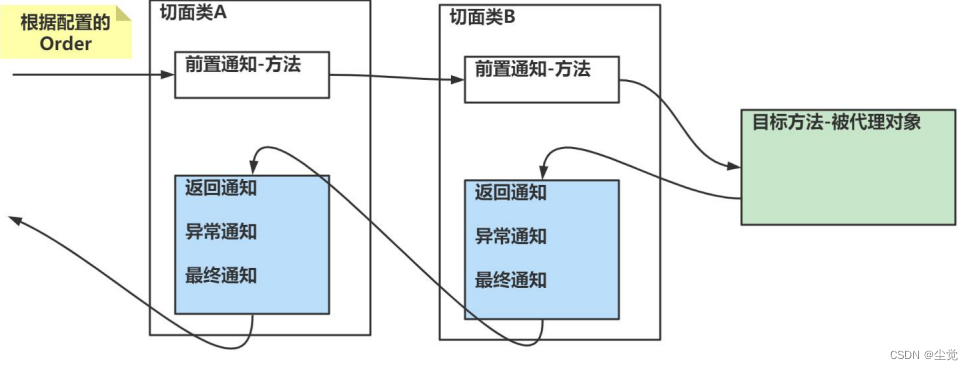
注意事项和细节说明
如何理解输出的信息顺序,类似 Filter 的过滤链式调用机制. (示意图-就比较清楚了.)
1. 不能理解成:优先级高的每个消息通知都先执行,这个和方法调用机制(和 Filter 过滤器链式调用类似)
2. 如何理解执行顺序
AOP-基于 XML 配置 AOP
● 基本说明:
前面我们是通过注解来配置 aop 的,在 spring 中,我们也可以通过 xml 的方式来配置 AOP
代码示例
创建接口SmartAnimalable
public interface SmartAnimalable {//求和float getSum(float i, float j);//求差float getSub(float i, float j);
}
创建SmartAnimalAspect类注意没有注解
public class SmartAnimalAspect {public void showBeginLog(JoinPoint joinPoint) {//通过连接点对象joinPoint 可以获取方法签名Signature signature = joinPoint.getSignature();System.out.println("SmartAnimalAspect-XML配置-切面类showBeginLog()[使用的myPointCut()]-方法执行前-日志-方法名-" + signature.getName() + "-参数 "+ Arrays.asList(joinPoint.getArgs()));}public void showSuccessEndLog(JoinPoint joinPoint, Object res) {Signature signature = joinPoint.getSignature();System.out.println("SmartAnimalAspect-XML配置-切面类showSuccessEndLog()-方法执行正常结束-日志-方法名-" + signature.getName() + " 返回的结果是=" + res);}public void showExceptionLog(JoinPoint joinPoint, Throwable throwable) {Signature signature = joinPoint.getSignature();System.out.println("SmartAnimalAspect-XML配置-切面类showExceptionLog()-方法执行异常-日志-方法名-" + signature.getName() + " 异常信息=" + throwable);}public void showFinallyEndLog(JoinPoint joinPoint) {Signature signature = joinPoint.getSignature();System.out.println("SmartAnimalAspect-XML配置-切面类showFinallyEndLog()-方法最终执行完毕-日志-方法名-" + signature.getName());}
}
创建SmartDog注意没有注解
public class SmartDog implements SmartAnimalable {@Overridepublic float getSum(float i, float j) {float result = i + j;//result = 1 / 0; //模拟一个算术异常System.out.println("方法内部打印result = " + result);return result;}@Overridepublic float getSub(float i, float j) {float result = i - j;System.out.println("方法内部打印result = " + result);return result;}
}
xml配置
<?xml version="1.0" encoding="UTF-8"?>
<beans xmlns="http://www.springframework.org/schema/beans"xmlns:xsi="http://www.w3.org/2001/XMLSchema-instance"xmlns:context="http://www.springframework.org/schema/context"xmlns:aop="http://www.springframework.org/schema/aop"xsi:schemaLocation="http://www.springframework.org/schema/beans http://www.springframework.org/schema/beans/spring-beans.xsd http://www.springframework.org/schema/context https://www.springframework.org/schema/context/spring-context.xsd http://www.springframework.org/schema/aop https://www.springframework.org/schema/aop/spring-aop.xsd"><!--使用XML配置,完成AOP编程--><!--配置一个切面类对象-bean--><bean class="com.spring.aop.xml.SmartAnimalAspect" id="smartAnimalAspect"/><!--配置一个SmartDog对象-bean--><bean class="com.spring.aop.xml.SmartDog" id="smartDog"/><!--配置切面类, 细节一定要引入 xmlns:aop--><aop:config><!--配置切入点--><aop:pointcut id="myPointCut" expression="execution(public float com.spring.aop.xml.SmartDog.getSum(float, float)))"/><!--配置切面的前置,返回, 异常, 最终通知--><aop:aspect ref="smartAnimalAspect" order="10"><!--配置前置通知--><aop:before method="showBeginLog" pointcut-ref="myPointCut"/><!--返回通知--><aop:after-returning method="showSuccessEndLog" pointcut-ref="myPointCut" returning="res"/><!--异常通知--><aop:after-throwing method="showExceptionLog" pointcut-ref="myPointCut" throwing="throwable"/><!--最终通知--><aop:after method="showFinallyEndLog" pointcut-ref="myPointCut"/><!--配置环绕通知--><!--<aop:around method=""/>--></aop:aspect></aop:config>
</beans>
测试
public class AopAspectjXMLTest {@Testpublic void testAspectByXML() {ApplicationContext ioc = new ClassPathXmlApplicationContext("beans09.xml");SmartAnimalable smartAnimalable =ioc.getBean(SmartAnimalable.class);smartAnimalable.getSum(10, 2);}}
综合代码-示例
1. 请编写一个 Cal 接口
方法 cal1(int n) 计算 1+2..+n
方法 cal2(int n) 计算 1 * 2 * ... * n
2. 实现类 MyCal implements Cal
3. 请分别使用注解方式 / XML 配置方式 完成 AOP 编程
(1) 在执行 cal1 前打印开始执行的时间,在 执行完后打印时间
(2) 在执行 cal2 前打印开始执行的时间,在 执行完后打印
基于注解
创建Cal.java接口
public interface Cal {public int cal1(int n);public int cal2(int n);
}
创建MyCal.java
@Component //将Cal对象作为组件,注入到Spring容器
public class MyCal implements Cal {@Overridepublic int cal1(int n) {int res = 1;for (int i = 1; i <= n; i++) {res += i;}System.out.println("cal1 执行结果=" + res);return res;}@Overridepublic int cal2(int n) {int res = 1;for (int i = 1; i <= n; i++) {res *= i;}System.out.println("cal2 执行结果=" + res);return res;}
}
创建MyCalAOP类
@Aspect //MyCalAOP 是一个切面类
@Component //MyCalAOP/对象 作为组件注入到spring容器
public class MyCalAOP {//前置通知//这里注意,如果目标类和切面类,在同一个包,可以省略包名//因为cal1和cal2方法,都要去输出开始执行时间,因此使用MyCal.*@Before(value = "execution(public int MyCal.*(int))")public void calStart(JoinPoint joinPoint) {Signature signature = joinPoint.getSignature();System.out.println(signature.getName() + " 执行, 开始执行时间=" + System.currentTimeMillis());}//返回通知//这里注意,如果目标类和切面类,在同一个包,可以省略包名//因为cal1和cal2方法,都要去输出开始执行时间,因此使用MyCal.*@AfterReturning(value = "execution(public int MyCal.*(int))")public void calEnd(JoinPoint joinPoint) {Signature signature = joinPoint.getSignature();System.out.println(signature.getName() + " 执行, 结束时间=" + System.currentTimeMillis());}
}
xml配置
<?xml version="1.0" encoding="UTF-8"?>
<beans xmlns="http://www.springframework.org/schema/beans"xmlns:xsi="http://www.w3.org/2001/XMLSchema-instance"xmlns:context="http://www.springframework.org/schema/context"xmlns:aop="http://www.springframework.org/schema/aop"xsi:schemaLocation="http://www.springframework.org/schema/beans http://www.springframework.org/schema/beans/spring-beans.xsd http://www.springframework.org/schema/context https://www.springframework.org/schema/context/spring-context.xsd http://www.springframework.org/schema/aop https://www.springframework.org/schema/aop/spring-aop.xsd"><!--扫描指定包--><context:component-scanbase-package="com.spring.aop.homework"/><!--启用基于注解的AOP功能--><aop:aspectj-autoproxy/>
</beans>
创建测试类
public class TestMyCalAOP {@Testpublic void testMyCalByAnnotation() {//得到spring容器ApplicationContext ioc =new ClassPathXmlApplicationContext("beans10.xml");Cal cal = ioc.getBean(Cal.class);cal.cal1(10);System.out.println("===========");cal.cal2(5);}
}
基于xml配置
创建Cal.java接口
public interface Cal {public int cal1(int n);public int cal2(int n);
}
创建MyCal.java
public class MyCal implements Cal {@Overridepublic int cal1(int n) {int res = 1;for (int i = 1; i <= n; i++) {res += i;}System.out.println("cal1 执行结果=" + res);return res;}@Overridepublic int cal2(int n) {int res = 1;for (int i = 1; i <= n; i++) {res *= i;}System.out.println("cal2 执行结果=" + res);return res;}
}
创建MyCalAOP类
public class MyCalAOP {//前置通知public void calStart(JoinPoint joinPoint) {Signature signature = joinPoint.getSignature();System.out.println(signature.getName() + " 执行, 开始执行时间=" + System.currentTimeMillis());}//返回通知public void calEnd(JoinPoint joinPoint) {Signature signature = joinPoint.getSignature();System.out.println(signature.getName() + " 执行, 结束时间=" + System.currentTimeMillis());}
}
xml配置
<?xml version="1.0" encoding="UTF-8"?>
<beans xmlns="http://www.springframework.org/schema/beans"xmlns:xsi="http://www.w3.org/2001/XMLSchema-instance" xmlns:aop="http://www.springframework.org/schema/aop"xsi:schemaLocation="http://www.springframework.org/schema/beans http://www.springframework.org/schema/beans/spring-beans.xsd http://www.springframework.org/schema/aop https://www.springframework.org/schema/aop/spring-aop.xsd"><!--配置MyCalAOP-bean--><bean class="com.spring.aop.homework.xml.MyCalAOP" id="myCalAOP" /><!--配置MyCal-bean--><bean class="com.spring.aop.homework.xml.MyCal" id="myCal"/><!--配置切面类--><aop:config><!--配置切入点表达式--><aop:pointcut id="myPointCut" expression="execution(public int com.spring.aop.homework.xml.MyCal.*(int))"/><!--配置前置,返回--><aop:aspect ref="myCalAOP" order="10"><aop:before method="calStart" pointcut-ref="myPointCut"/><aop:after-returning method="calEnd" pointcut-ref="myPointCut"/></aop:aspect></aop:config>
</beans>
创建测试类
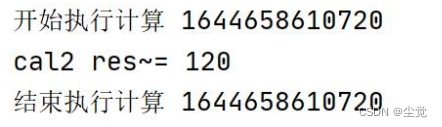
public class TestMyCalAOP {@Testpublic void testMyCalByAnnotation() {//得到spring容器ApplicationContext ioc =new ClassPathXmlApplicationContext("beans11.xml");Cal cal = ioc.getBean(Cal.class);cal.cal1(10);System.out.println("===========");cal.cal2(5);}
}相关文章
Packet Tracer - 静态路由故障排除
开源,点云处理及三维重建软件(Point Cloud Viewer, PCV)的设计与实现
Android 9.0 原生SystemUI下拉通知栏每条通知默认展开

【id:58】【20分】C. 复数运算(友元函数)
【Linux】入门介绍
如何理解自动化测试数据驱动与关键字驱动的区别?

JavaScript通过函数异常处理来输入圆的半径,输出圆的面积的代码

Soft-RoCE部署及通信测试
- Spring 源码解读:实现自定义注解处理器
- 植物病害识别系统Python+卷积神经网络算法+图像识别+人工智能项目+深度学习项目+计算机课设项目+Django网页界面
- 使用Maven创建一个Java项目并在repository中使用
- 如何用安卓玩Java版Minecraft,安卓手机安装我的世界Java版游戏的教程
- 网络质量劣化分析:保障业务连续性与网络优化的核心步骤
- git pull的merge和rebase模式