Spring基础学习

 已于 2022-10-05 17:48:24 修改
 阅读量405
 收藏
收藏


 点赞数
1
点赞数
1
目录
2.Spring的优势
3.了解程序的耦合
4.创建Bean工厂
5.ioc的概念和作用
6.spring的ioc的前期准备工作
7.Spring基于xml的IOC环境搭建和入门
ApplicationContext的三个常用实现类
BeanFactory的ApplicationContext的区别
8.创建Bean的三种方式
9.bean的作用范围的调整
10.bean对象的生命周期
11.Spring的依赖注入
1.第一种:使用构造函数提供
2.set方法的注入 -----------常用的方式
3.注解方式的注入
12.常见的IOC注解
13.配置类的创建
AnnotationConfigApplicationContext方法
@Import注解
@PropertySource
@Qualifier的另一种方式
14.Spring整合Junit
15.AOP的概念
1、AOP底层使用动态代理
AOP动态代理(JDK)
16.AOP的相关术语
1、连接点
2、切入点
3、通知(增强)
4.切面 --------是一个动作
17.AOP的操作
准备工作
切入点表达式
(1) 基于注解方式实现AspectJ
各种通知执行的效果
(2) 基于XML配置文件方式实现AspectJ
(3)完全注解开发开启AspectJ生成代理对象
18.JdbcTemplate概念和准备工作
19.JdbcTemplate操作数据库(单条)
1.添加功能
2.修改操作
3.删除操作
4.查询功能
20.JdbcTemplate操作数据库(批量)
1、批量操作:操作表里面多条记录
2、JdbcTemplate实现批量添加操作
编辑
21.事务
22.事务操作(搭建事务操作环境)
编辑
23.事务操作(Spring事务管理介绍)
24.事务操作(注解声明式事务管理)
25.事务操作(声明式事务管理参数配置)
编辑
26.声明式事务管理(XML方式)
27.事务操作(完全注解声明式事务管理)
1.Spring的基本概念
Spring是分层的Java SE/EE应用full-stack 轻量级开源框架,以IoC (Inverse Of Control:反转控制)和AOP (Aspect Oriented Programming)面向切面编程为内核.
2.Spring的优势
1.方便解耦,简便开发
2.AOP编程的支持
3.声明式事务的支持
4.方便程序的测试
5.方便集成各种框架
6.降低JAVA EE API的使用难度
3.了解程序的耦合
耦合:程序间的依赖关系---------包括:类之间的依赖,方法之间的依赖
解耦:降低程序间的依赖关系
实际开发中,应做到编译期不依赖,运行期才依赖.
简单的解耦示例

解耦的思路:
第一步:使用反射来创建对象,避免是用new对象
第二部:通过读取配置文件来获得要创建的对象的全限定类名
4.创建Bean工厂
Bean:在计算机英语中,有可重用组件的含义。
JavaBean:用java语言编写的可重用组件。javabean >实体类
它就是创建我们的service和dao对象的。
第一个:要一个配置文件来配置我们的service和dao
配置的内容:唯—标识=全限定类名(key=value)
第二个:通过读取配置文件中配置的内容,反射创建对象我的配置文件可以是xml也可以是properties
bean.properties
accountService=com.javastudy.service.AccountService
accountDao=com.javastudy.dao.AccountDao
BeanFactory
package com.javastudy.Servert;

import java.io.IOException;
import java.io.InputStream;
import java.util.Properties;

/**
 * @author Chooker
 * @create 2022-10-02 15:30
 */
public class BeanFactory {
   private static Properties pro;
//使用静态代码块为Properties对象赋值
 static {
    try {
        pro=new Properties();
        //获取Properties的流对象
        InputStream is = BeanFactory.class.getClassLoader().getResourceAsStream("bean.properties");
        pro.load(is);
    } catch (IOException e) {
        throw new ExceptionInInitializerError("pro初始化失败");
    }


}
//根据Bean名称获取Bean对象
 public static Object getBean(String beanName){
     Object bean = null;
     try {
         String beanPath = pro.getProperty(beanName);
         bean = Class.forName(beanPath);
     } catch (ClassNotFoundException e) {
         throw new RuntimeException(e);
     }
     return bean;

 }


        }
5.ioc的概念和作用
ioc:控制反转〈Inversion of Control,英文缩写为IoC),把创建对象的权利交给框架.是框架的重要特征,并非面向对象编程的专用术语。它包括依赖注入(Dependency lnjection,简称Dl)和依赖查找(Dependency Lookup)。

我的理解:原本new对象的模式,可以直接找到你需要的dao(拿dao举例),具有独立的自主控制权.现在通过beanfactory来获取想要的对象,至于获得哪个对象,使用配置文件里面所配置的全限定类名所决定的,dao这个类无法自主控制.
ioc的作用:削减计算机程序的耦合(解除我们代码中的依赖关系)。
6.spring的ioc的前期准备工作
1.导入依赖
    <dependency>
      <groupId>org.springframework</groupId>
      <artifactId>spring-context</artifactId>
      <version>5.2.5.RELEASE</version>
    </dependency>
spring的核心容器
bean.xml文件
<?xml version="1.0" encoding="UTF-8" ?>
<beans xmlns="http://www.springframework.org/schema/beans"
       xmlns:xsi="http://www.w3.org/2001/XMLSchema-instance"
       xsi:schemaLocation="http://www.springframework.org/schema/beans
       http://www.springframework.org/schema/beans/spring-beans.xsd">
<!--    把对象的创建交给spring来管理-->
    <bean id="accoutService" class="com.javastudy.service.AccountServiceImp"></bean>
    <bean id="accountDao" class="com.javastudy.dao.AccoutDaoImpl"></bean>
</beans>
7.Spring基于xml的IOC环境搭建和入门
    @Test
    public void test() {
        //1.获取核心容器对象
        ApplicationContext context = new ClassPathXmlApplicationContext("bean.xml");
        //2.根据Id获取bean对象
        AccountService service = context.getBean("accountService", AccountService.class);
        AccountDao dao = context.getBean("accountDao", AccountDao.class);
        System.out.println(service);
        System.out.println(dao);
    }
测试结果:com.javastudy.service.AccountServiceImp@7a187f14
com.javastudy.dao.AccoutDaoImpl@6f195bc3
从核心容器中拿到了dao和service对象
ApplicationContext的三个常用实现类
ClassPathXmLApplicationContext:它可以加载类路径下的配置文件,要求配置文件必须在类路径下。不在的话,加载不了
FileSystemXmLApplicationContext:它可以加载磁盘任意路径下的配置文件(必须有访间权限)
AnnotationConfigApplicationContext:它是用于读取注解创建容器的.
BeanFactory的ApplicationContext的区别
核心容器的两个接口引发出的问题;
ApplicationContext: 单例对象适用 实际开发中多采用
它在构建核心容器时,创建对象采取的策略是采用立即加载的方式。也就是说,只要一读取完配置文件马上就创建配置文件中配置的对象。
BeanFactory : 多例对象适用
它在构建核心容器时,创建对象采取的策略是采用延迟加载的方式。也就是说,什么时候根据id获取对象了,什么时候才真正的创建对象。
8.创建Bean的三种方式
创建Bean的三种方式
第一种方式:使用默认构造函数创建。
在spring的配置文件中使用bean标签,配以id和class属性之后,且没有其他属性和标签时。采用的就是默认构造函数创建bean对象,此时如果类中没有默认构造函数,则对象无法创建。
<bean id="accountService" class="com.javastudy.service.AccountServiceImp"></bean>
    public AccountServiceImp() {
        System.out.println("AccountServiceImp对象创建");
    }
此时bean标签就是寻找无参构造器构建的accountService对象.
第二种方式:使用普通工厂中的方法创建对象(使用某个类中的方法创建对象,并存入spring容器)

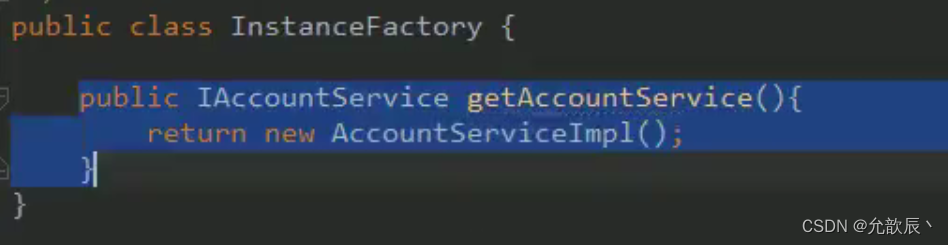
理解是:先创建工厂对象instanceFactory,然后通过里面的getAccoutService方法,获得想要的AccountService对象
第三种方式:使用工厂中的静态方法创建对象(使用某个类中的静态方法创建对象,并存入spring容器)


9.bean的作用范围的调整
bean标签的scope属性:
作用:用于指定bean的作用范围取值:常用的就是单例的和多例的
singleton:单例的(默认值)prototype:多例的
request:作用于web应用的请求范围
session:作用于web应用的会话范围
global-session:作用于集群环境的会话范围(全局会话范围),当不是集群环境时,它就是session
10.bean对象的生命周期
单例对象
出生:当容器创建时对象出生
活着:只要容器还在,对象一直活着
死亡:容器销毁,对象消亡
总结:单例对象的生命周期和容器相同
多例对象
出生:当我们使用对象时spring框架为我们创建
活着:对象只要是在使用过程中就一直活着。
死亡:当对象长时间不用,且没有别的对象引用时,由Java的垃圾回收器回收
11.Spring的依赖注入
依赖注入:
Dependency InjectionI
IOC的作用:
降低程序间的耦合(依赖关系)依赖关系的管理):
以后都交给spring来维护
在当前类需要用到其他类的对象,由spring为我们提供,我们只需要在配置文件中说明依赖关系的维护:
就称之为依赖注入。
依赖注入:
能注入的数据:有三类
基本类型和string
其他bean类型(在配置文件中或者注解配置过的bean)
复杂类型/集合类型
注入的方式:有三种
第一种:使用构造函数提供
第二种:使用set方法提供
第三种:使用注解提供
1.第一种:使用构造函数提供
构造函数注入:
使用的标签:constructor-arg
标签出现的位置: bean标签的内部标签中的属性
type:用于指定要注入的数据的数据类型,该数据类型也是构造函数中某个或某些参数的类型
index:用于指定要注入的数据给构造函数中指定索引位置的参数赋值。索引的位置是从0开始
name:用于指定给构造函数中指定名称的参数赋值 ---------最常用
value:用于提供基本类型和String类型的数据
ref:用于指定其他的bean类型数据。它指的就是在spring的Ioc核心容器中出现过的bean对象
以下为示例
    <bean id="accountService" class="com.javastudy.service.AccountServiceImp">
        <constructor-arg name="name" value="张选宁"></constructor-arg>
        <constructor-arg name="age" value="18"></constructor-arg>
        <constructor-arg name="birthday" ref="birthday"></constructor-arg>
    </bean>
    <bean id="birthday" class="java.util.Date">

    </bean>
优势:
在获取bean对象时,注入数据是必须的操作,否则对象无法创建成功。
弊端:
改变了bean对象的实例化方式,使我们在创建对象时,如果用不到这些数据,也必须提供。
2.set方法的注入 -----------常用的方式
涉及的标签:property
出现的位置:bean 标签的内部标签的属性
name:用于指定注入时所调用的set方法名称
value:用于提供基本类型和String类型的数据
ref:用于指定其他的bean类型数据。它指的就是在spring的Ioc核心容器中出现过的bean对象
优势:
创建对象时没有明确的限制,可以直接使用默认构造函数
弊端:
如果有某个成员必须有值,则获取对象是有可能set方法没有执行。
复杂类型/集合类型的注入
bean id="accountService2" class="com.javastudy.service.AccountServiceImpl2">
        <property name="strs">
            <array>
                <value>AAA</value>
                <value>bbb</value>
                <value>ccc</value>
            </array>
        </property>

        <property name="lists">
            <list>
                <value>AAA</value>
                <value>bbb</value>
                <value>ccc</value>
            </list>

        </property>

        <property name="sets">
            <set>
                <value>AAA</value>
                <value>bbb</value>
                <value>ccc</value>
            </set>
        </property>

        <property name="maps">
            <map>
                <entry key="zxn" value="2b"></entry>
                <entry key="ljl" value="2b"></entry>
                <entry key="xcl" value="2b"></entry>
            </map>
        </property>

        <property name="properties">
           <props>
               <prop key="222">333</prop>
               <prop key="25432">453</prop>
               <prop key="222">333</prop>
               <prop key="222">333</prop>
           </props>
        </property>
    </bean>
3.注解方式的注入
12.常见的IOC注解
用于创建对象的
他们的作用就和在XML配置文件中编写一个<bean>标签实现的功能是一样的
@Component 作用:将当前类对象存入spring容器中
属性:value相当于id(默认为当前类名,首字母小写)
@Component(value = "accountService")
public class AccountServiceImpl implements AccountService{
    @Override
    public void saveAccount() {
        System.out.println("保存用户成功");
    }
}
<?xml version="1.0" encoding="UTF-8"?>
<beans xmlns="http://www.springframework.org/schema/beans"
       xmlns:xsi="http://www.w3.org/2001/XMLSchema-instance"
       xmlns:context="http://www.springframework.org/schema/context"
       xsi:schemaLocation="http://www.springframework.org/schema/beans
        https://www.springframework.org/schema/beans/spring-beans.xsd
        http://www.springframework.org/schema/context
        https://www.springframework.org/schema/context/spring-context.xsd">
<!--告诉Spring在创建容器时需要所扫描的包,配置所需要的标签不是在beans的约束中,而是一个名称为context的空间和约束中-->
          <context:component-scan base-package="com.javastudy"></context:component-scan>
</beans>
@Controller :一般用于表现层
@Service :一般用于业务层
@Repository:一般用在持久层
以上三个注解他们的作用和属性与Component是一模一样。
他们三个是spring框架为我们提供明确的三层使用的注解,使我们的三层对象更加清晰
用于注入数据的
他们的作用就和在xml配置文件中的bean标签中写一个<property>标签的作用是一样的
@Autowired 作用:自动按照类型注入,只要容器中有唯一的一个bean对象类型和要注入的变量类型匹配,就可以注入成功
如果IOC容器中没有任何bean的类型和要注入的变量类型匹配,则报错。
如果工IOC容器中有多个类型匹配时:
出现位置:可以是变量上,也可以是方法上
细节:在使用注解注入时,set方法就不是必须的了。
@Qualifier:
作用:在按照类中注入的基础之上再按照名称注入。它在给类成员注入时不能单独使用。但是在给方法参数注入时可以(必须和@Autowired一起使用)
属性:value:用于指定注入bean的id.
@Resource
作用:直接按照bean的id注入。它可以独立使用
属性:name:用于指定bean的Id
以上三个注解都只能注入其他bean类型的数据,而基本类型和string类型无法使用上述注解实现。另外,集合类型的注入只能通过XML来实现。
@Value
作用:用于注入基本类型和String类型的数据属性:
value:用于指定数据的值。它可以使用spring中spEL(也就是spring的eL表达式)
spEL的写法:${表达式}
用于改变作用范围的
他们的作用就和在bean标签中使用scope性实现的功能是一样的
@Scope
作用:用于指定bean的作用范围属性:
value:指定范围的取值。常用取值:singleton prototype
和生命周期相关 了解 (与xml类似)
他们的作用就和在bean标签中使用init-method和destroy-methode的作用是一样的
PreDestroy
作用:用于指定销毁方法
PostConstruct
作用:用于指定初始化方法
13.配置类的创建
@Configuration
作用:指定当前类是一个配置类
@ComponentScan
作用:用于通过注解指定spring在创建容器时要扫描的包
属性:
value:它和basePackages的作用是一样的,都是用于指定创建容器时要扫描的包。
我们使用此注解就等同于在xmL中配置了
<context:component-scan base-package="com.javastudy"></context:component-scan>@Bean注解
Bean
作用:用于把当前方法的返回值作为bean对象存入spring的ioc容器中属性:
name:用于指定bean的id。当不写时,默认值是当前方法的名称
  @Bean(name="runner")
    public QueryRunner getQueryRunner(DataSource dataSource){
        return  new QueryRunner(dataSource);
    }
相当于
  <!--    配置queryRunner对象-->
    <bean id="runner" class="org.apache.commons.dbutils.QueryRunner" scope="prototype">
        <!--        注入数据源-->
        <constructor-arg name="ds" ref="dataSource"></constructor-arg>
    </bean>
@Bean(name="dateSource")
public DataSource getDataSource(){
ComboPooledDataSource dateSource = null;
try {
dateSource = new ComboPooledDataSource();
dateSource.setDriverClass("com.mysql.cj.jdbc.Driver");
dateSource.setJdbcUrl("jdbc:mysql://localhost:3306/eesy?characterEncoding=utf8&useUnicode=true&useSSL=false&serverTimezone=UTC");
dateSource.setUser("root");
dateSource.setPassword("woaini520");
} catch (PropertyVetoException e) {
throw new RuntimeException(e);
}
return dateSource;
}相当于
<!-- 配置数据源-->
<bean id="dataSource" class="com.mchange.v2.c3p0.ComboPooledDataSource">
<!-- 连接数据库的必备信息-->
<property name="driverClass" value="com.mysql.cj.jdbc.Driver"></property>
<property name="jdbcUrl" value="jdbc:mysql://localhost:3306/eesy?characterEncoding=utf8&useUnicode=true&useSSL=false&serverTimezone=UTC"></property>
<property name="user" value="root"></property>
<property name="password" value="woaini520"></property>
</bean>AnnotationConfigApplicationContext方法
 @Test
    public void testFindAll(){
//        ApplicationContext context = new ClassPathXmlApplicationContext("bean.xml");
       ApplicationContext context = new AnnotationConfigApplicationContext(SpringConfiguration.class);
        AccountService service = context.getBean("accountService", AccountService.class);
        List<Account> allAccount = service.findAllAccount();
        for (Account account : allAccount) {
            System.out.println(account);
        }

    }
@Import注解
作用:用于导入其他的配置类属性:
value:用于指定其他配置类的字节码。
当我们使用工mport的注解之后,有Import注解的类就父配置类,而导入的都是子配置类
@PropertySource
@Configuration
@ComponentScan(basePackages = "com.javastudy")
@PropertySource("jdbcConfig.properties")
public class SpringConfiguration {
    @Value("${jdbc.driverClass}")
    private String driverClass;
    @Value("${jdbc.url}")
    private String url;
    @Value("${jdbc.user}")
    private String user;
    @Value("${jdbc.password}")
    private String password;
@Qualifier的另一种方式

14.Spring整合Junit
为什么要整合Junit
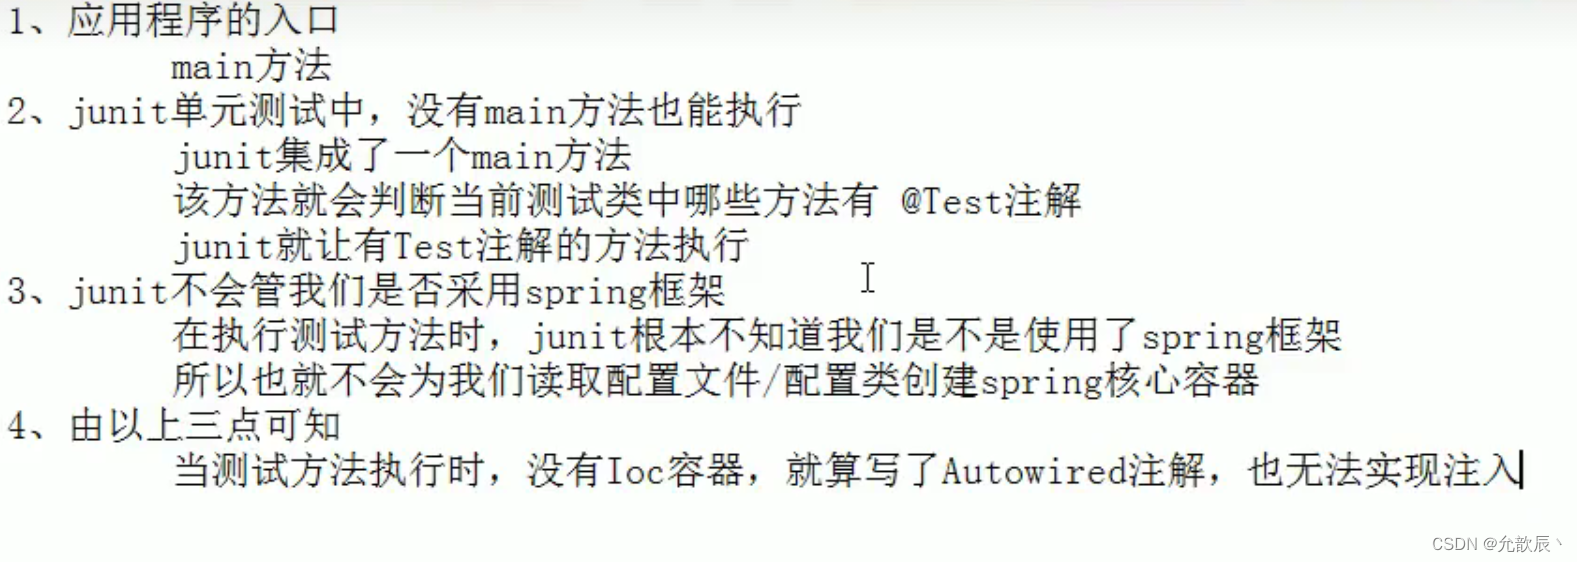
因此使用@Autowire注解时,无法导入Spring容器中的bean
解决的方法
1.导入spring整合的junit坐标
    <dependency>
      <groupId>org.springframework</groupId>
      <artifactId>spring-test</artifactId>
      <version>5.3.22</version>
    </dependency>
注意:一定要与Spring其他jar包的版本一致,否则会报错
2.使用Junit提供的一个注解把原有的main方法替换了,替换成spring提供的
@Runwith
@RunWith(SpringJUnit4ClassRunner.class)3、告知spring的运行器,spring和IOC创建是基于xmL还是注解的,并且说明位置
@ContextConfiguration
locations:指定xmL文件的位置,加上classpath关键字,表示在类路径下
@ContextConfiguration(locations = "classpath:bean.xml")classes:指定注解类所在地位置
@ContextConfiguration(classes = SpringConfiguration.class)注意:当我们使用spring 5.x版本的时候,要求junit的jar必须是4.12及以上
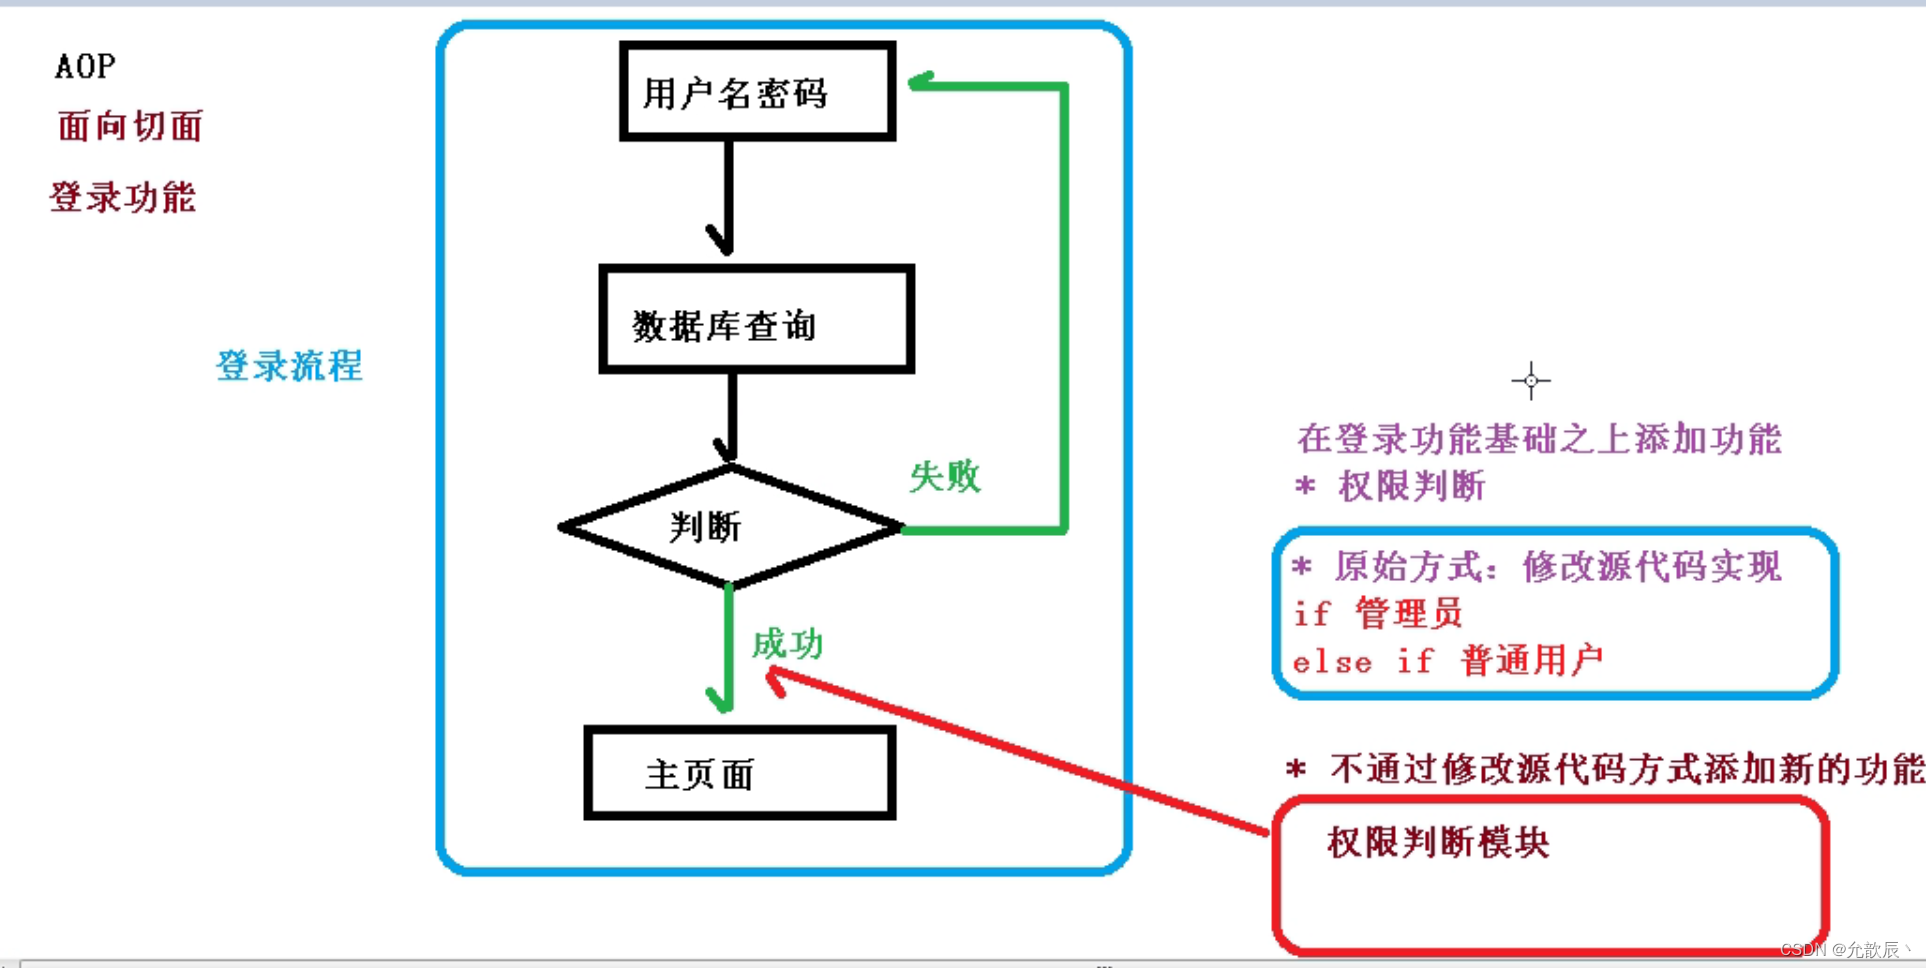
15.AOP的概念
(1)面向切面编程(方面),利用AOP可以对业务逻辑的各个部分进行隔离,从而使得业务逻辑各部分之间的耦合度降低,提高程序的可重用性,同时提高了开发的效率。
通俗理解:不通过修改源代码,来增加新功能
1、AOP底层使用动态代理
(1)有两种情况动态代理
第一种有接口情况,使用JDK动态代理
创建接口实现类代理对象,增强类的方法

第二种没有接口情况,使用CGLIB动态代理
创建子类的代理对象,增强类的方法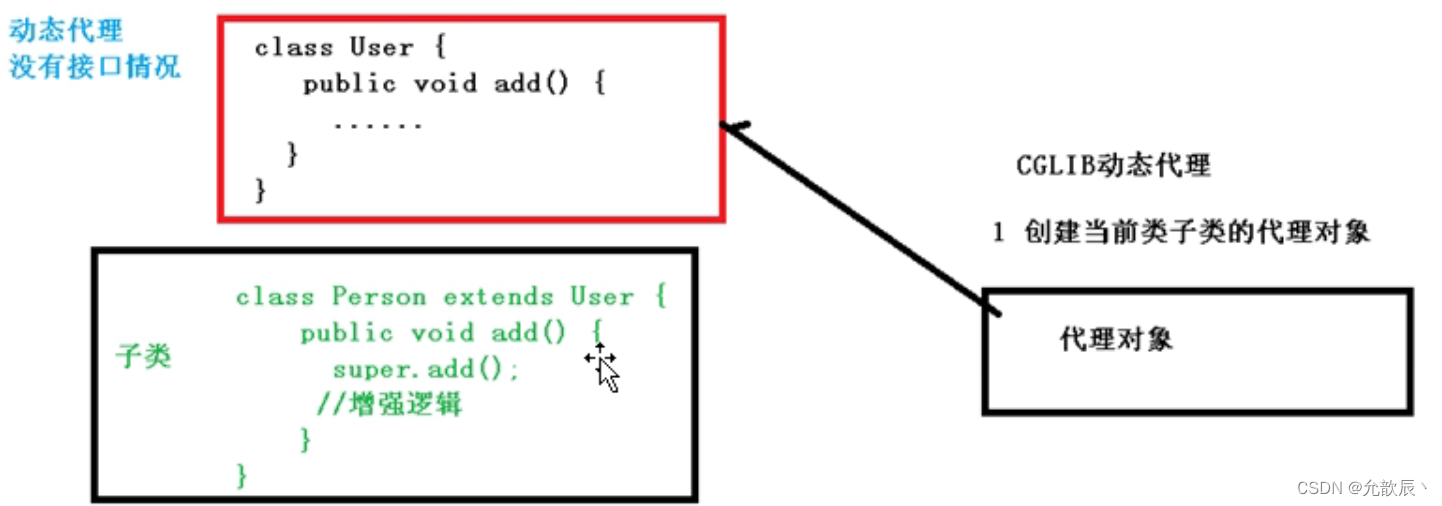
AOP动态代理(JDK)
1、使用JDK动态代理,使用Proxy类里面的方法创建代理对象
2.编写代码
(1)创建接口,定义方法
public interface UserDao {
    int add(int a,int b);
}
(2)创建接口实现类,实现方法
public class UserDaoImpl implements UserDao{
    @Override
    public int add(int a, int b) {
        return a+b;
    }
}
(3)使用Proxy 类创建接口代理对象
public class JDKProxy {
    public static void main(String[] args) {
        UserDaoImpl userDao = new UserDaoImpl();
        //创建接口实现类对象
        UserDao dao = (UserDao)Proxy.newProxyInstance(JDKProxy.class.getClassLoader(), userDao.getClass().getInterfaces(), new UserProxy(userDao));
        int add = dao.add(1, 2);
        System.out.println(add);
    }


}
public class UserProxy implements InvocationHandler {
    UserDao dao;
    public UserProxy(UserDao dao){
        this.dao=dao;
    }

    @Override
    public Object invoke(Object proxy, Method method, Object[] args) throws Throwable {
        //在方法之前执行
        System.out.println("方法之前执行"+method.getName()+"参数是"+ Arrays.toString(args));
        //执行此方法
        Object invoke = method.invoke(dao, args);

        //在方法之后执行
        System.out.println("方法之后执行"+dao);
        return invoke;
    }
}
16.AOP的相关术语
1、连接点
类里面哪些方法可以被增强,这些方法称为连接点
2、切入点
实际被真正增强的方法,称为切入点
3、通知(增强)
(1)实际增强的逻辑部分称为通知(增强)
(2)通知有多钟类型
--前置通知
--后置通知
--环绕通知
--异常通知
--最终通知
4.切面 --------是一个动作
把通知应用到切入点的过程
17.AOP的操作
1、Spring框架一般都是基于Asp.ect.实现AOP操作
(1)什么是Aspect:
*Aspect].不是Spring组成部分,独立AOP框架,一般把Aspect].和Spimg,框架一起使用,进行AOP操作v
2、基于Aspect]实现AOP操作
(1)基于xml配置文件实现
(2)基于注解方式实现(使用)
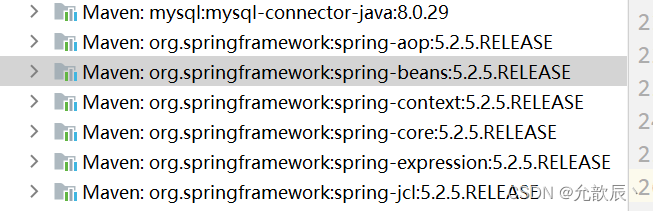
准备工作
导入依赖
  <dependencies>
<!--AspectJ-->
    <dependency>
      <groupId>aopalliance</groupId>
      <artifactId>aopalliance</artifactId>
      <version>1.0</version>
    </dependency>
    <dependency>
      <groupId>org.aspectj</groupId>
      <artifactId>aspectjweaver</artifactId>
      <version>1.8.13</version>
    </dependency>
    <dependency>
      <groupId>org.springframework</groupId>
      <artifactId>spring-aspects</artifactId>
      <version>5.0.8.RELEASE</version>
    </dependency>
    <dependency>
      <groupId>org.springframework</groupId>
      <artifactId>spring-aop</artifactId>
      <version>5.0.8.RELEASE</version>
    </dependency>


<!--Mysql-->
    <dependency>
      <groupId>mysql</groupId>
      <artifactId>mysql-connector-java</artifactId>
      <version>8.0.29</version>
    </dependency>
<!--spring-->
    <dependency>
      <groupId>org.springframework</groupId>
      <artifactId>spring-context</artifactId>
      <version>5.0.2.RELEASE</version>
    </dependency>

      <dependency>
      <groupId>org.springframework</groupId>
      <artifactId>spring-core</artifactId>
      <version>5.0.8.RELEASE</version>
      </dependency>

      <dependency>
          <groupId>org.springframework</groupId>
          <artifactId>spring-beans</artifactId>
          <version>5.0.8.RELEASE</version>
      </dependency>

      <dependency>
          <groupId>org.springframework</groupId>
          <artifactId>spring-context-support</artifactId>
          <version>5.0.8.RELEASE</version>
      </dependency>


<!--    springTest-->
    <dependency>
      <groupId>junit</groupId>
      <artifactId>junit</artifactId>
      <version>4.13</version>
      <scope>compile</scope>
    </dependency>
    <dependency>
      <groupId>org.springframework</groupId>
      <artifactId>spring-test</artifactId>
      <version>5.0.2.RELEASE</version>
    </dependency>
<!--DBTUILS-->
    <dependency>
      <groupId>commons-dbutils</groupId>
      <artifactId>commons-dbutils</artifactId>
      <version>1.6</version>
    </dependency>
<!--C3P0-->
    <dependency>
      <groupId>c3p0</groupId>
      <artifactId>c3p0</artifactId>
      <version>0.9.1.2</version>
    </dependency>


  </dependencies>
切入点表达式
(1)切入点表达式作用:知道对哪个类里面的哪个方法进行增强
(2)语法结构:
execution([权限修饰符][返回类型][类全路径][方法名称]([参数列表]))
举例1:对com.atguigu.dao.BookDao类里面的add进行增强
execution(* com.atguiqu.da0.BookDao.add(..))
举例2:对com.atguigu.dao.BookDao类里面的所有的方法进行增强
execution(* com.atguigu.dao.BookDao.*(..))
举例3:对com.atguigu.dao包里面所有类,类里面所有方法进行增强
execution(* com.atguigu.dao.*.*(..))
(1) 基于注解方式实现AspectJ
1.创建类和方法
public class User {
    public void add(){
        System.out.println("add方法正在执行");
    }
}
2.创建增强类(编写增强逻辑)
在增强类里面,创建方法,让不同方法代表不同通知类型
public class UserProxy {
    //前置通知
    public void before(){
        System.out.println("before方法执行");
    }
}
3.进行通知的配置
(1)在spring配置文件中,开启注解扫描
<?xml version="1.0" encoding="UTF-8"?>
<beans xmlns="http://www.springframework.org/schema/beans"
       xmlns:xsi="http://www.w3.org/2001/XMLSchema-instance"
       xmlns:context="http://www.springframework.org/schema/context"
       xsi:schemaLocation="http://www.springframework.org/schema/beans
        https://www.springframework.org/schema/beans/spring-beans.xsd
        http://www.springframework.org/schema/context
        https://www.springframework.org/schema/context/spring-context.xsd">
    <!--告诉Spring在创建容器时需要所扫描的包,配置所需要的标签不是在beans的约束中,而是一个名称为context的空间和约束中-->
    <context:component-scan base-package="com.javastudy"></context:component-scan>
</beans>
(2)使用注解创建User和 UserProxy对象
(3)在增强类上面添加注解@Aspect
@Repository
public class User {
    public void add(){
        System.out.println("add方法正在执行");
    }
}
@Component
@Aspect
public class UserProxy {
//前置通知
public void before(){
System.out.println("before方法执行");
}
}
(4)在spring配置文件中开启生成代理对象
<!--    开启AspectJ生成代理对象-->
    <aop:aspectj-autoproxy></aop:aspectj-autoproxy>
4.配置不同类型的通知
@Component
@Aspect
public class UserProxy {
    //前置通知
    @Before("execution(* com.javastudy.dao.User.add(..))")
    public void before(){
        System.out.println("before方法执行");
    }
}
各种通知执行的效果
@Component
@Aspect
public class UserProxy {
    //前置通知
    @Before("execution(* com.javastudy.dao.User.add(..))")
    public void before(){
        System.out.println("before方法执行");
    }
    //后置通知
    @After("execution(* com.javastudy.dao.User.add(..))")
    public void after(){
        System.out.println("after方法执行");
    }
    //最终通知
    @AfterReturning("execution(* com.javastudy.dao.User.add(..))")
    public void afterReturning(){
        System.out.println("afterReturning方法执行");
    }
    //异常通知
    @AfterThrowing("execution(* com.javastudy.dao.User.add(..))")
    public void afterThrowing(){
        System.out.println("AfterThrowing方法执行");
    }
    //环绕通知
    @Around("execution(* com.javastudy.dao.User.add(..))")
    public void around(ProceedingJoinPoint proceedingJoinPoint) throws Throwable {
        System.out.println("around之前方法执行");
        //被执行方法执行
        proceedingJoinPoint.proceed();
        System.out.println("around之后方法执行");

    }
}
正常执行的结果:
around之前方法执行
before方法执行
add方法正在执行
around之后方法执行
after方法执行
afterReturning方法执行
出现异常的执行结果:
around之前方法执行
before方法执行
after方法执行
AfterThrowing方法执行
5.相同的切入点的抽取
   @Pointcut(value = "execution(* com.javastudy.dao.User.add(..))")
    public void pointDemo(){

    }

    //前置通知
    @Before("pointDemo()")
    public void before(){
        System.out.println("before方法执行");
    }
6.有多个增强类多同一个方法进行增强,设置增强类优先级
在增强类上面添加注解@Order(数字类型值),数字类型值越小优先级越高
@Component
@Aspect
@Order(2)
public class PersonProxy {
}
@Component
@Aspect
@Order(1)
public class UserProxy {
}
beforeUser方法执行
beforePerson方法执行
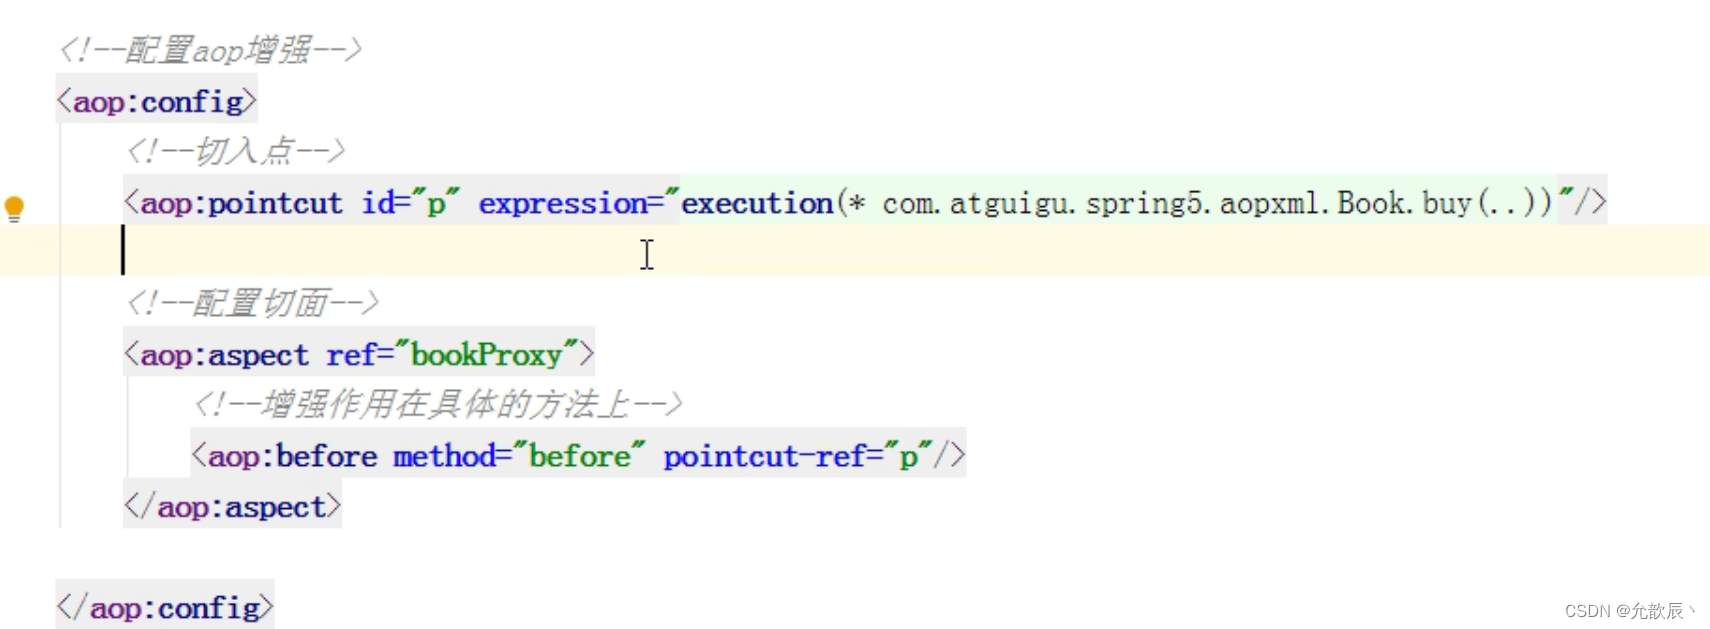
(2) 基于XML配置文件方式实现AspectJ
1、创建两个类,增强类和被增强类,创建方法
同上.....
2、在spring配置文件中创建两个类对象

3、在spring配置文件中配置切入点
(3)完全注解开发开启AspectJ生成代理对象
@EnableAspectJAutoProxy
public class SpringConfiguration {
}
来代替
<aop:aspectj-autoproxy></aop:aspectj-autoproxy>18.JdbcTemplate概念和准备工作
1.Spring框架对JDBC进行封装,使用JdbcTemplate方便实现对数据库操作
2.准备工作
导入相关依赖
    <dependency>
      <groupId>org.springframework</groupId>
      <artifactId>spring-jdbc</artifactId>
      <version>5.3.22</version>
    </dependency>

    <dependency>
      <groupId>org.springframework</groupId>
      <artifactId>spring-core</artifactId>
      <version>5.0.8.RELEASE</version>
    </dependency>

    <dependency>
      <groupId>org.springframework</groupId>
      <artifactId>spring-beans</artifactId>
      <version>5.0.8.RELEASE</version>
    </dependency>

    <!--Mysql-->
    <dependency>
      <groupId>mysql</groupId>
      <artifactId>mysql-connector-java</artifactId>
      <version>8.0.29</version>
    </dependency>
<!--    druid-->
    <dependency>
      <groupId>com.alibaba</groupId>
      <artifactId>druid</artifactId>
      <version>1.1.12</version>
    </dependency>
3.在spring配置文件配置数据库连接池
<!-- 数据库连接池 -->
<bean id="dataSource" class="com.alibaba.druid.pool.DruidDataSource" destroy-method="close">
<property name="driverClassName" value="com.mysql.cj.jdbc.Driver"/>
<property name="url" value="jdbc:mysql://localhost:3306/user_db?characterEncoding=utf8&useUnicode=true&useSSL=false&serverTimezone=UTC"/>
<property name="username" value="root"/>
<property name="password" value="woaini520"/>
</bean>4.注入JdbcTemplate对象
<!--注入JdbcTemplate对象-->
    <bean id="jdbcTemplate" class="org.springframework.jdbc.core.JdbcTemplate">
        <property name="dataSource" ref="dataSource"/>
    </bean>
5.创建service类,创建dao类,在dao注入jdbcTemplate对象
public class UserDaoImpl implements UserDao{
    @Autowired
    JdbcTemplate jdbcTemplate;
}
19.JdbcTemplate操作数据库(单条)
1.添加功能
dao层(省略userdao)
@Repository
public class UserDaoImpl implements UserDao{
    @Autowired
    JdbcTemplate jdbcTemplate;

    @Override
    public List<User> findAll() {
        return null;
    }

    @Override
    public void addUser(User user) {
        jdbcTemplate.update("insert into user(username,birthday,sex,address) values(?,?,?,?)",user.getUsername(),user.getBirthday(),
        user.getSex(),user.getAddress());

    }
}
service层(省略userSerive)
@Service
public class UserServiceImpl implements UserService{
    @Autowired
    UserDao dao;

    @Override
    public void addUser(User user) {
        dao.addUser(user);
    }
}
test层
    @Test
    public void testaddOne(){
        User user = new User(0, "薛程朗", new Date(System.currentTimeMillis()), "男", "三峡市");
         service.addUser(user);


    }
结果
![]()
2.修改操作
dao层
   @Override
    public void updateUser(User user) {
        jdbcTemplate.update("update user set username=?,birthday=?,sex=?,address=? where id=?",
        user.getUsername(),user.getBirthday(),user.getSex(),user.getAddress(),user.getId());

    }
service层(省略)
test层
 @Test
    public void testUpdateOne(){
        User user = new User(49, "刘健磊", new Date(System.currentTimeMillis()), "男", "三峡市");
        service.updateUser(user);


    }
结果
![]()
3.删除操作
dao层
  @Override
    public void deleteUserById(Integer id) {
        jdbcTemplate.update("delete from user where id=?",id);

    }
service层(省略)
test层
   @Test
    public void testDeleteUser(){
     service.deleteUser(48);

    }
结果

4.查询功能
1.查询返回某个值

有两个参数
第一个参数: sql语句
第二个参数:返回类型Class
dao层
 @Override
    public int findCount() {
        return jdbcTemplate.queryForObject("select count(*) from user",Integer.class);
    }
service层(省略)
test层
   @Test
    public void testFindCount(){
        int count = service.findCount();
        System.out.println("总共有"+count+"条数据");

    }
结果

2.查询返回某个对象

有三个参数
*第一个参数: sql语句
*第二个参数:RowMappex,是接口,返回不同类型数据,使用这个接口里面实现类完成数据封装
*第三个参数:sql语句值
dao层
    @Override
    public User findUserById(Integer id) {
        return jdbcTemplate.queryForObject("select * from user where id=?",new BeanPropertyRowMapper<User>(User.class),
                id);
    }
service层(省略)
test层
 @Test
    public void testFindOne(){
        User one = service.findOne(49);
        System.out.println(one);

    }
结果

3.查询返回集合

有三个参数
第一个参数:sql语句
第二个参数:RowMapper是接口,针对返回不同类型数据,使用这个接口里面实现类完成数据封装
第三个参数: sal.语句值
dao层
  @Override
    public void addUser(User user) {
        jdbcTemplate.update("insert into user(username,birthday,sex,address) values(?,?,?,?)",user.getUsername(),user.getBirthday(),
        user.getSex(),user.getAddress());

    }
service层(省略)
test层
  @Test
    public void testFindAll(){
        List<User> all = service.findAll();
        for (User user : all) {
            System.out.println(user);
        }

    }
结果

20.JdbcTemplate操作数据库(批量)
1、批量操作:操作表里面多条记录
2、JdbcTemplate实现批量添加操作

有两个参数
第一个参数:sql语句
第二个参数: List集合,添加多条记录数据
dao层
 @Override
    public void batchAdd(List<Object[]> objects) {
        int[] ints = jdbcTemplate.batchUpdate("insert into user(username,birthday,sex,address) values(?,?,?,?)",
                objects);
        System.out.println(Arrays.toString(ints));
    }
service层(省略)
test层
    @Test
    public void testBatchAdd(){
        List<Object[]> objects = new ArrayList<>();
        Object[] o1={"刘子","2018-03-07 17:37:26","男","西安"};
        Object[] o2={"薛子","2018-03-07 17:37:26","男","西安"};
        Object[] o3={"张子","2018-03-07 17:37:26","男","西安"};
        objects.add(o1);
        objects.add(o2);
        objects.add(o3);
        service.batchAdd(objects);

    }
结果


3、JdbcTemplate实现批量修改操作
dao
 @Override
    public void batchUpdate(List<Object[]> objects) {
        int[] ints = jdbcTemplate.batchUpdate("update user set username=?,birthday=?,sex=?,address=? where id=?", objects);
        System.out.println(Arrays.toString(ints));
    }
service层(省略)
test层
 @Test
    public void testBatchUpdate(){
        List<Object[]> objects = new ArrayList<>();
        Object[] o1={"刘子","2019-03-07 17:37:26","男","西安",50};
        Object[] o2={"薛子","2019-04-07 17:37:26","男","西安",51};
        Object[] o3={"张子","2019-05-07 17:37:26","男","西安",52};
        objects.add(o1);
        objects.add(o2);
        objects.add(o3);
        service.batchUpdate(objects);

    }
结果


4、JdbcTemplate实现批量删除操作
dao
    @Override
    public void batchDelete(List<Object[]> objects) {
        int[] ints = jdbcTemplate.batchUpdate("delete from user where id=?", objects);
        System.out.println(Arrays.toString(ints));
    }
service层(省略)
test层
    @Test
    public void testBatchDelete(){
        List<Object[]> objects = new ArrayList<>();
        Object[] o1={50};
        Object[] o2={51};
        objects.add(o1);
        objects.add(o2);
        service.batchDelete(objects);

    }
结果


21.事务
(1)事务是数据库操作最基本单元,逻辑上一组操作,要么都成功,如果有一个失败所有操作都失败
2、事务四个特性(ACID)
(1)原子性:atomicity 事务,一组操作,要么成功,一个失败都失败
(2)一致性:consistency 总量不变,如转账钱的总数
(3)隔离性:isolation 多事务操作,不会产生影响
(4)持久性:durability 事务提交之后,数据就会发生变化
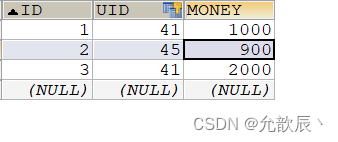
22.事务操作(搭建事务操作环境)

dao
@Repository
public class AccountDaoImpl implements AccountDao{
    @Autowired
    JdbcTemplate jdbcTemplate;

    @Override
    public void addMoney() {
        String sql="update user set money=money+? where id=?";
        jdbcTemplate.update(sql,100,1);

    }

    @Override
    public void reduceMoney() {
        String sql="update user set money=money-? where id=?";
        jdbcTemplate.update(sql,100,2);

    }
}
service
@Service
public class AccountServiceImpl implements AccountService{
    @Autowired
    AccountDao accountDao;

    @Override
    public void transfer() {
        accountDao.reduceMoney();

        accountDao.addMoney();
    }
}
test类
@RunWith(SpringJUnit4ClassRunner.class)
@ContextConfiguration(locations = "classpath:bean.xml")
public class AccountTest {
    @Autowired
    AccountService service;

    @Test
    public void testTransfer(){
        service.transfer();


    }
}
结果

异常模拟
@Service
public class AccountServiceImpl implements AccountService{
    @Autowired
    AccountDao accountDao;

    @Override
    public void transfer() {
        accountDao.reduceMoney();
        int i=10/0;

        accountDao.addMoney();
    }
}
结果
23.事务操作(Spring事务管理介绍)
1、事务添加到JavaE三层结构里面Service层(业务逻辑层)
2、在 Spring进行事务管理操作
(1)有两种方式:编程式事务管理和声明式事务管理(使用)
3、声明式事务管理
(1)基于注解方式
(2)基于xml配置文件方式
4、在 Spring进行声明式事务管理,底层使用AOP
5、Spring事务管理API
(1)提供一个接口,代表事务管理器,这个接口针对不同的框架提供不同的实现类.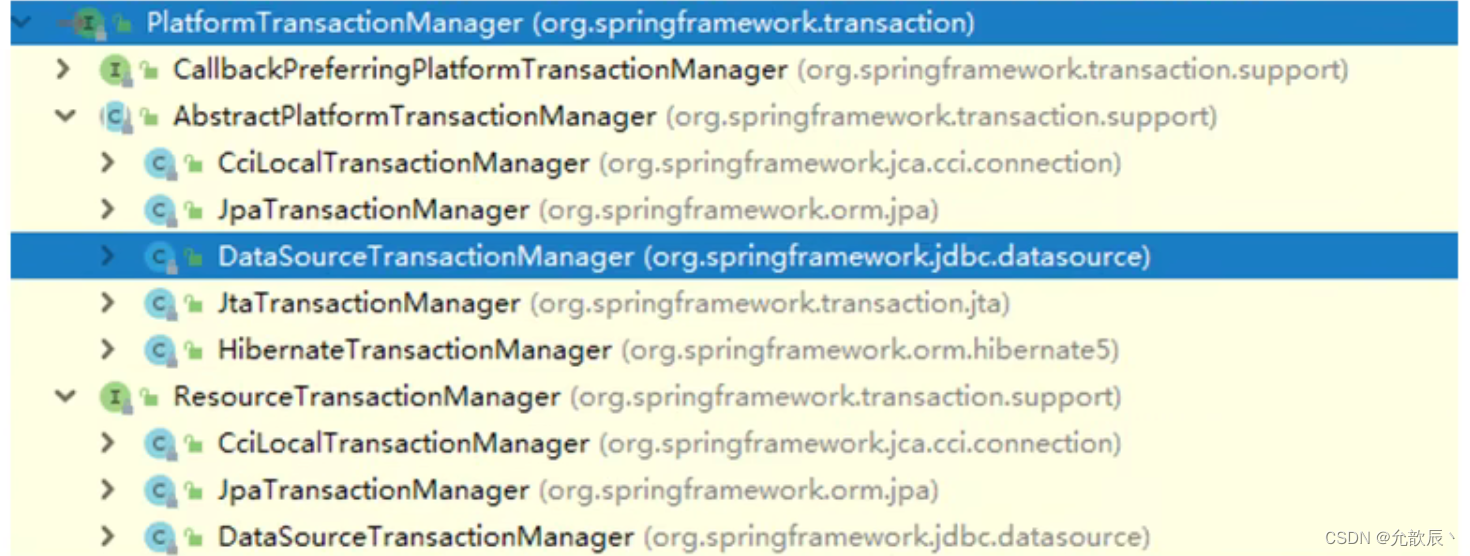
24.事务操作(注解声明式事务管理)
1、在spring配置文件配置事务管理器
<!--    创建事务管理器-->
    <bean id="transactionManager" class="org.springframework.jdbc.datasource.DataSourceTransactionManager">
        <property name="dataSource" ref="dataSource"></property>
    </bean>
2、在spring配置文件,开启事务注解
1)在spring配置文件引入名称空间tx
<?xml version="1.0" encoding="UTF-8"?>
<beans xmlns="http://www.springframework.org/schema/beans"
       xmlns:xsi="http://www.w3.org/2001/XMLSchema-instance"
       xmlns:context="http://www.springframework.org/schema/context"
       xmlns:aop="http://www.springframework.org/schema/aop"
       xmlns:tx="http://www.springframework.org/schema/tx"
       xsi:schemaLocation="http://www.springframework.org/schema/beans https://www.springframework.org/schema/beans/spring-beans.xsd
        http://www.springframework.org/schema/context https://www.springframework.org/schema/context/spring-context.xsd
        http://www.springframework.org/schema/aop http://www.springframework.org/schema/aop/spring-aop.xsd
        http://www.springframework.org/schema/tx http://www.springframework.org/schema/tx/spring-tx.xsd">
(2)开启事务注解
<!--    开启事务注解-->
    <tx:annotation-driven transaction-manager="transactionManager"></tx:annotation-driven>
3、在service类上面(获取service类里面方法上面)添加事务注解
(1)@Transactional,这个注解添加到类上面,也可以添加方法上面
(2)如果把这个注解添加类上面,这个类里面所有的方法都添加事务
(3)如果把这个注解添加方法上面,为这个方法添加事务
@Service
@Transactional
public class AccountServiceImpl implements AccountService{
    @Autowired
    AccountDao accountDao;

    @Override
    public void transfer() {

            accountDao.reduceMoney();
            int i=10/0;

            accountDao.addMoney();


    }
}
25.事务操作(声明式事务管理参数配置)

1、propagation:事务传播行为
当一个事务方法被另外一个事务方法调用时候,这个事务方法如何进行
7种:(required / supports / mandatory / requires_new / not supported / never / nested)
PROPAGATION_REQUIRED:如果当前没有事务,就创建一个新事务,如果当前存在事务,就加入该事务,这是最常见的选择,也是Spring默认的事务传播行为。(required需要,没有新建,有加入)
PROPAGATION_SUPPORTS:支持当前事务,如果当前存在事务,就加入该事务,如果当前不存在事务,就以非事务执行。(supports支持,有则加入,没有就不管了,非事务运行)
PROPAGATION_MANDATORY:支持当前事务,如果当前存在事务,就加入该事务,如果当前不存在事务,就抛出异常。(mandatory强制性,有则加入,没有异常)
PROPAGATION_REQUIRES_NEW:创建新事务,无论当前存不存在事务,都创建新事务。(requires_new需要新的,不管有没有,直接创建新事务)
PROPAGATION_NOT_SUPPORTED:以非事务方式执行操作,如果当前存在事务,就把当前事务挂起。(not supported不支持事务,存在就挂起)
PROPAGATION_NEVER:以非事务方式执行,如果当前存在事务,则抛出异常。(never不支持事务,存在就异常)
PROPAGATION_NESTED:如果当前存在事务,则在嵌套事务内执行。如果当前没有事务,则按REQUIRED属性执行。(nested存在就在嵌套的执行,没有就找是否存在外面的事务,有则加入,没有则新建)
2、ioslation:事务隔离级别
(1)事务有特性成为隔离性,多事务操作之间不会产生影响。不考虑隔离性产生很多问题
(2)有3个读问题:脏读、不可重复读、虚(幻)读

设置隔离级别
@Transactional(propagation = Propagation.REQUIRED,isolation = Isolation.READ_COMMITTED)默认为Read_COMMITED
3、timeout:超时时间
(1)事务需要在一定时间内进行提交,如果不提交进行回滚
(2)默认值是-1,设置时间以秒单位进行计算
timeout = 1010秒回滚
4、readOnly:是否只读
(1)读:查询操作,写:添加修改删除操作
(2) readOnly默认值 false,表示可以查询,可以添加修改删除操作
(3)设置readOnly值是true,设置成true之后,只能查询
5、rollbackFor:回滚
(1)设置出现哪些异常进行事务回滚
6、noRollbackFor:不回滚
(1)设置出现哪些异常不进行事务回滚
26.声明式事务管理(XML方式)
1、在spring配置文件中进行配置
第一步:配步置事务管理器
    <!--创建事务管理器-->
    <bean id="transactionManager" class="org.springframework.jdbc.datasource.DataSourceTransactionManager">
        <property name="dataSource" ref="dataSource"></property>
    </bean>
第二步:配置通知
<!--配置通知-->
    <tx:advice id="txadvice">
<!--        配置事务的相关操作-->
        <tx:attributes>
<!--            指定哪种规则的方法上添加事务-->
            <tx:method name="tranfer" propagation="REQUIRED" isolation="READ_COMMITTED"/>
        </tx:attributes>
    </tx:advice>
'
第三步:配置切入点和切面
<!--    配置切入点和切面-->
    <aop:config>
<!--        配置切入点-->
        <aop:pointcut id="pt" expression="execution(* com.javastudy.service.AccountService(..)"/>
<!--        配置切面-->
        <aop:advisor advice-ref="txadvice" pointcut-ref="pt"></aop:advisor>
    </aop:config>
27.事务操作(完全注解声明式事务管理)
@Configuration
@ComponentScan("com.javastudy")
@EnableTransactionManagement
public class TxConfig {
    @Bean
    public DruidDataSource getDateSource(){
        DruidDataSource dateSource = new DruidDataSource();
        dateSource.setDriverClassName("com.mysql.cj.jdbc.Driver");
        dateSource.setUrl("jdbc:mysql://localhost:3306/user_db?characterEncoding=utf8&useUnicode=true&useSSL=false&serverTimezone=UTC");
        dateSource.setUsername("root");
        dateSource.setPassword("woaini520");
        return dateSource;
    }
    @Bean
    public JdbcTemplate getJdbcTemplate(DruidDataSource dataSource){
        JdbcTemplate jdbcTemplate = new JdbcTemplate();
        jdbcTemplate.setDataSource(dataSource);
        return jdbcTemplate;

    }
    @Bean
    public DataSourceTransactionManager getDataSourceTransactionManager(DruidDataSource dataSource){
        DataSourceTransactionManager dataSourceTransactionManager = new DataSourceTransactionManager();
        dataSourceTransactionManager.setDataSource(dataSource);
        return dataSourceTransactionManager;
    }
}


 3万+
3万+


 Java领域新星创作者


 到【灌水乐园】发言


穷苦书生_万事愁: 对博主的这篇《Java之多线程进阶_java线程进阶》文章感到十分赞赏!文章内容详实,让我对这个主题有了更深入的理解。博主对细节的把握极为到位,展现了深厚的专业功底。希望博主能继续分享更多优质的文章,也期待能够得到博主的指导,共同进步。感谢博主的辛勤工作和付出!
myalice_2333: 代码实现细节真好啊,二分最需要的就是细节。
熊鲅天下: 有没有邻接表的实现方式
zoeil: 大佬的文章让我对这领域的技术问题有了更深入的了解,尤其是大佬提到的那些“坑点”,我相信能够在实际应用中避免或解决很多问题。谢谢大佬的分享,期待大佬的更多精彩文章,让我们共同学习、进步。
程思扬: 非常不错的技术领域文章分享,解决了我在实践中的大问题!博主很有耐心,更有对知识的热忱和热爱,写了这么实用有效的分享,值得收藏点赞。