全网各编程语言的爱心代码合集

站在高处看童年.
 已于 2022-12-23 20:38:09 修改
 阅读量1.5w
 收藏
158
收藏
158
 点赞数
33
点赞数
33
已于 2022-12-23 20:38:09 修改
阅读量1.5w
收藏
158

 点赞数
33
点赞数
33
于 2022-11-29 21:31:47 首次发布
背景
由于电视剧《点燃我温暖你》的男主角李峋在期中考试用c语言编译了一个粒子爱心动态图,掀起了网络上各个编程语言版本的爱心代码层出不穷。
李峋同款爱心C语言版
运行后效果:
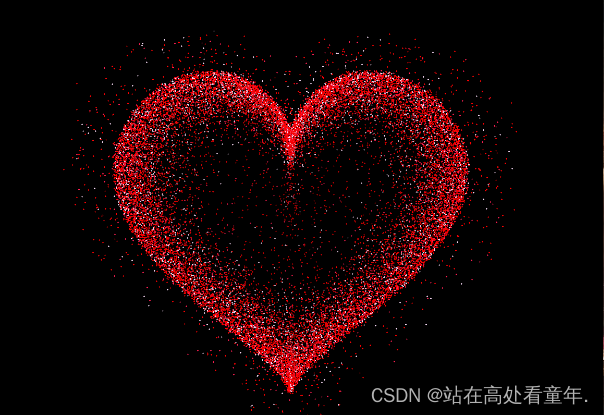
编译器: visual studio 2019
先安装环境easyx库
  **教程链接**:https://blog.csdn.net/qq_58397358/article/details/121330936
         **或者**:http://wjhsh.net/TaoR320-p-12680155.html
  **下载链接**:https://easyx.cn/
  **帮助文档**: https://docs.easyx.cn/zh-cn/tutorials
源代码:
#include<graphics.h>

#include <conio.h>

#include<time.h>

#include<math.h>

#include<stdlib.h>


struct Point {

	double x, y;

	COLORREF color;

};


COLORREF colors[256] = { RGB(255,32,83),RGB(252,222,250) ,RGB(255,0,0) ,RGB(255,0,0) ,RGB(255,2,2) ,RGB(255,0,8) ,RGB(255,5,5) };

const int xScreen = 1200;

const int yScreen = 800;

const double PI = 3.1426535159;

const double e = 2.71828;

const double averag_distance = 0.162;

const int quantity = 506;

const int circles = 210;

const int frames = 20;

Point origin_points[quantity];

Point points[circles * quantity];

IMAGE images[frames];


int creat_random(int x1, int x2)

{

	if (x2 > x1)

		return rand() % (x2 - x1 + 1) + x1;

}


void creat_data()

{

	int index = 0;

	double x1 = 0, y1 = 0, x2 = 0, y2 = 0;

	for (double radian = 0.1; radian <= 2 * PI; radian += 0.005)

	{

		x2 = 16 * pow(sin(radian), 3);

		y2 = 13 * cos(radian) - 5 * cos(2 * radian) - 2 * cos(3 * radian) - cos(4 * radian);


		double distance = sqrt(pow(x2 - x1, 2) + pow(y2 - y1, 2));

		if (distance > averag_distance)

		{

			x1 = x2, y1 = y2;

			origin_points[index].x = x2;

			origin_points[index++].y = y2;

		}

	}


	index = 0;

	for (double size = 0.1, lightness = 1.5; size <= 20; size += 0.1)

	{

		double success_p = 1 / (1 + pow(e, 8 - size / 2));

		if (lightness > 1) lightness -= 0.0025;


		for (int i = 0; i < quantity; ++i)

		{

			if (success_p > creat_random(0, 100) / 100.0)

			{

				COLORREF color = colors[creat_random(0, 6)];

				points[index].color = RGB(GetRValue(color) / lightness, GetGValue(color) / lightness, GetBValue(color) / lightness);

				points[index].x = size * origin_points[i].x + creat_random(-4, 4);

				points[index++].y = size * origin_points[i].y + creat_random(-4, 4);

			}

		}

	}


	int points_size = index;


	for (int frame = 0; frame < frames; ++frame)

	{

		images[frame] = IMAGE(xScreen, yScreen);

		SetWorkingImage(&images[frame]);

		setorigin(xScreen / 2, yScreen / 2);

		setaspectratio(1, -1);


		for (index = 0; index < points_size; ++index)

		{

			double x = points[index].x, y = points[index].y;

			double distance = sqrt(pow(x, 2) + pow(y, 2));

			double diatance_increase = -0.0009 * distance * distance + 0.35714 * distance + 5;

			double x_increase = diatance_increase * x / distance / frames;

			double y_increase = diatance_increase * y / distance / frames;


			points[index].x += x_increase;

			points[index].y += y_increase;


			setfillcolor(points[index].color);

			solidcircle(points[index].x, points[index].y, 1);

		}


		for (double size = 17; size < 23; size += 0.3)

		{

			for (index = 0; index < quantity; ++index)

			{

				if ((creat_random(0, 100) / 100.0 > 0.6 && size >= 20) || (size < 20 && creat_random(0, 100) / 100.0 > 0.95))

				{

					double x, y;

					if (size >= 20)

					{

						x = origin_points[index].x * size + creat_random(-frame * frame / 5 - 15, frame * frame / 5 + 15);

						y = origin_points[index].y * size + creat_random(-frame * frame / 5 - 15, frame * frame / 5 + 15);

					}

					else

					{

						x = origin_points[index].x * size + creat_random(-5, 5);

						y = origin_points[index].y * size + creat_random(-5, 5);

					}


					setfillcolor(colors[creat_random(0, 6)]);

					solidcircle(x, y, 1);

				}

			}

		}


		saveimage(_T("缓存.png"), &images[frame]);

		setorigin(0, 0);

		setaspectratio(1, 1);

		loadimage(&images[frame], _T("缓存.png"));

	}

	SetWorkingImage();

}


void init()

{

	HWND hwnd = initgraph(xScreen, yScreen);

	SetWindowLong(hwnd, GWL_STYLE, GetWindowLong(hwnd, GWL_STYLE) & (!WS_CAPTION));

	SetWindowPos(hwnd, HWND_TOP, 0, 0, xScreen, yScreen, SWP_SHOWWINDOW);

	BeginBatchDraw();

	setorigin(xScreen / 2, yScreen / 2);

	setaspectratio(1, -1);

	srand(time(0));

}


int main()

{

	init();

	creat_data();

	graphdefaults();


	bool extend = true, shrink = false;

	for (int frame = 0; !_kbhit();)

	{

		putimage(0, 0, &images[frame]);

		FlushBatchDraw();

		Sleep(20);

		cleardevice();


		if (extend)

			frame == 19 ? (shrink = true, extend = false) : ++frame;

		else

			frame == 0 ? (shrink = false, extend = true) : --frame;

	}

	EndBatchDraw();

	closegraph();

	return 0;

}
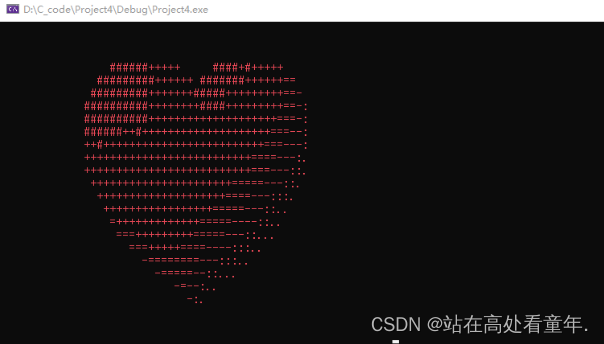
动态爱心C语言版
.c文件 编译器·:visual studio 2019
源代码
#include <stdio.h>
#include <math.h>
#include <windows.h>
#include <tchar.h>
#include <stdlib.h>
#include <string.h>

float f(float x, float y, float z) {
    float a = x * x + 9.0f / 4.0f * y * y + z * z - 1;
    return a * a * a - x * x * z * z * z - 9.0f / 80.0f * y * y * z * z * z;
}

float h(float x, float z) {
    for (float y = 1.0f; y >= 0.0f; y -= 0.001f)
        if (f(x, y, z) <= 0.0f)
            return y;
    return 0.0f;
}

int main() {
    HANDLE o = GetStdHandle(STD_OUTPUT_HANDLE);
    _TCHAR buffer[25][80] = { _T(' ') };
    _TCHAR ramp[] = _T(".:-=++#%@");   //心  每层使用的字符

    int is = 0;

    for (float t = 0.0f;; t += 0.1f)
    {
        //两种颜色循环切换
        is++;
        if (is % 2 == 0)system("color c");
        else  system("color c");

        int sy = 0;
        float s = sinf(t);
        float a = s * s * s * s * 0.2f;

        //生成当前心的形态
        for (float z = 1.3f; z > -1.2f; z -= 0.1f)
        {
            _TCHAR* p = &buffer[sy++][0];
            float tz = z * (1.2f - a);
            for (float x = -1.5f; x < 1.5f; x += 0.05f) {
                float tx = x * (1.2f + a);
                float v = f(tx, 0.0f, tz);
                //如果是在心的范围中间  就计算对应的层
                if (v <= 0.0f) {
                    float y0 = h(tx, tz);
                    float ny = 0.01f;
                    float nx = h(tx + ny, tz) - y0;
                    float nz = h(tx, tz + ny) - y0;
                    float nd = 1.0f / sqrtf(nx * nx + ny * ny + nz * nz);
                    float d = (nx + ny - nz) * nd * 0.5f + 0.5f;
                    *p++ = ramp[(int)(d * 5.0f)];
                }
                //如果不在直接添加空格
                else
                    *p++ = ' ';
            }
        }


        //将当前的心形打印出来   按行打印
        for (sy = 0; sy < 25; sy++) {
            COORD coord = { 0, sy };
            SetConsoleCursorPosition(o, coord);
            WriteConsole(o, buffer[sy], 79, NULL, 0);
            //if(sy ==12 )printf("520");
        }
        Sleep(33);
    }
}
运行后结果
动态爱心html版
.html文件 编译器:visual studio code
源代码:
<!DOCTYPE HTML PUBLIC "-//W3C//DTD HTML 4.0 Transitional//EN">
<HTML>
  <HEAD>
    <TITLE> New Document </TITLE>
    <META NAME="Generator" CONTENT="EditPlus">
    <META NAME="Author" CONTENT="">
    <META NAME="Keywords" CONTENT="">
    <META NAME="Description" CONTENT="">
    <style>
      html, body {
        height: 100%;
        padding: 0;
        margin: 0;
        background: #000;
      }
      canvas {
        position: absolute;
        width: 100%;
        height: 100%;
      }
    </style>
  </HEAD>
  <BODY>
    <canvas id="pinkboard"></canvas>
    <script>
      /*
* Settings
*/
      var settings = {
        particles: {
          length: 500, // maximum amount of particles
          duration: 2, // particle duration in sec
          velocity: 100, // particle velocity in pixels/sec
          effect: -0.75, // play with this for a nice effect
          size: 30, // particle size in pixels
        },
      };
      /*
* RequestAnimationFrame polyfill by Erik Möller
*/
      (function(){var b=0;var c=["ms","moz","webkit","o"];for(var a=0;a<c.length&&!window.requestAnimationFrame;++a){window.requestAnimationFrame=window[c[a]+"RequestAnimationFrame"];window.cancelAnimationFrame=window[c[a]+"CancelAnimationFrame"]||window[c[a]+"CancelRequestAnimationFrame"]}if(!window.requestAnimationFrame){window.requestAnimationFrame=function(h,e){var d=new Date().getTime();var f=Math.max(0,16-(d-b));var g=window.setTimeout(function(){h(d+f)},f);b=d+f;return g}}if(!window.cancelAnimationFrame){window.cancelAnimationFrame=function(d){clearTimeout(d)}}}());
        /*
        * Point class
        */
        var Point = (function() {
        function Point(x, y) {
        this.x = (typeof x !== 'undefined') ? x : 0;
        this.y = (typeof y !== 'undefined') ? y : 0;
        }
        Point.prototype.clone = function() {
        return new Point(this.x, this.y);
        };
        Point.prototype.length = function(length) {
        if (typeof length == 'undefined')
        return Math.sqrt(this.x * this.x + this.y * this.y);
        this.normalize();
        this.x *= length;
        this.y *= length;
        return this;
        };
        Point.prototype.normalize = function() {
        var length = this.length();
        this.x /= length;
        this.y /= length;
        return this;
        };
        return Point;
        })();
        /*
        * Particle class
        */
        var Particle = (function() {
        function Particle() {
        this.position = new Point();
        this.velocity = new Point();
        this.acceleration = new Point();
        this.age = 0;
        }
        Particle.prototype.initialize = function(x, y, dx, dy) {
        this.position.x = x;
        this.position.y = y;
        this.velocity.x = dx;
        this.velocity.y = dy;
        this.acceleration.x = dx * settings.particles.effect;
        this.acceleration.y = dy * settings.particles.effect;
        this.age = 0;
        };
        Particle.prototype.update = function(deltaTime) {
        this.position.x += this.velocity.x * deltaTime;
        this.position.y += this.velocity.y * deltaTime;
        this.velocity.x += this.acceleration.x * deltaTime;
        this.velocity.y += this.acceleration.y * deltaTime;
        this.age += deltaTime;
        };
        Particle.prototype.draw = function(context, image) {
        function ease(t) {
        return (--t) * t * t + 1;
        }
        var size = image.width * ease(this.age / settings.particles.duration);
        context.globalAlpha = 1 - this.age / settings.particles.duration;
        context.drawImage(image, this.position.x - size / 2, this.position.y - size / 2, size, size);
        };
        return Particle;
        })();
        /*
        * ParticlePool class
        */
        var ParticlePool = (function() {
        var particles,
        firstActive = 0,
        firstFree = 0,
        duration = settings.particles.duration;
        function ParticlePool(length) {
        // create and populate particle pool
        particles = new Array(length);
        for (var i = 0; i < particles.length; i++)
        particles[i] = new Particle();
        }
        ParticlePool.prototype.add = function(x, y, dx, dy) {
        particles[firstFree].initialize(x, y, dx, dy);
        // handle circular queue
        firstFree++;
        if (firstFree == particles.length) firstFree = 0;
        if (firstActive == firstFree ) firstActive++;
        if (firstActive == particles.length) firstActive = 0;
        };
        ParticlePool.prototype.update = function(deltaTime) {
        var i;
        // update active particles
        if (firstActive < firstFree) {
        for (i = firstActive; i < firstFree; i++)
        particles[i].update(deltaTime);
        }
        if (firstFree < firstActive) {
        for (i = firstActive; i < particles.length; i++)
        particles[i].update(deltaTime);
        for (i = 0; i < firstFree; i++)
        particles[i].update(deltaTime);
        }
        // remove inactive particles
        while (particles[firstActive].age >= duration && firstActive != firstFree) {
        firstActive++;
        if (firstActive == particles.length) firstActive = 0;
        }
        };
        ParticlePool.prototype.draw = function(context, image) {
        // draw active particles
        if (firstActive < firstFree) {
        for (i = firstActive; i < firstFree; i++)
        particles[i].draw(context, image);
        }
        if (firstFree < firstActive) {
        for (i = firstActive; i < particles.length; i++)
        particles[i].draw(context, image);
        for (i = 0; i < firstFree; i++)
        particles[i].draw(context, image);
        }
        };
        return ParticlePool;
        })();
        /*
        * Putting it all together
        */
        (function(canvas) {
        var context = canvas.getContext('2d'),
        particles = new ParticlePool(settings.particles.length),
        particleRate = settings.particles.length / settings.particles.duration, // particles/sec
        time;
        // get point on heart with -PI <= t <= PI
        function pointOnHeart(t) {
        return new Point(
        160 * Math.pow(Math.sin(t), 3),
        130 * Math.cos(t) - 50 * Math.cos(2 * t) - 20 * Math.cos(3 * t) - 10 * Math.cos(4 * t) + 25
        );
        }
        // creating the particle image using a dummy canvas
        var image = (function() {
        var canvas = document.createElement('canvas'),
        context = canvas.getContext('2d');
        canvas.width = settings.particles.size;
        canvas.height = settings.particles.size;
        // helper function to create the path
        function to(t) {
        var point = pointOnHeart(t);
        point.x = settings.particles.size / 2 + point.x * settings.particles.size / 350;
        point.y = settings.particles.size / 2 - point.y * settings.particles.size / 350;
        return point;
        }
        // create the path
        context.beginPath();
        var t = -Math.PI;
        var point = to(t);
        context.moveTo(point.x, point.y);
        while (t < Math.PI) {
        t += 0.01; // baby steps!
        point = to(t);
        context.lineTo(point.x, point.y);
        }
        context.closePath();
        // create the fill
        context.fillStyle = '#ea80b0';
        context.fill();
        // create the image
        var image = new Image();
        image.src = canvas.toDataURL();
        return image;
        })();
        // render that thing!
        function render() {
        // next animation frame
        requestAnimationFrame(render);
        // update time
        var newTime = new Date().getTime() / 1000,
        deltaTime = newTime - (time || newTime);
        time = newTime;
        // clear canvas
        context.clearRect(0, 0, canvas.width, canvas.height);
        // create new particles
        var amount = particleRate * deltaTime;
        for (var i = 0; i < amount; i++) {
        var pos = pointOnHeart(Math.PI - 2 * Math.PI * Math.random());
        var dir = pos.clone().length(settings.particles.velocity);
        particles.add(canvas.width / 2 + pos.x, canvas.height / 2 - pos.y, dir.x, -dir.y);
        }
        // update and draw particles
        particles.update(deltaTime);
        particles.draw(context, image);
        }
        // handle (re-)sizing of the canvas
        function onResize() {
        canvas.width = canvas.clientWidth;
        canvas.height = canvas.clientHeight;
        }
        window.onresize = onResize;
        // delay rendering bootstrap
        setTimeout(function() {
        onResize();
        render();
        }, 10);
        })(document.getElementById('pinkboard'));
        </script>
        </BODY>
        </HTML>
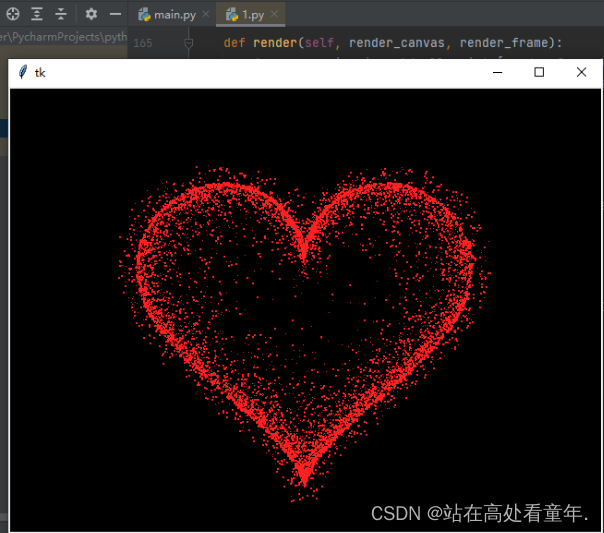
动态爱心python版
.py文件 编译器:pycharm community
源代码:
1.浅红色版
import random
from math import sin, cos, pi, log
from tkinter import *

CANVAS_WIDTH = 640  # 画布的宽
CANVAS_HEIGHT = 480  # 画布的高
CANVAS_CENTER_X = CANVAS_WIDTH / 2  # 画布中心的X轴坐标
CANVAS_CENTER_Y = CANVAS_HEIGHT / 2  # 画布中心的Y轴坐标
IMAGE_ENLARGE = 11  # 放大比例
HEART_COLOR = "#ff2121"  # 心的颜色,这个是中国红


def heart_function(t, shrink_ratio: float = IMAGE_ENLARGE):
    """
    “爱心函数生成器”
    :param shrink_ratio: 放大比例
    :param t: 参数
    :return: 坐标
    """
    # 基础函数
    x = 16 * (sin(t) ** 3)
    y = -(13 * cos(t) - 5 * cos(2 * t) - 2 * cos(3 * t) - cos(4 * t))

    # 放大
    x *= shrink_ratio
    y *= shrink_ratio

    # 移到画布中央
    x += CANVAS_CENTER_X
    y += CANVAS_CENTER_Y

    return int(x), int(y)


def scatter_inside(x, y, beta=0.15):
    """
    随机内部扩散
    :param x: 原x
    :param y: 原y
    :param beta: 强度
    :return: 新坐标
    """
    ratio_x = - beta * log(random.random())
    ratio_y = - beta * log(random.random())

    dx = ratio_x * (x - CANVAS_CENTER_X)
    dy = ratio_y * (y - CANVAS_CENTER_Y)

    return x - dx, y - dy


def shrink(x, y, ratio):
    """
    抖动
    :param x: 原x
    :param y: 原y
    :param ratio: 比例
    :return: 新坐标
    """
    force = -1 / (((x - CANVAS_CENTER_X) ** 2 + (y - CANVAS_CENTER_Y) ** 2) ** 0.6)  # 这个参数...
    dx = ratio * force * (x - CANVAS_CENTER_X)
    dy = ratio * force * (y - CANVAS_CENTER_Y)
    return x - dx, y - dy


def curve(p):
    """
    自定义曲线函数,调整跳动周期
    :param p: 参数
    :return: 正弦
    """
    # 可以尝试换其他的动态函数,达到更有力量的效果(贝塞尔?)
    return 2 * (2 * sin(4 * p)) / (2 * pi)


class Heart:
    """
    爱心类
    """

    def __init__(self, generate_frame=20):
        self._points = set()  # 原始爱心坐标集合
        self._edge_diffusion_points = set()  # 边缘扩散效果点坐标集合
        self._center_diffusion_points = set()  # 中心扩散效果点坐标集合
        self.all_points = {}  # 每帧动态点坐标
        self.build(2000)

        self.random_halo = 1000

        self.generate_frame = generate_frame
        for frame in range(generate_frame):
            self.calc(frame)

    def build(self, number):
        # 爱心
        for _ in range(number):
            t = random.uniform(0, 2 * pi)  # 随机不到的地方造成爱心有缺口
            x, y = heart_function(t)
            self._points.add((x, y))

        # 爱心内扩散
        for _x, _y in list(self._points):
            for _ in range(3):
                x, y = scatter_inside(_x, _y, 0.05)
                self._edge_diffusion_points.add((x, y))

        # 爱心内再次扩散
        point_list = list(self._points)
        for _ in range(4000):
            x, y = random.choice(point_list)
            x, y = scatter_inside(x, y, 0.17)
            self._center_diffusion_points.add((x, y))

    @staticmethod
    def calc_position(x, y, ratio):
        # 调整缩放比例
        force = 1 / (((x - CANVAS_CENTER_X) ** 2 + (y - CANVAS_CENTER_Y) ** 2) ** 0.520)  # 魔法参数

        dx = ratio * force * (x - CANVAS_CENTER_X) + random.randint(-1, 1)
        dy = ratio * force * (y - CANVAS_CENTER_Y) + random.randint(-1, 1)

        return x - dx, y - dy

    def calc(self, generate_frame):
        ratio = 10 * curve(generate_frame / 10 * pi)  # 圆滑的周期的缩放比例

        halo_radius = int(4 + 6 * (1 + curve(generate_frame / 10 * pi)))
        halo_number = int(3000 + 4000 * abs(curve(generate_frame / 10 * pi) ** 2))

        all_points = []

        # 光环
        heart_halo_point = set()  # 光环的点坐标集合
        for _ in range(halo_number):
            t = random.uniform(0, 2 * pi)  # 随机不到的地方造成爱心有缺口
            x, y = heart_function(t, shrink_ratio=11.6)  # 魔法参数
            x, y = shrink(x, y, halo_radius)
            if (x, y) not in heart_halo_point:
                # 处理新的点
                heart_halo_point.add((x, y))
                x += random.randint(-14, 14)
                y += random.randint(-14, 14)
                size = random.choice((1, 2, 2))
                all_points.append((x, y, size))

        # 轮廓
        for x, y in self._points:
            x, y = self.calc_position(x, y, ratio)
            size = random.randint(1, 3)
            all_points.append((x, y, size))

        # 内容
        for x, y in self._edge_diffusion_points:
            x, y = self.calc_position(x, y, ratio)
            size = random.randint(1, 2)
            all_points.append((x, y, size))

        for x, y in self._center_diffusion_points:
            x, y = self.calc_position(x, y, ratio)
            size = random.randint(1, 2)
            all_points.append((x, y, size))

        self.all_points[generate_frame] = all_points

    def render(self, render_canvas, render_frame):
        for x, y, size in self.all_points[render_frame % self.generate_frame]:
            render_canvas.create_rectangle(x, y, x + size, y + size, width=0, fill=HEART_COLOR)


def draw(main: Tk, render_canvas: Canvas, render_heart: Heart, render_frame=0):
    render_canvas.delete('all')
    render_heart.render(render_canvas, render_frame)
    main.after(160, draw, main, render_canvas, render_heart, render_frame + 1)


if __name__ == '__main__':
    root = Tk()  # 一个Tk
    canvas = Canvas(root, bg='black', height=CANVAS_HEIGHT, width=CANVAS_WIDTH)
    canvas.pack()
    heart = Heart()  # 心
    draw(root, canvas, heart)  # 开始画画~
    root.mainloop()
运行后结果
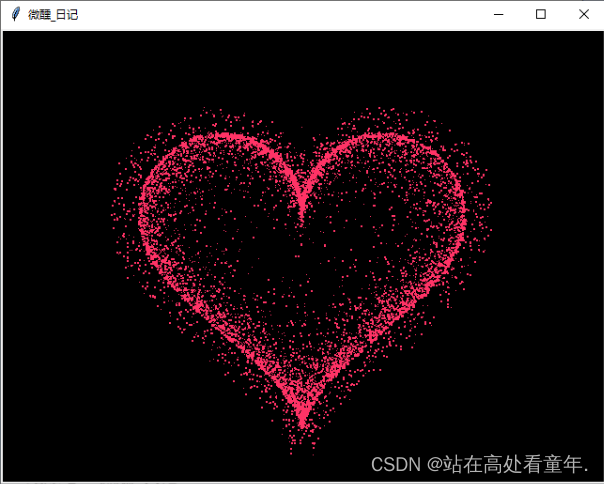
2.浅粉色版
# 颜色可以参考12行注释修改
# 微醺_日记

import random
from math import sin, cos, pi, log
from tkinter import *

CANVAS_WIDTH = 640  # 画布的宽
CANVAS_HEIGHT = 480  # 画布的高
CANVAS_CENTER_X = CANVAS_WIDTH / 2  # 画布中心的X轴坐标
CANVAS_CENTER_Y = CANVAS_HEIGHT / 2  # 画布中心的Y轴坐标
IMAGE_ENLARGE = 11  # 放大比例
HEART_COLOR = "#ff3366"  # 心的颜色(16进制代码) 参考链接:https://developer.aliyun.com/article/760003

def heart_function(t, shrink_ratio: float = IMAGE_ENLARGE):
    """
    “爱心函数生成器”
    :param shrink_ratio: 放大比例
    :param t: 参数
    :return: 坐标
    """
    # 基础函数
    x = 16 * (sin(t) ** 3)
    y = -(13 * cos(t) - 5 * cos(2 * t) - 2 * cos(3 * t) - cos(4 * t))

    # 放大
    x *= shrink_ratio
    y *= shrink_ratio

    # 移到画布中央
    x += CANVAS_CENTER_X
    y += CANVAS_CENTER_Y

    return int(x), int(y)


def scatter_inside(x, y, beta=0.15):
    """
    随机内部扩散
    :param x: 原x
    :param y: 原y
    :param beta: 强度
    :return: 新坐标
    """
    ratio_x = - beta * log(random.random())
    ratio_y = - beta * log(random.random())

    dx = ratio_x * (x - CANVAS_CENTER_X)
    dy = ratio_y * (y - CANVAS_CENTER_Y)

    return x - dx, y - dy


def shrink(x, y, ratio):
    """
    抖动
    :param x: 原x
    :param y: 原y
    :param ratio: 比例
    :return: 新坐标
    """
    force = -1 / (((x - CANVAS_CENTER_X) ** 2 + (y - CANVAS_CENTER_Y) ** 2) ** 0.6)  # 这个参数...
    dx = ratio * force * (x - CANVAS_CENTER_X)
    dy = ratio * force * (y - CANVAS_CENTER_Y)
    return x - dx, y - dy


def curve(p):
    """
    自定义曲线函数,调整跳动周期
    :param p: 参数
    :return: 正弦
    """
    # 可以尝试换其他的动态函数,达到更有力量的效果(贝塞尔?)
    return 2 * (2 * sin(4 * p)) / (2 * pi)


class Heart:
    """
    爱心类
    """

    def __init__(self, generate_frame=20):
        self._points = set()  # 原始爱心坐标集合
        self._edge_diffusion_points = set()  # 边缘扩散效果点坐标集合
        self._center_diffusion_points = set()  # 中心扩散效果点坐标集合
        self.all_points = {}  # 每帧动态点坐标
        self.build(2000)

        self.random_halo = 1000

        self.generate_frame = generate_frame
        for frame in range(generate_frame):
            self.calc(frame)

    def build(self, number):
        # 爱心
        for _ in range(number):
            t = random.uniform(0, 2 * pi)  # 随机不到的地方造成爱心有缺口
            x, y = heart_function(t)
            self._points.add((x, y))

        # 爱心内扩散
        for _x, _y in list(self._points):
            for _ in range(3):
                x, y = scatter_inside(_x, _y, 0.05)
                self._edge_diffusion_points.add((x, y))

        # 爱心内再次扩散
        point_list = list(self._points)
        for _ in range(4000):
            x, y = random.choice(point_list)
            x, y = scatter_inside(x, y, 0.17)
            self._center_diffusion_points.add((x, y))

    @staticmethod
    def calc_position(x, y, ratio):
        # 调整缩放比例
        force = 1 / (((x - CANVAS_CENTER_X) ** 2 + (y - CANVAS_CENTER_Y) ** 2) ** 0.520)  # 魔法参数

        dx = ratio * force * (x - CANVAS_CENTER_X) + random.randint(-1, 1)
        dy = ratio * force * (y - CANVAS_CENTER_Y) + random.randint(-1, 1)

        return x - dx, y - dy

    def calc(self, generate_frame):
        ratio = 10 * curve(generate_frame / 10 * pi)  # 圆滑的周期的缩放比例

        halo_radius = int(4 + 6 * (1 + curve(generate_frame / 10 * pi)))
        halo_number = int(3000 + 4000 * abs(curve(generate_frame / 10 * pi) ** 2))

        all_points = []

        # 光环
        heart_halo_point = set()  # 光环的点坐标集合
        for _ in range(halo_number):
            t = random.uniform(0, 2 * pi)  # 随机不到的地方造成爱心有缺口
            x, y = heart_function(t, shrink_ratio=11.6)  # 魔法参数
            x, y = shrink(x, y, halo_radius)
            if (x, y) not in heart_halo_point:
                # 处理新的点
                heart_halo_point.add((x, y))
                x += random.randint(-14, 14)
                y += random.randint(-14, 14)
                size = random.choice((1, 2, 2))
                all_points.append((x, y, size))

        # 轮廓
        for x, y in self._points:
            x, y = self.calc_position(x, y, ratio)
            size = random.randint(1, 3)
            all_points.append((x, y, size))

        # 内容
        for x, y in self._edge_diffusion_points:
            x, y = self.calc_position(x, y, ratio)
            size = random.randint(1, 2)
            all_points.append((x, y, size))

        for x, y in self._center_diffusion_points:
            x, y = self.calc_position(x, y, ratio)
            size = random.randint(1, 2)
            all_points.append((x, y, size))

        self.all_points[generate_frame] = all_points

    def render(self, render_canvas, render_frame):
        for x, y, size in self.all_points[render_frame % self.generate_frame]:
            render_canvas.create_rectangle(x, y, x + size, y + size, width=0, fill=HEART_COLOR)


def draw(main: Tk, render_canvas: Canvas, render_heart: Heart, render_frame=0):
    render_canvas.delete('all')
    render_heart.render(render_canvas, render_frame)
    main.after(160, draw, main, render_canvas, render_heart, render_frame + 1)


if __name__ == '__main__':
    root = Tk()  # 一个Tk
    root.title("微醺_日记") #设置窗口名 可以修改或注释掉
    canvas = Canvas(root, bg='black', height=CANVAS_HEIGHT, width=CANVAS_WIDTH)
    canvas.pack()
    heart = Heart()  # 心
    draw(root, canvas, heart)  # 开始画画~
    root.mainloop()
运行后结果
爱心动图一键生成版本
说明:
就是将源代码打包成一个html文件,无需编译器,只要电脑有浏览器便可鼠标左键点击文件,直接生成爱心动图,简单方便,对非计算机专业的同学十分友好
视频教程链接: 一键运行爱心代码教程(超链接 直接点击蓝色字体访问)
链接:https://pan.baidu.com/s/1Nh5es6GB3FIVxaWCT45gkA?pwd=w0ui
提取码:w0ui
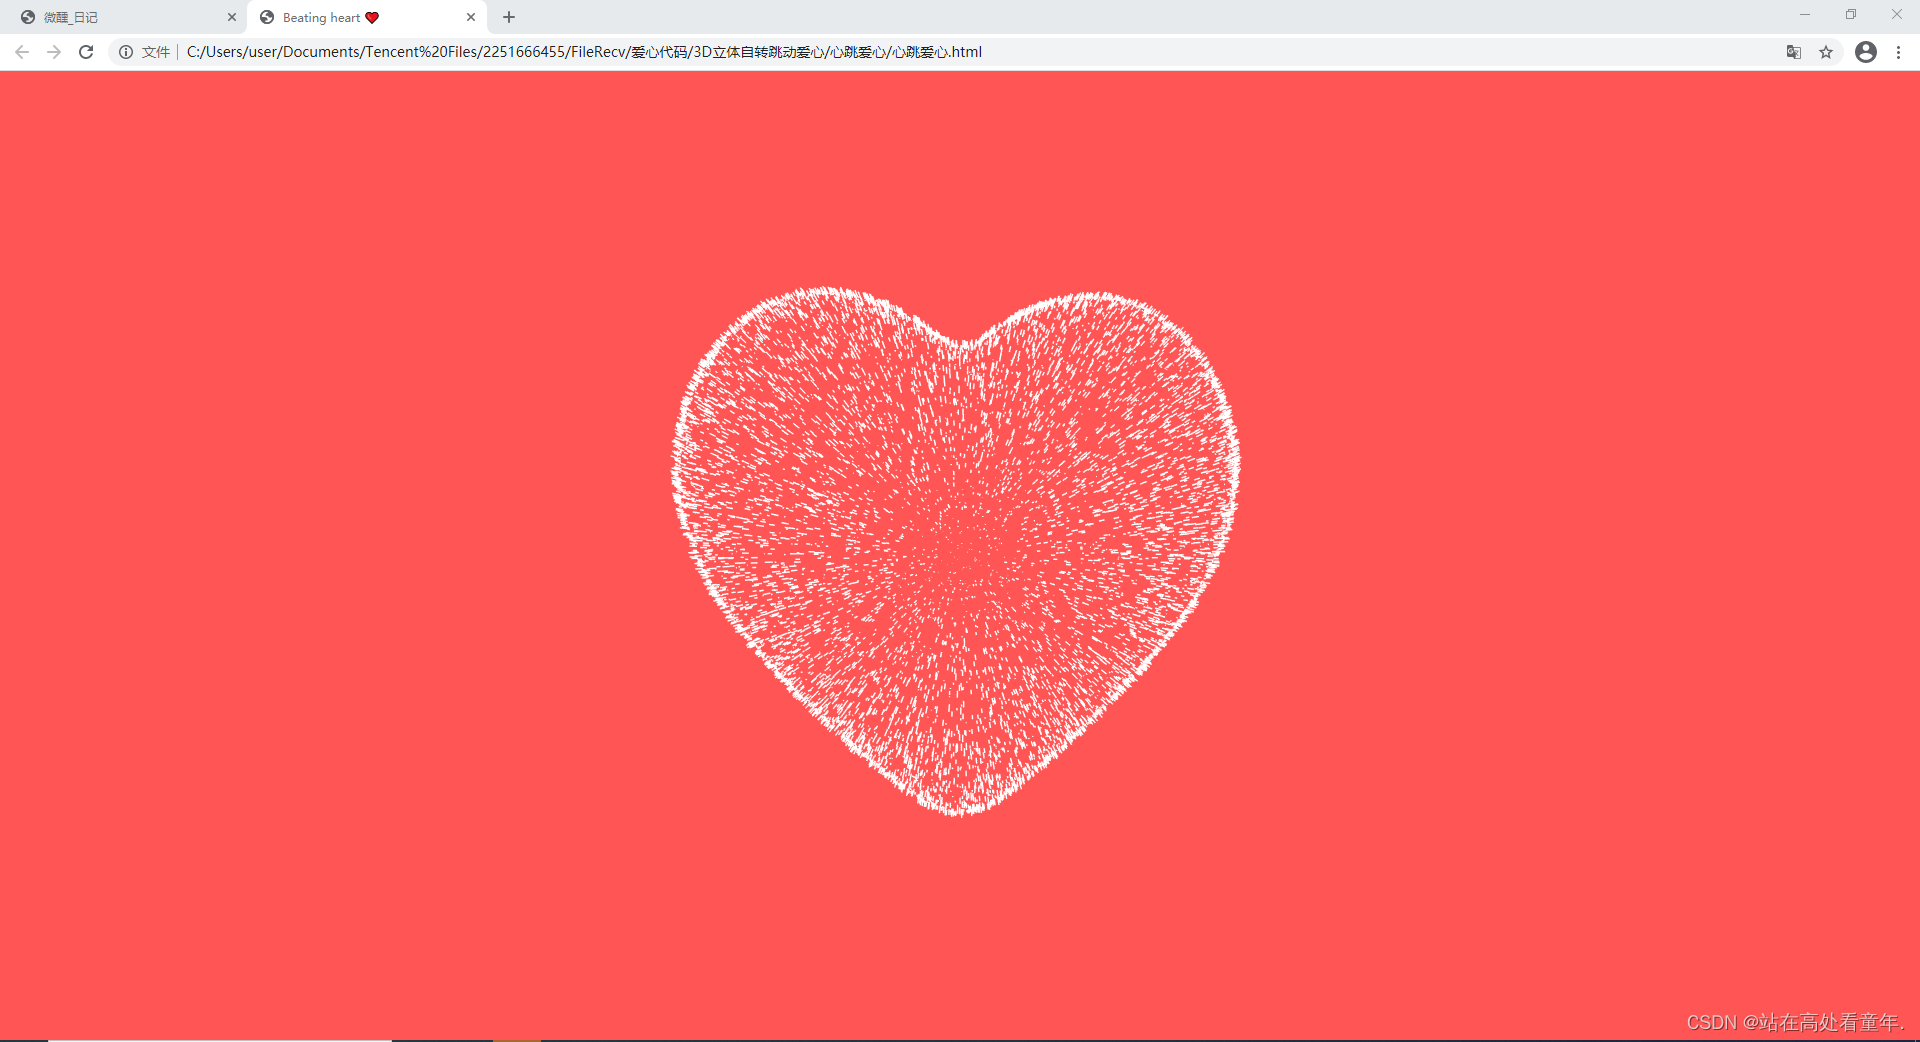
1.3D立体跳动爱心
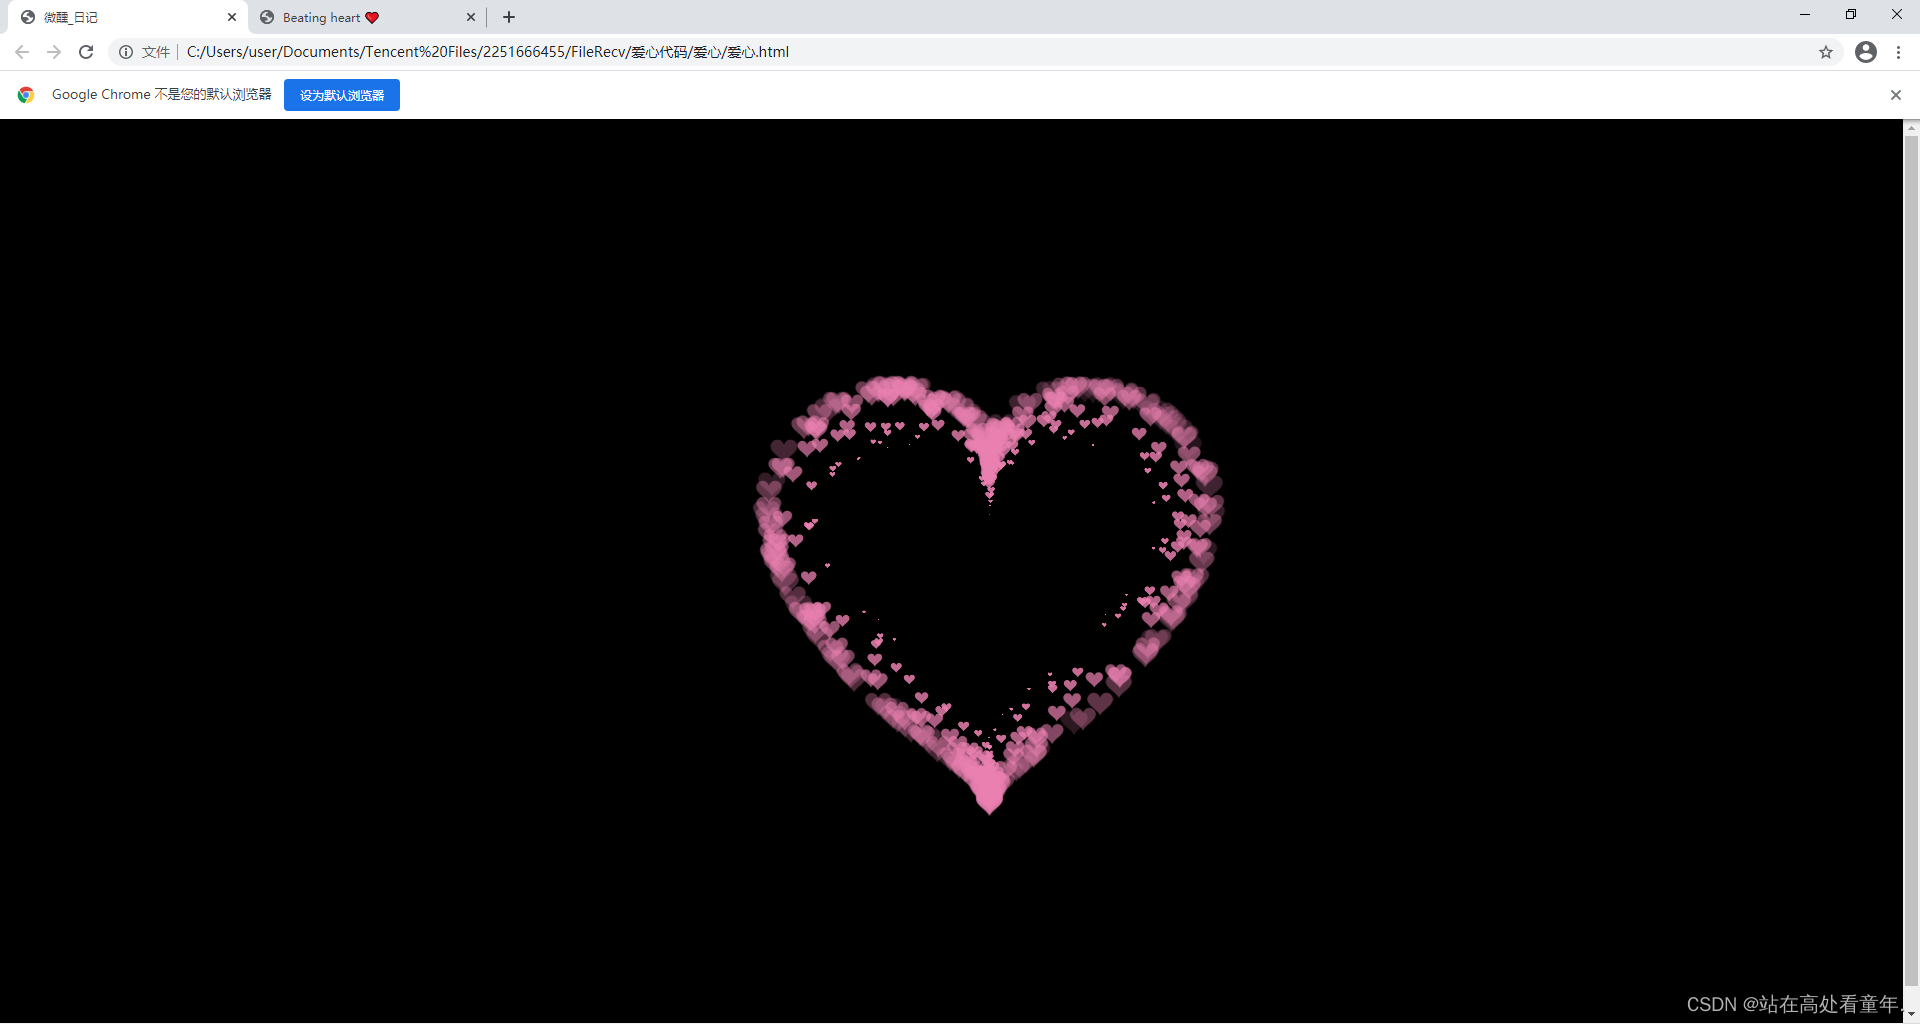
2.粉红流动爱心
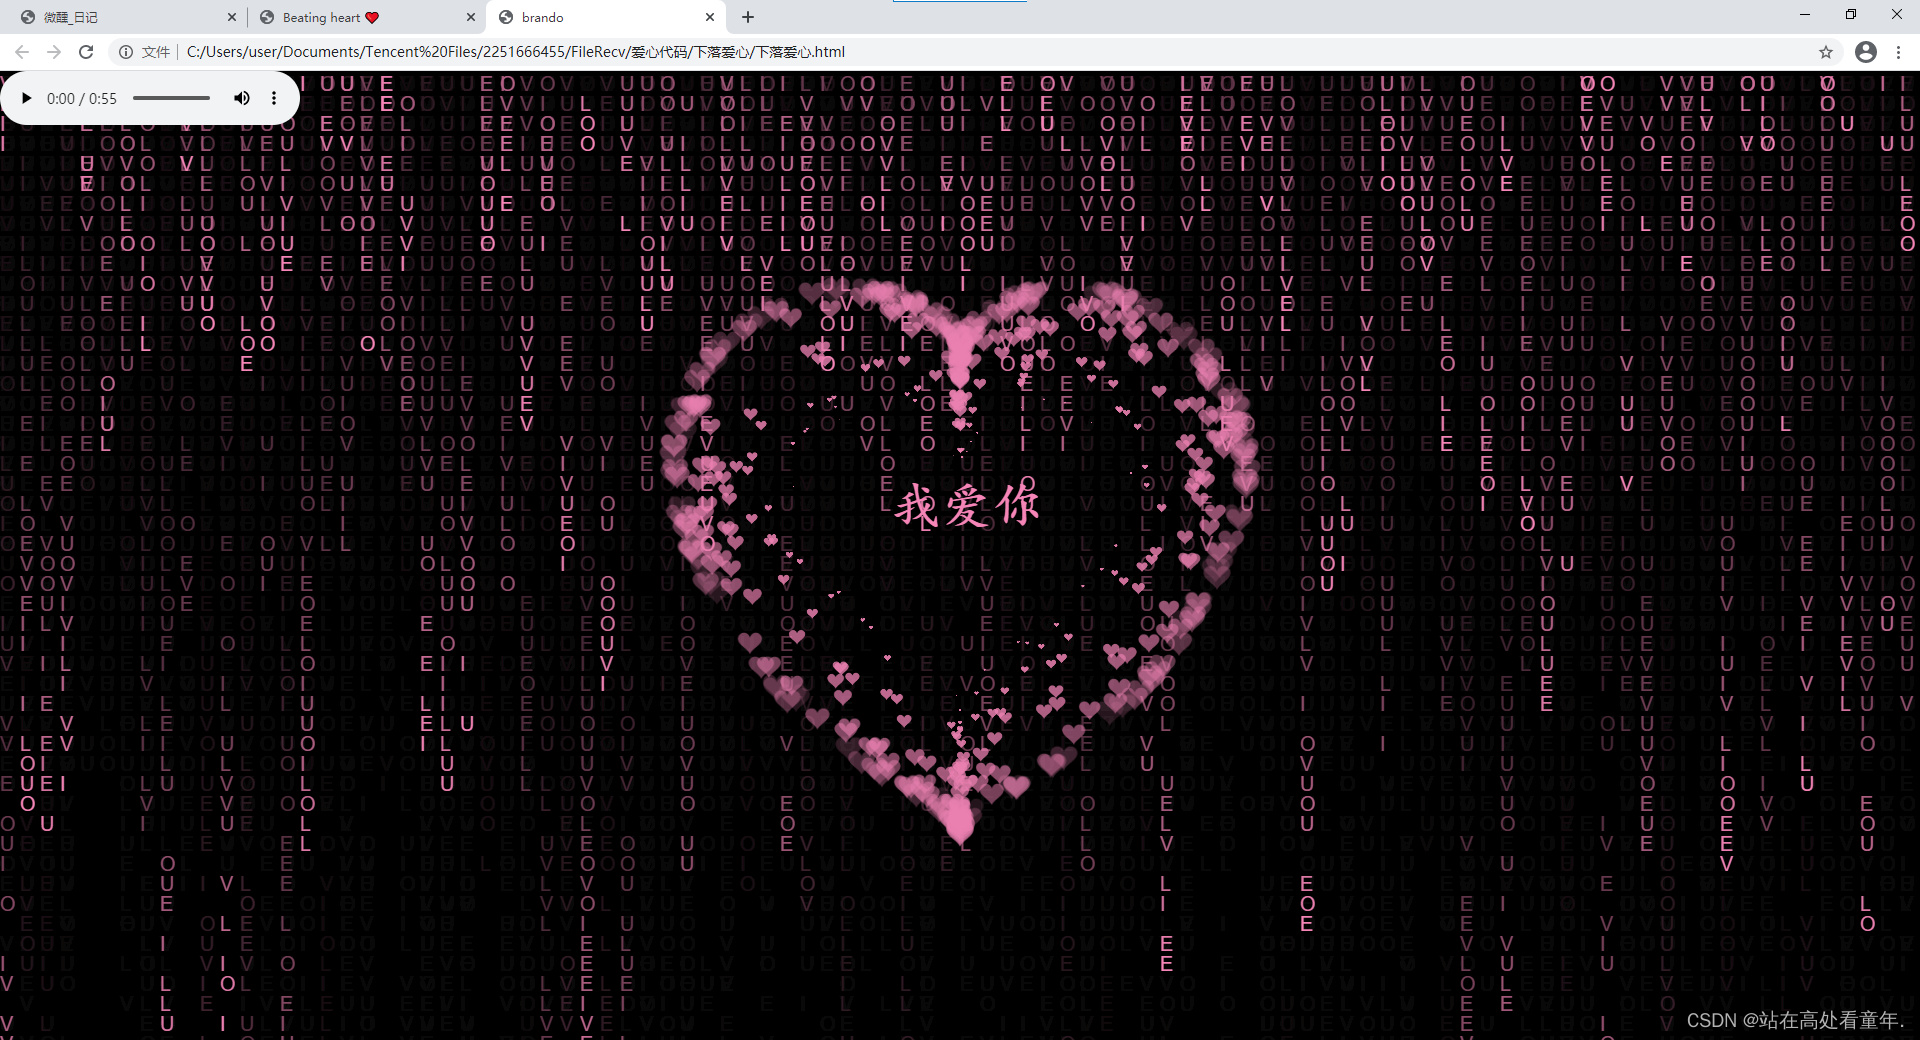
3.下落爱心
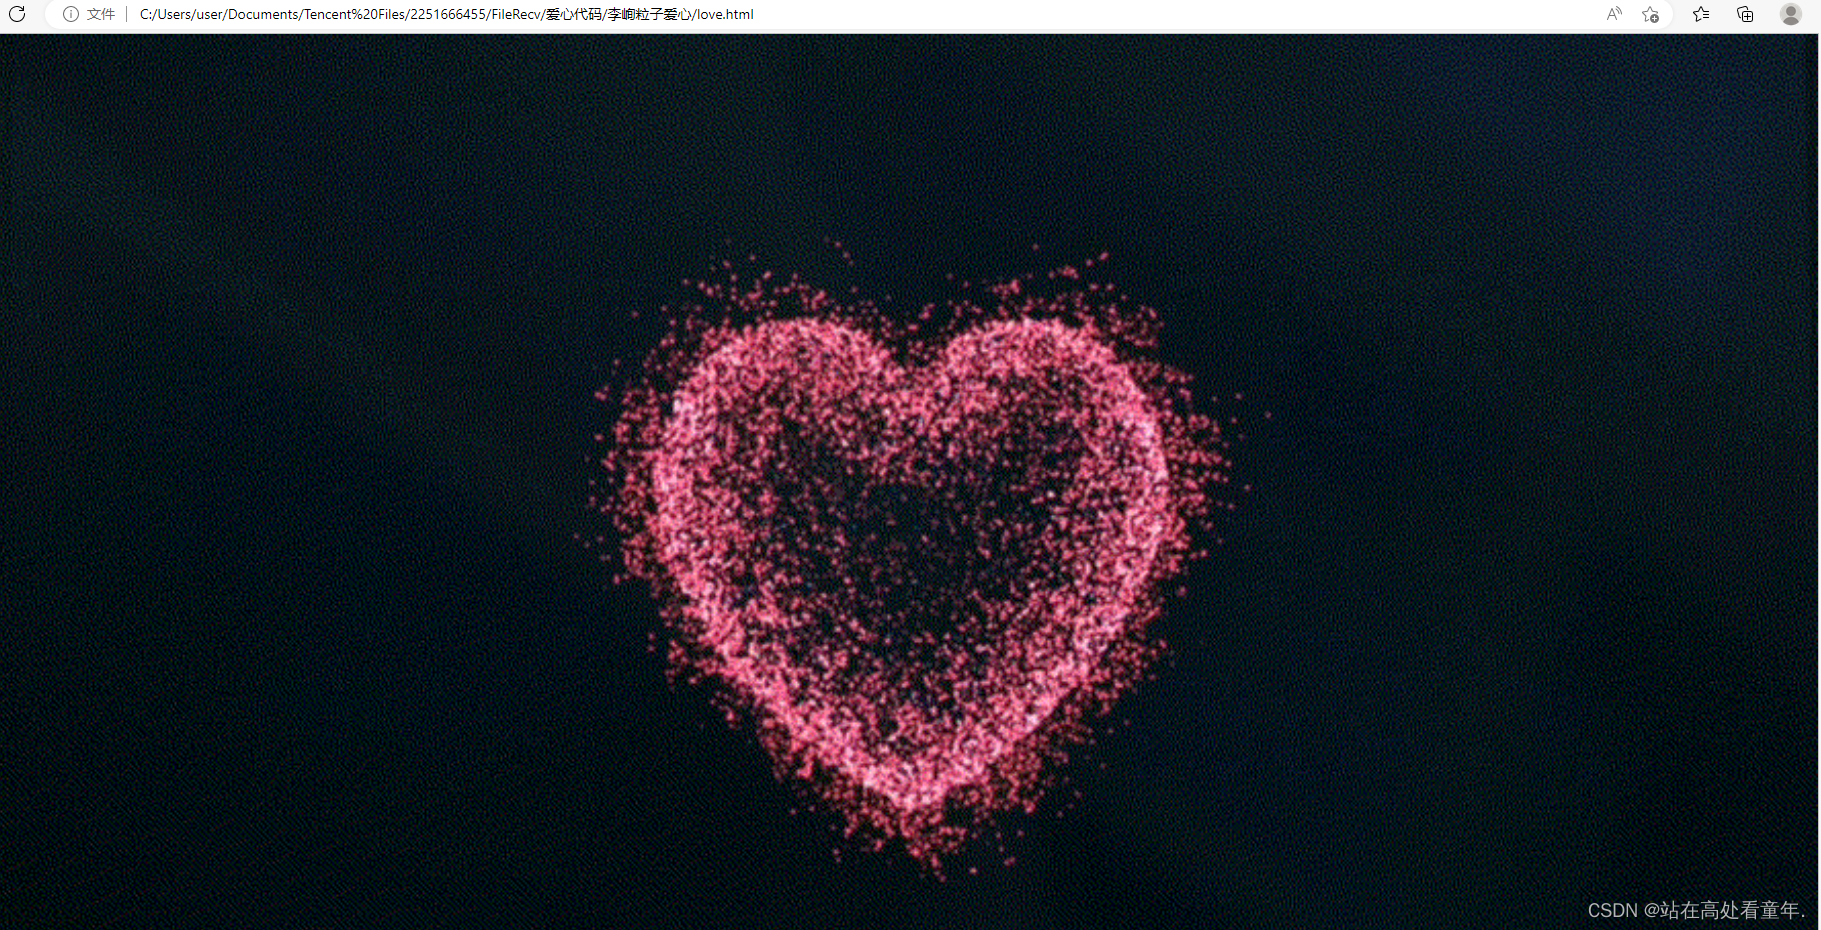
4.李峋同款爱心动图
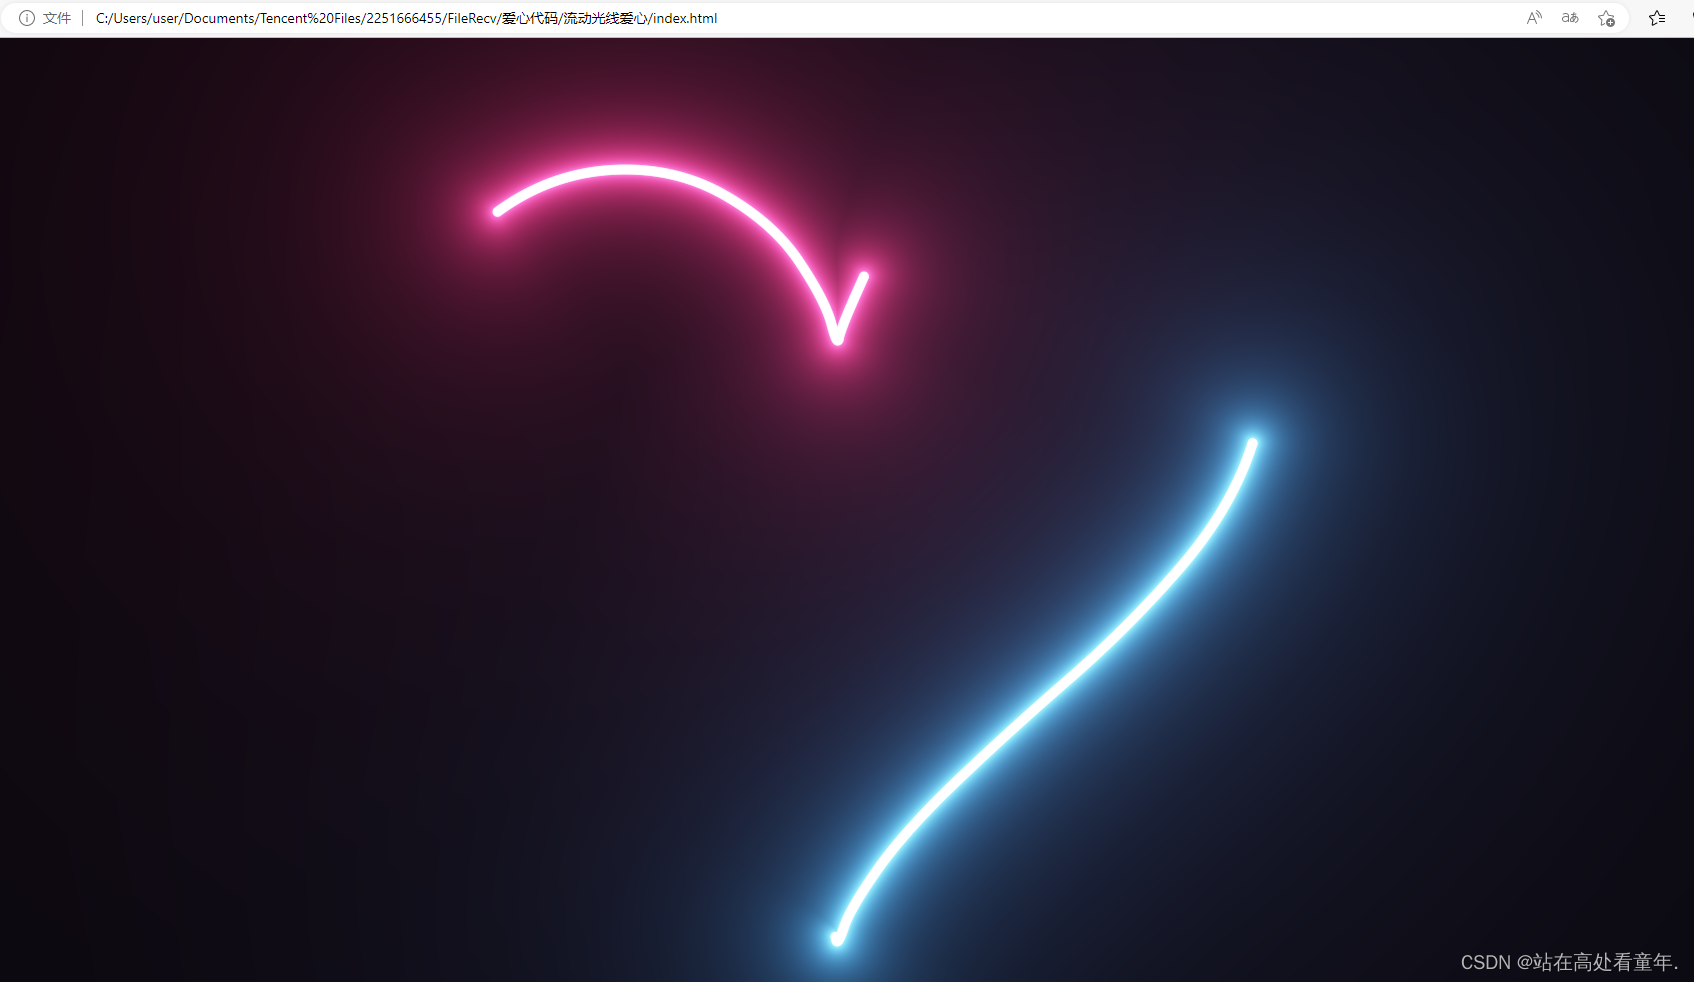
5.流动光线爱心
都是已经打包好的 点击文件一键运行就好 不需要复制粘贴代码 只要有浏览器就好
一键三连,谢谢!!!
注:I’m a vegetable dog,以上都是因为好玩做出来的,有一大部分自己做不出来就搬运大佬们的代码了。


 3174
3174


 暂无认证
暂无认证


 到【灌水乐园】发言


ঞ吴⁵²⁰ོꦿ࿐໌້ᮨ: 中间部分空着的怎样填充饱满啊
CSDN-Ada助手: 恭喜您撰写了第三篇博客!标题"基于LNMP搭建私有网盘FileRun"听起来非常有趣。您的文章内容一定十分详细,让我对LNMP搭建私有网盘产生了浓厚的兴趣。感谢您分享这个有用的信息。 我期待着您未来更多的创作。如果可能的话,我希望您能提供一些关于如何优化LNMP搭建私有网盘的实用技巧和经验分享。这将使读者更加受益,并且进一步巩固您在这个领域的专业知识。 再次感谢您的分享,希望您能继续以谦虚的态度写作,让我们受益匪浅。期待看到您未来更多的精彩文章! CSDN 正在通过评论红包奖励优秀博客,请看红包流:https://bbs.csdn.net/?type=4&header=0&utm_source=csdn_ai_ada_blog_reply3
m0_64583869: 现在不用啦 我已经知道了嘿嘿
m0_64583869: 你好呀!感谢分享 想问问 Python版的 如果想要在爱心中间添加文字 应该输入什么代码呀
站在高处看童年.: 有C语言的技能树吗,谢谢